> ## Documentation Index
> Fetch the complete documentation index at: https://docs.gurubase.ai/llms.txt
> Use this file to discover all available pages before exploring further.
# Triage
> Automatically classify and route user questions with intelligent triage rules
Triage lets your Guru intelligently classify incoming questions by asking clarifying questions about configurable dimensions (like operating system, product tier, or environment) before answering. The result is more accurate, context-aware responses that address the user's specific situation instead of generic answers.
***
## What Triage Does
Determines whether a question needs clarification, can be answered directly,
or is a simple greeting
Asks about relevant dimensions via interactive UI elements in the widget:
buttons, dropdowns, or text fields
Greetings get quick responses, general knowledge goes straight to an answer,
and specific support gets full triage
***
## How It Works
A user submits a question through the widget or another integration. This can be anything from a simple greeting to a detailed technical support request.
The classification engine analyzes the question and determines its type:
* **Greeting**: casual messages like "hi", "thanks", or "goodbye"
* **General knowledge**: broad conceptual questions that can be answered without additional context
* **Specific support**: targeted questions that benefit from knowing the user's environment, product tier, or other dimensions
For specific support questions, the engine evaluates each configured dimension
against the question text and the full conversation history to detect any
values the user has already provided. This avoids redundant questions.
If required dimensions are still missing after checking the conversation, the
widget displays interactive inputs (buttons, dropdowns, or text fields) so the
user can provide the needed context. Each input type is chosen automatically
based on the number of options you configured for that dimension.
Once enough context is gathered (or the clarification limit is reached), the question is answered with all resolved dimension values injected into the search query and the LLM prompt. This produces answers tailored to the user's specific situation.
The triage engine recognizes dimension values mentioned earlier in the
conversation, so users won't be asked for information they've already
provided. For example, if a user says "I'm on MacOS" in their first message,
the engine will detect "MacOS" as the operating system value for all
subsequent questions in the same session.
***
## Classification Routes
The triage engine routes each question into one of three paths:
| Route | When | Behavior |
| ---------------------- | --------------------------------------------------------- | -------------------------------------------------- |
| **Simple Interaction** | Greetings, thanks, goodbye | Quick friendly response, no triage |
| **Answer** | General knowledge questions OR all required info gathered | Proceeds directly to answer with dimension context |
| **Clarify** | Specific support with missing dimensions | Shows interactive inputs in widget |
**Simple Interaction** handles conversational messages that don't require a knowledge-base lookup. The engine generates a brief, friendly reply (for example, "Hello! How can I help you today?") and does not invoke any triage dimensions.
**Answer** is the default path for general knowledge questions that your Guru can answer without needing to know the user's specific environment. It is also the path taken when all required dimension values have been collected or when the clarification limit has been reached.
**Clarify** is triggered when the engine detects that the question is about specific support and one or more required dimensions are still missing. The widget renders interactive inputs so the user can provide the needed context before the Guru generates an answer.
The clarification limit (default: 2) controls how many rounds of clarifying
questions the triage engine asks before answering with whatever info it has.
This prevents frustrating loops where users are asked too many questions
before getting help.
***
## Setting Up Triage
This section walks through the full configuration process: enabling triage, adding rules, reordering them, and connecting a ticket action.
### Enabling Triage
To enable triage for your Guru:
1. Go to your Guru's detail page
2. Click **Triage** in the sidebar
3. Toggle **Enable Triage** on
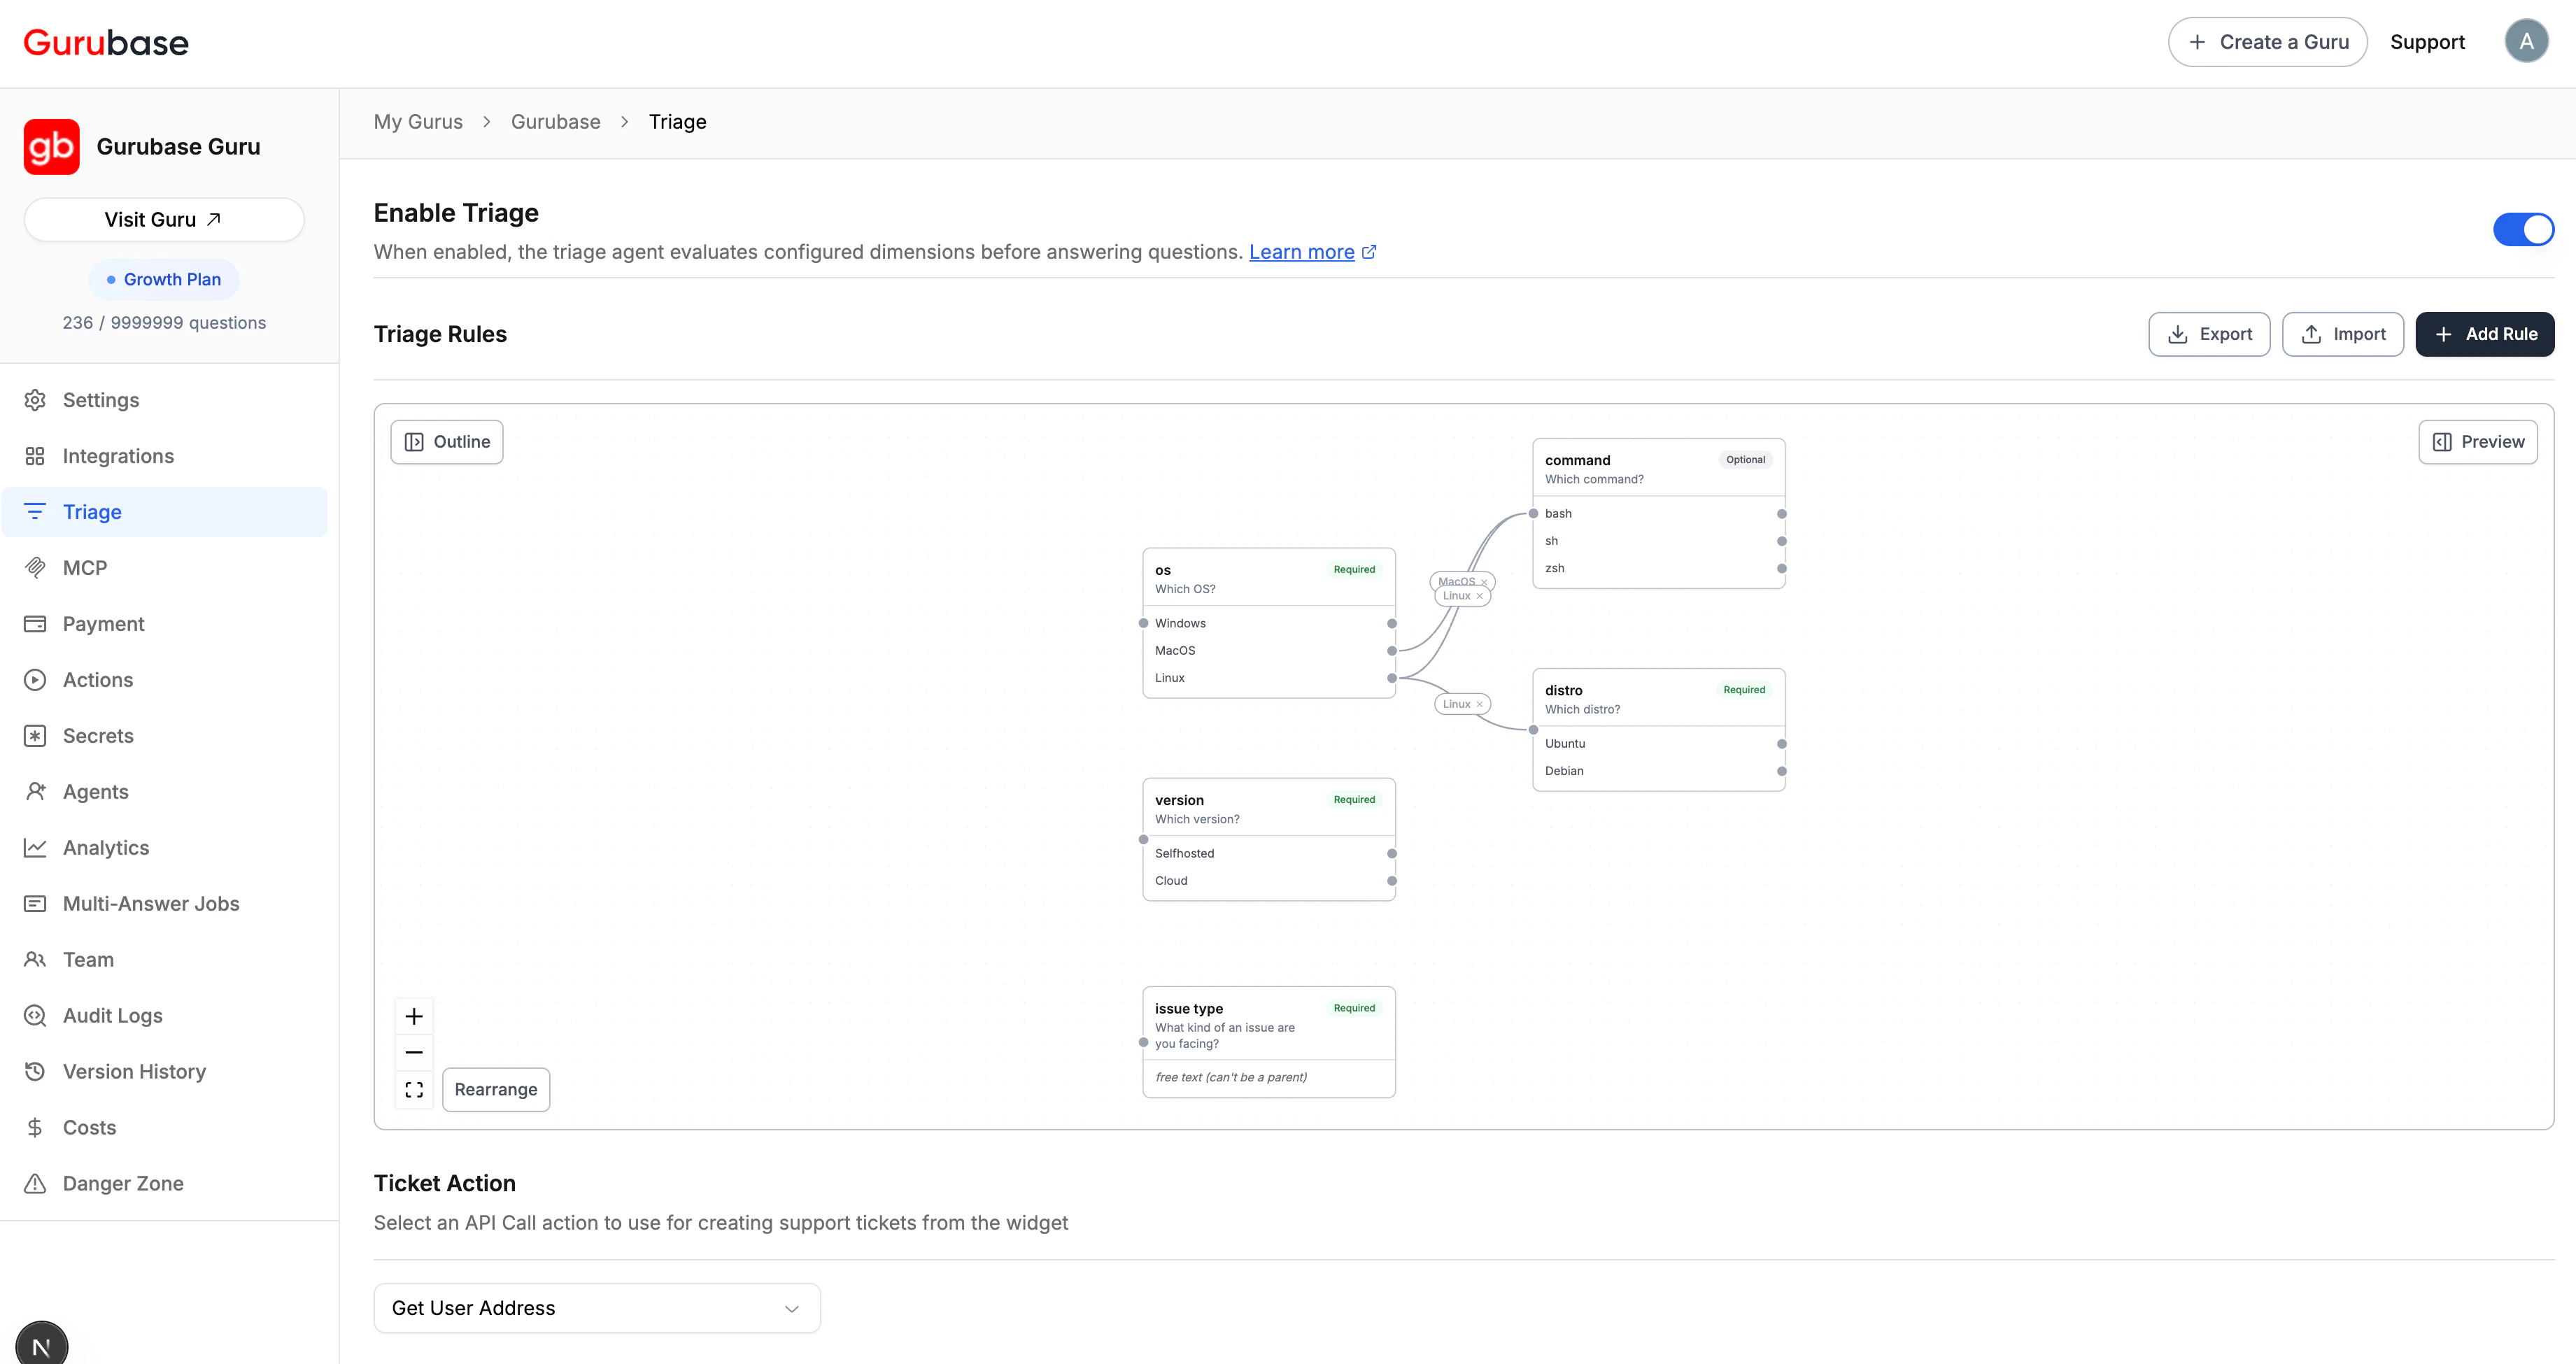 Triage is disabled by default. You can enable or disable it at any time
without losing your configured rules.
### Adding Triage Rules
Click the **Add Rule** button to open the rule creation modal. Rules appear as nodes in an interactive **decision DAG canvas**, with edges between them representing visibility conditions. A side **Live preview** panel renders what end users actually see in the widget for the current rule set, updating as you edit.
Triage is disabled by default. You can enable or disable it at any time
without losing your configured rules.
### Adding Triage Rules
Click the **Add Rule** button to open the rule creation modal. Rules appear as nodes in an interactive **decision DAG canvas**, with edges between them representing visibility conditions. A side **Live preview** panel renders what end users actually see in the widget for the current rule set, updating as you edit.
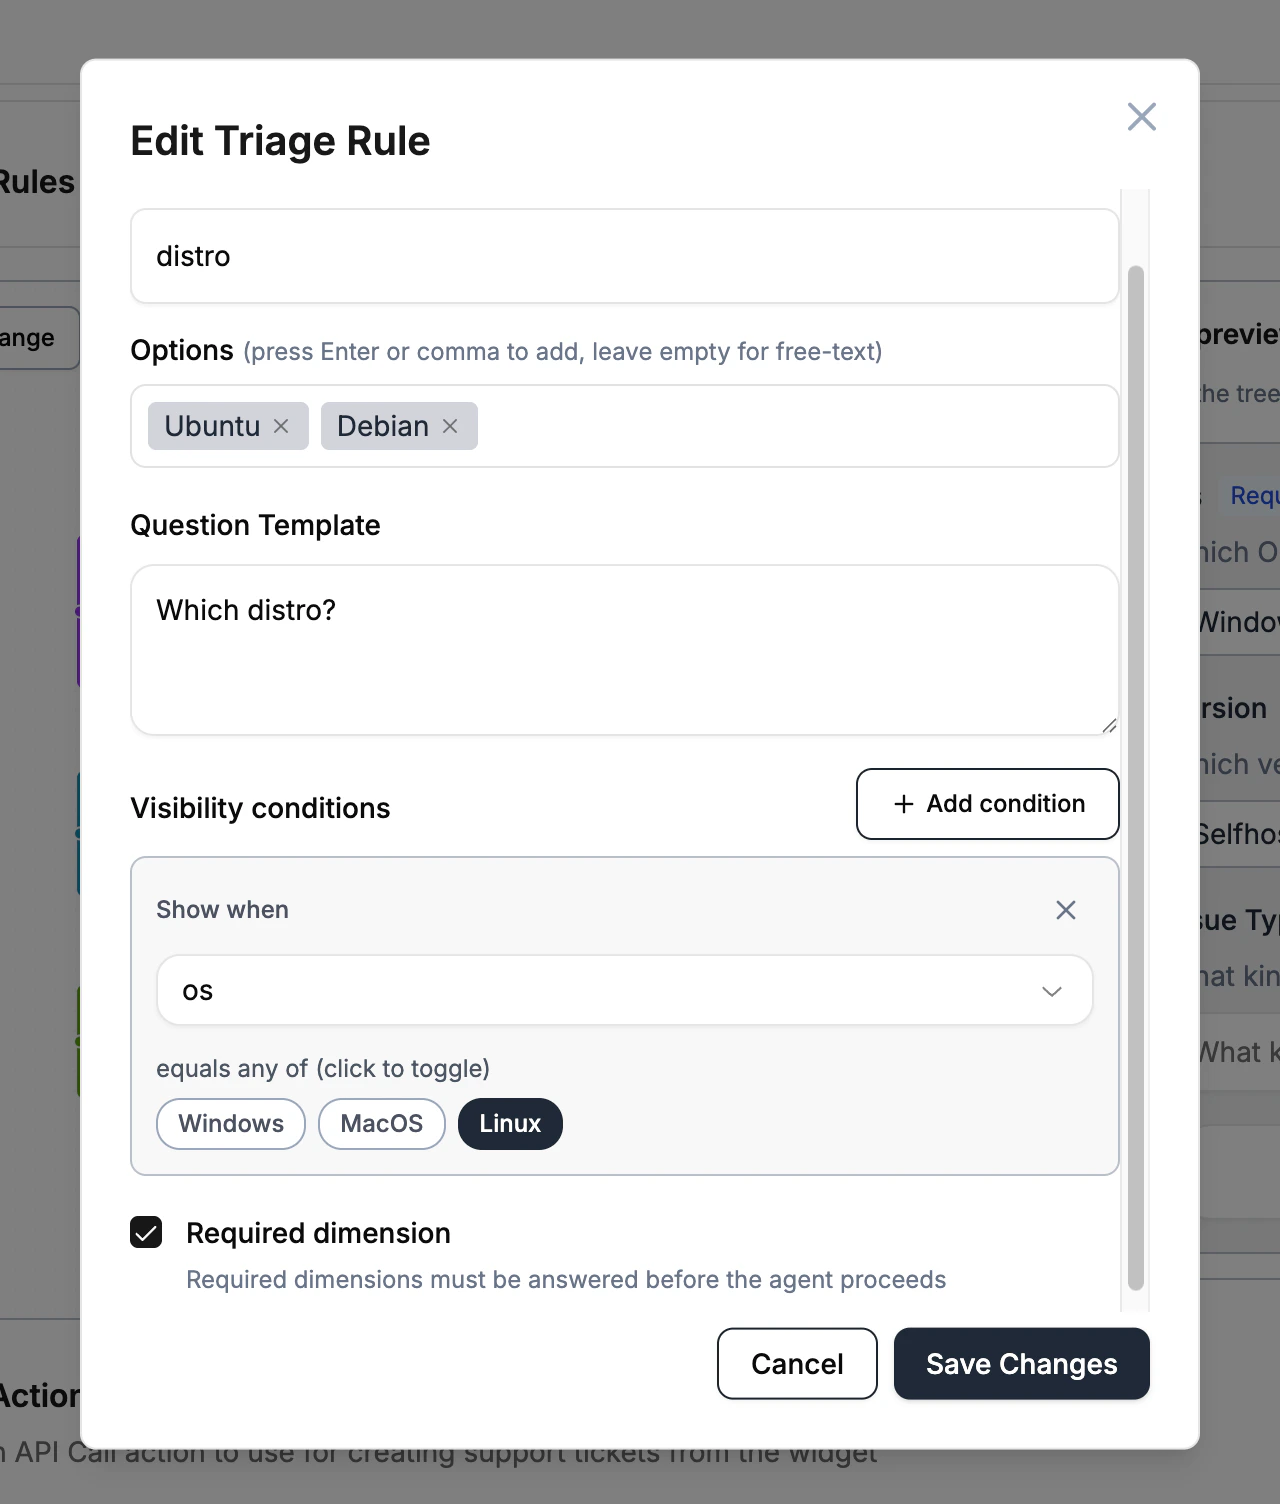 Use the **Rearrange** button (next to the zoom controls) to re-run auto-layout if the graph gets messy after edits. The order in which dimensions are presented to users is controlled from the **Outline** panel on the left of the canvas; see [Reordering the Form](#reordering-the-form).
The modal has these fields:
| Field | Description | Example |
| ------------------------- | ----------------------------------------------------------------------------------------------------------------------------------------------------------------------------------------------------------------------- | ------------------------------------------------- |
| **Dimension Name** | The category being classified | "Operating System", "Product Tier", "Environment" |
| **Options** | Predefined choices entered as chips (press Enter or comma to add each one). Leave empty for free-text input. | "Windows", "MacOS", "Linux" |
| **Question Template** | The question shown to the user when this dimension needs to be collected | "What operating system are you using?" |
| **Visibility conditions** | When this rule should appear in the form. Empty means the rule is a root and is always considered. Add one or more conditions to gate it on earlier answers (see [Conditional Rules](#conditional-rules-decision-dag)). | Show when `os` equals any of `Linux, MacOS` |
| **Required dimension** | When checked, the user must answer this dimension before the agent proceeds | Checked / Unchecked |
Both **Dimension Name** and **Question Template** are required fields. The
modal will not allow you to save a rule without filling in both.
### Conditional Rules (Decision DAG)
Rules can be made **conditional** on earlier answers so the widget only asks for a dimension when it's relevant. For example, only ask "Which Linux distro?" when the user already answered "Linux" to the operating system question.
There are two ways to add a condition:
* **Visibility Conditions** section in the rule modal. Pick a **parent question** (another rule with predefined options) and toggle one or more of its option **values** that should unlock this rule.
* **Drag an individual answer onto another rule** on the canvas. Every option/answer on a parent node has its own handle; dragging that specific answer onto a child node makes the child conditionally appear in the triage form whenever the user picks that answer for the parent. For example, dragging `OS = Linux` onto the `Distro` node adds (or extends) a condition `parent=OS, values=[Linux]` so `Distro` only shows after the user picks Linux. Drop on the child's left edge handle. To remove a value from an existing condition, click the small × on its chip on the edge.
Use the **Rearrange** button (next to the zoom controls) to re-run auto-layout if the graph gets messy after edits. The order in which dimensions are presented to users is controlled from the **Outline** panel on the left of the canvas; see [Reordering the Form](#reordering-the-form).
The modal has these fields:
| Field | Description | Example |
| ------------------------- | ----------------------------------------------------------------------------------------------------------------------------------------------------------------------------------------------------------------------- | ------------------------------------------------- |
| **Dimension Name** | The category being classified | "Operating System", "Product Tier", "Environment" |
| **Options** | Predefined choices entered as chips (press Enter or comma to add each one). Leave empty for free-text input. | "Windows", "MacOS", "Linux" |
| **Question Template** | The question shown to the user when this dimension needs to be collected | "What operating system are you using?" |
| **Visibility conditions** | When this rule should appear in the form. Empty means the rule is a root and is always considered. Add one or more conditions to gate it on earlier answers (see [Conditional Rules](#conditional-rules-decision-dag)). | Show when `os` equals any of `Linux, MacOS` |
| **Required dimension** | When checked, the user must answer this dimension before the agent proceeds | Checked / Unchecked |
Both **Dimension Name** and **Question Template** are required fields. The
modal will not allow you to save a rule without filling in both.
### Conditional Rules (Decision DAG)
Rules can be made **conditional** on earlier answers so the widget only asks for a dimension when it's relevant. For example, only ask "Which Linux distro?" when the user already answered "Linux" to the operating system question.
There are two ways to add a condition:
* **Visibility Conditions** section in the rule modal. Pick a **parent question** (another rule with predefined options) and toggle one or more of its option **values** that should unlock this rule.
* **Drag an individual answer onto another rule** on the canvas. Every option/answer on a parent node has its own handle; dragging that specific answer onto a child node makes the child conditionally appear in the triage form whenever the user picks that answer for the parent. For example, dragging `OS = Linux` onto the `Distro` node adds (or extends) a condition `parent=OS, values=[Linux]` so `Distro` only shows after the user picks Linux. Drop on the child's left edge handle. To remove a value from an existing condition, click the small × on its chip on the edge.
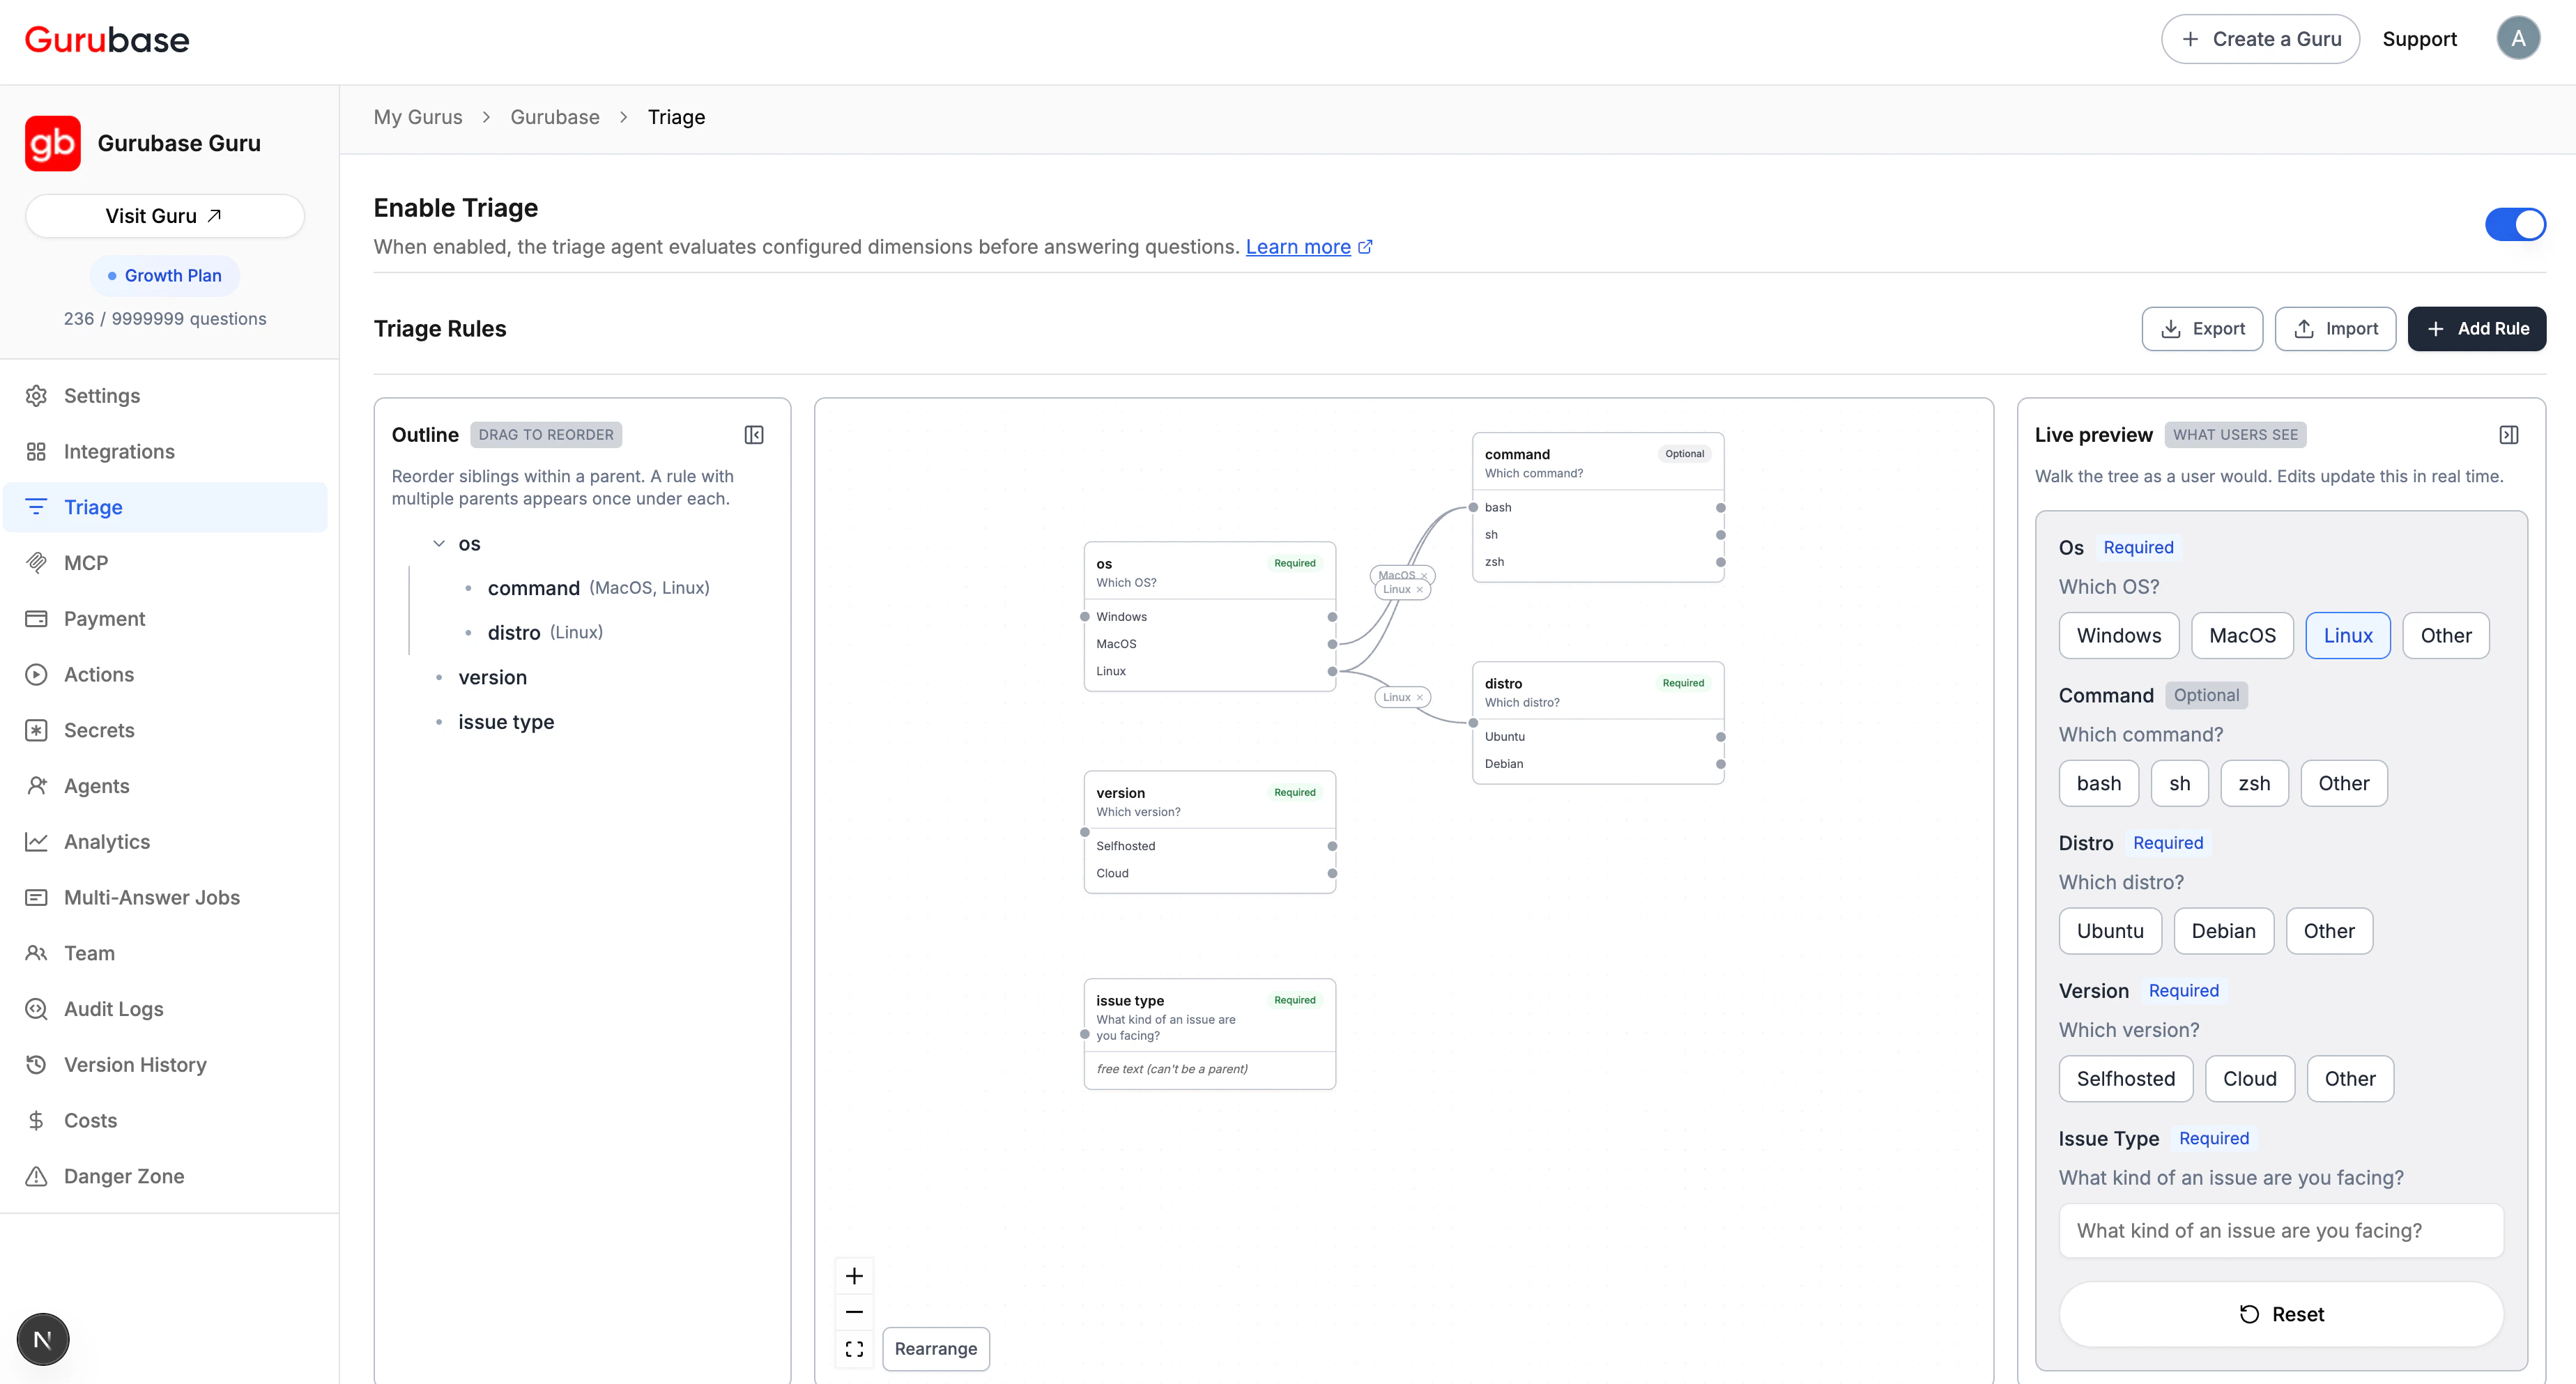 A rule is shown when **at least one** condition is satisfied. Within a condition, **any** of the selected values counts as a match. (Both layers are OR; there is no AND.)
| Shape | Behavior |
| ---------------------------------- | ---------------------------------------------------------------- |
| No conditions | Root rule, always visible (subject to triage classification). |
| One condition with one value | Classic tree: shown only when the parent resolves to that value. |
| One condition with multiple values | Shown when the parent resolves to any of those values. |
| Multiple conditions | Shown when any condition is satisfied. |
Free-text rules (rules with no options) cannot be used as parents because there is nothing to branch on.
To express AND (e.g., "shown when OS is Linux AND severity is high"), chain
the rules: make the second rule conditional on the first, and make the
consuming rule conditional on the second.
#### Guards
The backend blocks configurations that would break the DAG:
* **Cycles** — a rule cannot (directly or transitively) depend on itself.
* **Depth cap** — the longest ancestor chain is bounded.
* **Stale option references** — if you try to remove an option value that a child rule's condition still references, the edit is rejected with the list of dependent children. Remove or change those conditions first.
* **Free-text parents** — a rule with no predefined options cannot be used as a parent (there is nothing to branch on).
* **Cross-guru parents** — a condition's parent must belong to the same Guru.
### Reordering the Form
The **Outline** panel on the left of the canvas mirrors the rule DAG as a nested, draggable tree. The order shown in the outline is the order users see the dimensions in the live preview, the widget, and every other surface that renders the triage form.
To reorder, hover a row to reveal its drag handle (the dotted grip on the left), then drag it up or down within its parent group. Roots reorder among the other roots; children reorder among their siblings under the same parent. Drops across parents are ignored on purpose because reparenting changes the rule's visibility conditions, which lives in the rule's edit modal.
A few details that come up:
* **Per-edge ordering**: ordering is stored per `(parent → child)` edge, so a rule that appears under two parents can sit at a different position under each.
* **Multi-parent rules**: a rule with more than one parent appears once under each parent in the outline, marked with a small branch icon. Each appearance is independently expandable.
* **Click to focus**: clicking a row highlights the matching node on the canvas with a blue ring so you can locate it in a busy graph.
* **Collapse**: hide the outline with the panel-collapse button at the top right of the outline; reopen it with the **Outline** button that appears in the canvas's top-left corner.
Reordering only affects display order; it never changes the DAG. Visibility still depends on the conditions you configured: a child is hidden until at least one of its conditions is satisfied, regardless of where it sits in the outline.
### Editing and Deleting Rules
Each node on the canvas exposes **Edit** and **Delete** buttons. Editing opens the same modal pre-filled with the rule's current values. Deleting shows a confirmation dialog before removing the rule, and if any other rules' conditions reference the rule being deleted, the dialog lists those dependents and warns that they will become root rules (always visible) once their last condition is scrubbed.
A rule is shown when **at least one** condition is satisfied. Within a condition, **any** of the selected values counts as a match. (Both layers are OR; there is no AND.)
| Shape | Behavior |
| ---------------------------------- | ---------------------------------------------------------------- |
| No conditions | Root rule, always visible (subject to triage classification). |
| One condition with one value | Classic tree: shown only when the parent resolves to that value. |
| One condition with multiple values | Shown when the parent resolves to any of those values. |
| Multiple conditions | Shown when any condition is satisfied. |
Free-text rules (rules with no options) cannot be used as parents because there is nothing to branch on.
To express AND (e.g., "shown when OS is Linux AND severity is high"), chain
the rules: make the second rule conditional on the first, and make the
consuming rule conditional on the second.
#### Guards
The backend blocks configurations that would break the DAG:
* **Cycles** — a rule cannot (directly or transitively) depend on itself.
* **Depth cap** — the longest ancestor chain is bounded.
* **Stale option references** — if you try to remove an option value that a child rule's condition still references, the edit is rejected with the list of dependent children. Remove or change those conditions first.
* **Free-text parents** — a rule with no predefined options cannot be used as a parent (there is nothing to branch on).
* **Cross-guru parents** — a condition's parent must belong to the same Guru.
### Reordering the Form
The **Outline** panel on the left of the canvas mirrors the rule DAG as a nested, draggable tree. The order shown in the outline is the order users see the dimensions in the live preview, the widget, and every other surface that renders the triage form.
To reorder, hover a row to reveal its drag handle (the dotted grip on the left), then drag it up or down within its parent group. Roots reorder among the other roots; children reorder among their siblings under the same parent. Drops across parents are ignored on purpose because reparenting changes the rule's visibility conditions, which lives in the rule's edit modal.
A few details that come up:
* **Per-edge ordering**: ordering is stored per `(parent → child)` edge, so a rule that appears under two parents can sit at a different position under each.
* **Multi-parent rules**: a rule with more than one parent appears once under each parent in the outline, marked with a small branch icon. Each appearance is independently expandable.
* **Click to focus**: clicking a row highlights the matching node on the canvas with a blue ring so you can locate it in a busy graph.
* **Collapse**: hide the outline with the panel-collapse button at the top right of the outline; reopen it with the **Outline** button that appears in the canvas's top-left corner.
Reordering only affects display order; it never changes the DAG. Visibility still depends on the conditions you configured: a child is hidden until at least one of its conditions is satisfied, regardless of where it sits in the outline.
### Editing and Deleting Rules
Each node on the canvas exposes **Edit** and **Delete** buttons. Editing opens the same modal pre-filled with the rule's current values. Deleting shows a confirmation dialog before removing the rule, and if any other rules' conditions reference the rule being deleted, the dialog lists those dependents and warns that they will become root rules (always visible) once their last condition is scrubbed.
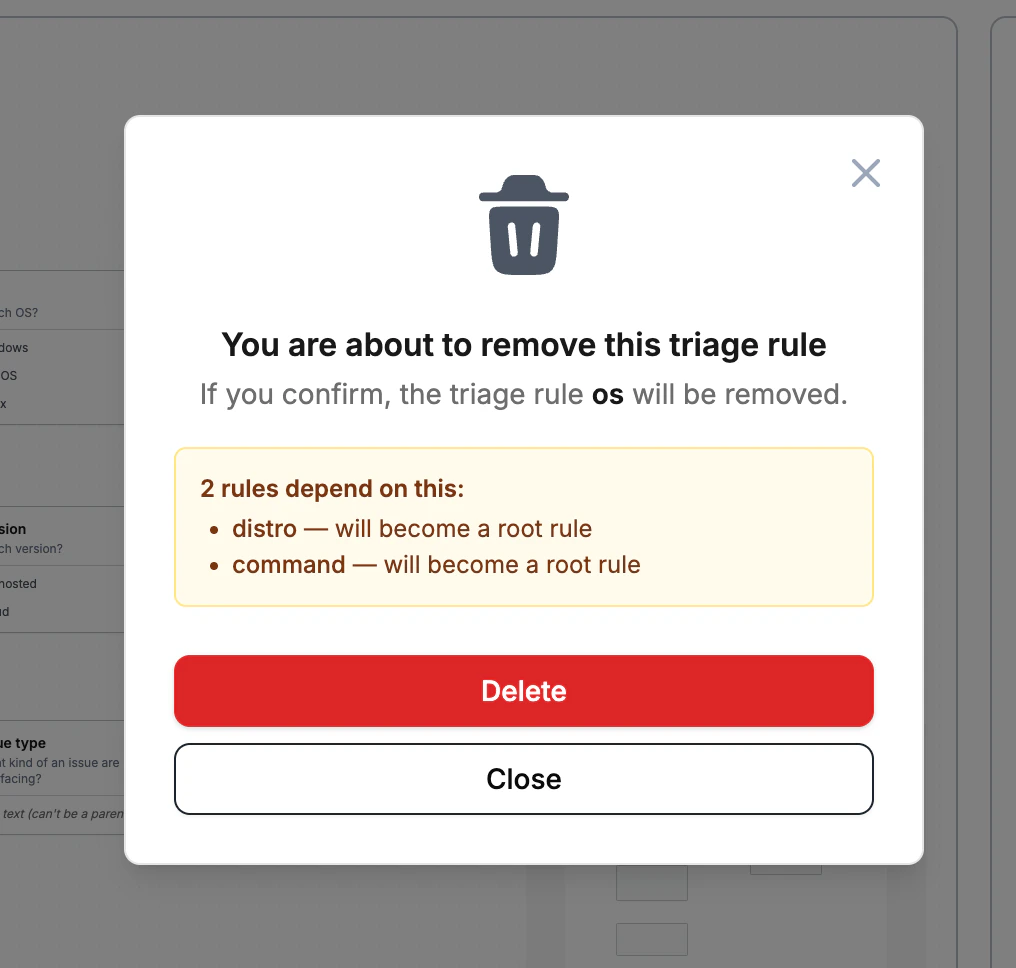 When a rule is deleted, any condition on other rules that referenced it is scrubbed automatically. Children that lose their last condition become root rules.
### Configuring Ticket Action
Below the rules table, you can select an API Call action to use for creating support tickets from the widget. Only actions of type **API Call** are shown in the dropdown. Select **None** to disable ticket creation.
To use ticket creation, first create an API Call action in the Actions tab,
then select it here. See the [Actions guide](/guides/actions) for details on
creating API Call actions.
The ticket action dropdown updates immediately when you make a selection. There is no separate save button. If you remove the selected action from the Actions tab, the ticket action configuration will be cleared automatically.
***
## Widget Experience
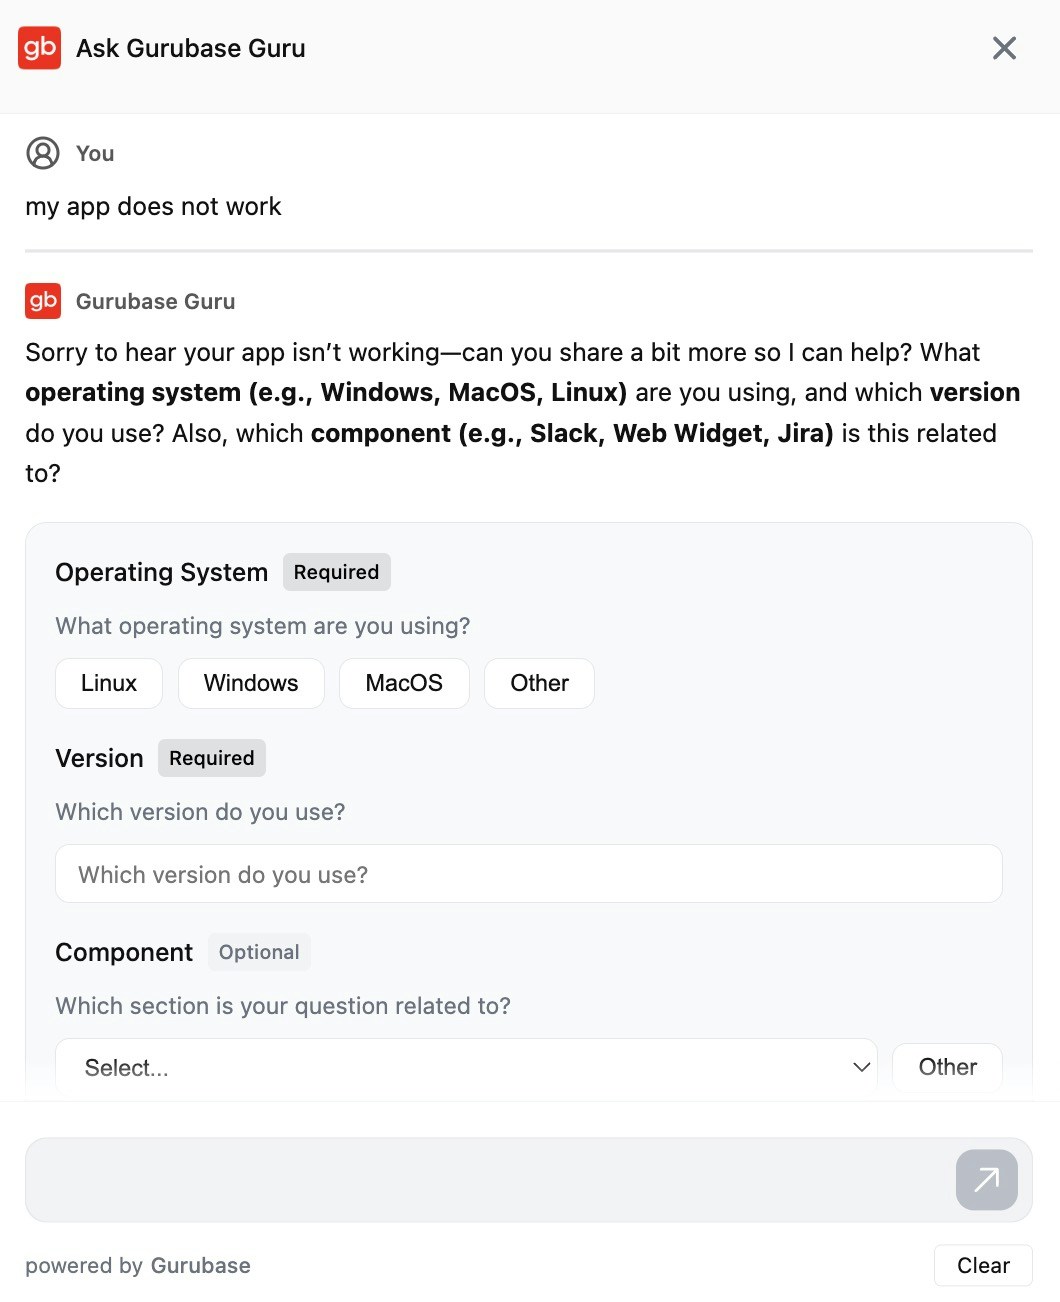
When triage is enabled, users interact with the triage system directly in the widget. The input type displayed depends on the number of options configured for each dimension. Each dimension appears as a labeled section with its question template text, a required/optional badge, and the appropriate input control.
### Interactive Dimension Inputs
The widget automatically renders one of three input types based on the number of predefined options for each dimension:
| Option Count | Input Type | Description |
| -------------------------- | --------------- | ----------------------------------------------------------------------------------- |
| **2-4 options** | Button row | All options shown as clickable buttons. Users click one to select it. |
| **5+ options** | Dropdown select | Options shown in a select menu for a cleaner interface. |
| **No options (free text)** | Text input | A single-line text field, or a multi-line textarea for error logs and descriptions. |
When a rule is deleted, any condition on other rules that referenced it is scrubbed automatically. Children that lose their last condition become root rules.
### Configuring Ticket Action
Below the rules table, you can select an API Call action to use for creating support tickets from the widget. Only actions of type **API Call** are shown in the dropdown. Select **None** to disable ticket creation.
To use ticket creation, first create an API Call action in the Actions tab,
then select it here. See the [Actions guide](/guides/actions) for details on
creating API Call actions.
The ticket action dropdown updates immediately when you make a selection. There is no separate save button. If you remove the selected action from the Actions tab, the ticket action configuration will be cleared automatically.
***
## Widget Experience
When triage is enabled, users interact with the triage system directly in the widget. The input type displayed depends on the number of options configured for each dimension. Each dimension appears as a labeled section with its question template text, a required/optional badge, and the appropriate input control.
### Interactive Dimension Inputs
The widget automatically renders one of three input types based on the number of predefined options for each dimension:
| Option Count | Input Type | Description |
| -------------------------- | --------------- | ----------------------------------------------------------------------------------- |
| **2-4 options** | Button row | All options shown as clickable buttons. Users click one to select it. |
| **5+ options** | Dropdown select | Options shown in a select menu for a cleaner interface. |
| **No options (free text)** | Text input | A single-line text field, or a multi-line textarea for error logs and descriptions. |
 ### The "Other" Option
Every dimension with predefined options also shows an **Other** button alongside the preset choices. Clicking **Other** replaces the buttons or dropdown with a free-text input field where users can type a custom value. Clicking **Other** again toggles back to the preset options.
This ensures users are never blocked when their situation doesn't match the predefined choices. For example, if your operating system options are "Windows", "MacOS", and "Linux", a user running FreeBSD can click **Other** and type their OS manually.
### Submit Validation
Required dimensions must have a value before the **Submit** button becomes active. Optional dimensions can be left blank and are clearly labeled with an "Optional" badge. The submit button stays disabled until all required fields are filled in, providing clear visual feedback about what information is still needed.
### Additional Details
Below all dimension inputs, the triage form includes an optional **Additional Details** textarea. Users can provide extra context about their issue that doesn't fit into any specific dimension. This text is:
* Included in the formatted triage submission sent as a message (e.g., `Additional Details: `)
* Appended to the ticket form's **Description** field when the user creates a ticket after triage
### Ticket Creation from Widget
When a ticket action is configured (see [Configuring Ticket Action](#configuring-ticket-action)), users see a **Create Ticket** button below the most recent AI answer. Clicking it opens a ticket form that combines standard fields with any parameters defined on the linked Action.
#### Standard Fields
Every ticket form includes these fields:
* **Subject**: auto-generated from the conversation, summarizing the user's question. Editable before submission.
* **Description**: pre-filled with the full conversation history (user messages and AI responses), including any triage clarification steps. If the user provided additional details during triage, they are appended at the end of the description. Editable before submission.
* **Email**: the user's email address for follow-up communication.
* **Name** (optional): the user's name.
If `data-pass-user-info` is configured on the widget, the email and name fields are pre-filled automatically from the user's stored identity in localStorage. See the [Website Widget guide](/integrations/bots/website-widget#user-identification) for details on configuring user info passthrough.
#### Action Parameters as Form Fields
Any parameters you define on the linked API Call action appear as additional fields in the ticket form. These parameters are automatically populated from the conversation context, including values the user provided during triage.
For example, if your ticket action has these parameters defined:
| Parameter | Type | What to Extract |
| ------------------ | ------ | ---------------- |
| `operating_system` | String | Operating System |
| `version` | String | Version |
| `component` | String | Component |
The ticket form will display an **Operating System**, **Version**, and **Component** field below the standard fields. If the user already provided these values during the triage flow (for example, they selected "Linux" as their operating system), those fields are pre-filled automatically. Users can review and edit these values before submitting.
### The "Other" Option
Every dimension with predefined options also shows an **Other** button alongside the preset choices. Clicking **Other** replaces the buttons or dropdown with a free-text input field where users can type a custom value. Clicking **Other** again toggles back to the preset options.
This ensures users are never blocked when their situation doesn't match the predefined choices. For example, if your operating system options are "Windows", "MacOS", and "Linux", a user running FreeBSD can click **Other** and type their OS manually.
### Submit Validation
Required dimensions must have a value before the **Submit** button becomes active. Optional dimensions can be left blank and are clearly labeled with an "Optional" badge. The submit button stays disabled until all required fields are filled in, providing clear visual feedback about what information is still needed.
### Additional Details
Below all dimension inputs, the triage form includes an optional **Additional Details** textarea. Users can provide extra context about their issue that doesn't fit into any specific dimension. This text is:
* Included in the formatted triage submission sent as a message (e.g., `Additional Details: `)
* Appended to the ticket form's **Description** field when the user creates a ticket after triage
### Ticket Creation from Widget
When a ticket action is configured (see [Configuring Ticket Action](#configuring-ticket-action)), users see a **Create Ticket** button below the most recent AI answer. Clicking it opens a ticket form that combines standard fields with any parameters defined on the linked Action.
#### Standard Fields
Every ticket form includes these fields:
* **Subject**: auto-generated from the conversation, summarizing the user's question. Editable before submission.
* **Description**: pre-filled with the full conversation history (user messages and AI responses), including any triage clarification steps. If the user provided additional details during triage, they are appended at the end of the description. Editable before submission.
* **Email**: the user's email address for follow-up communication.
* **Name** (optional): the user's name.
If `data-pass-user-info` is configured on the widget, the email and name fields are pre-filled automatically from the user's stored identity in localStorage. See the [Website Widget guide](/integrations/bots/website-widget#user-identification) for details on configuring user info passthrough.
#### Action Parameters as Form Fields
Any parameters you define on the linked API Call action appear as additional fields in the ticket form. These parameters are automatically populated from the conversation context, including values the user provided during triage.
For example, if your ticket action has these parameters defined:
| Parameter | Type | What to Extract |
| ------------------ | ------ | ---------------- |
| `operating_system` | String | Operating System |
| `version` | String | Version |
| `component` | String | Component |
The ticket form will display an **Operating System**, **Version**, and **Component** field below the standard fields. If the user already provided these values during the triage flow (for example, they selected "Linux" as their operating system), those fields are pre-filled automatically. Users can review and edit these values before submitting.
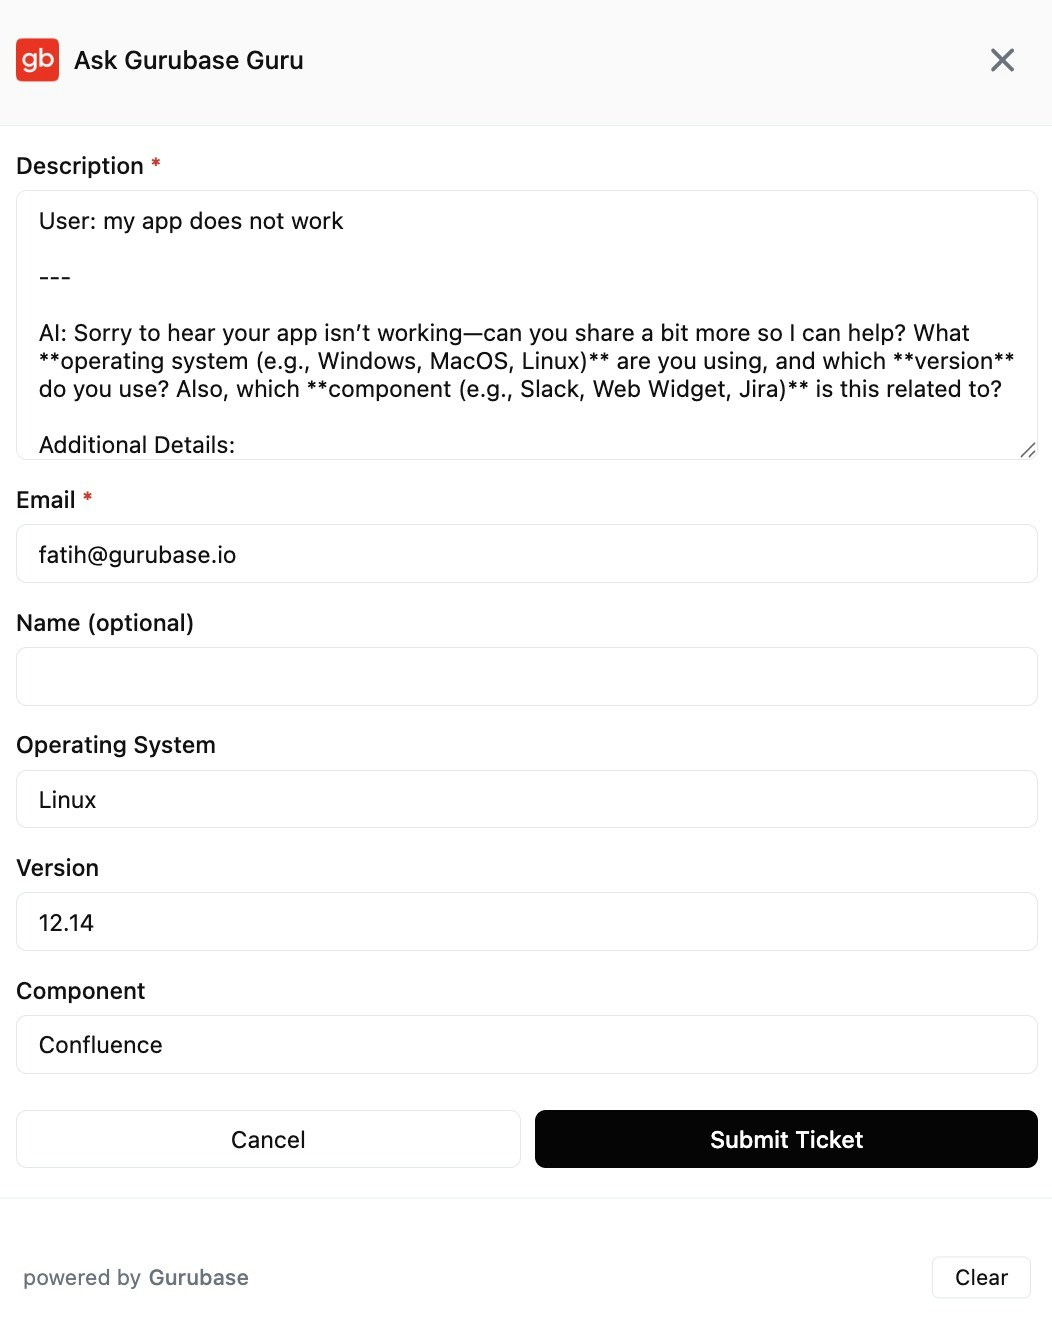
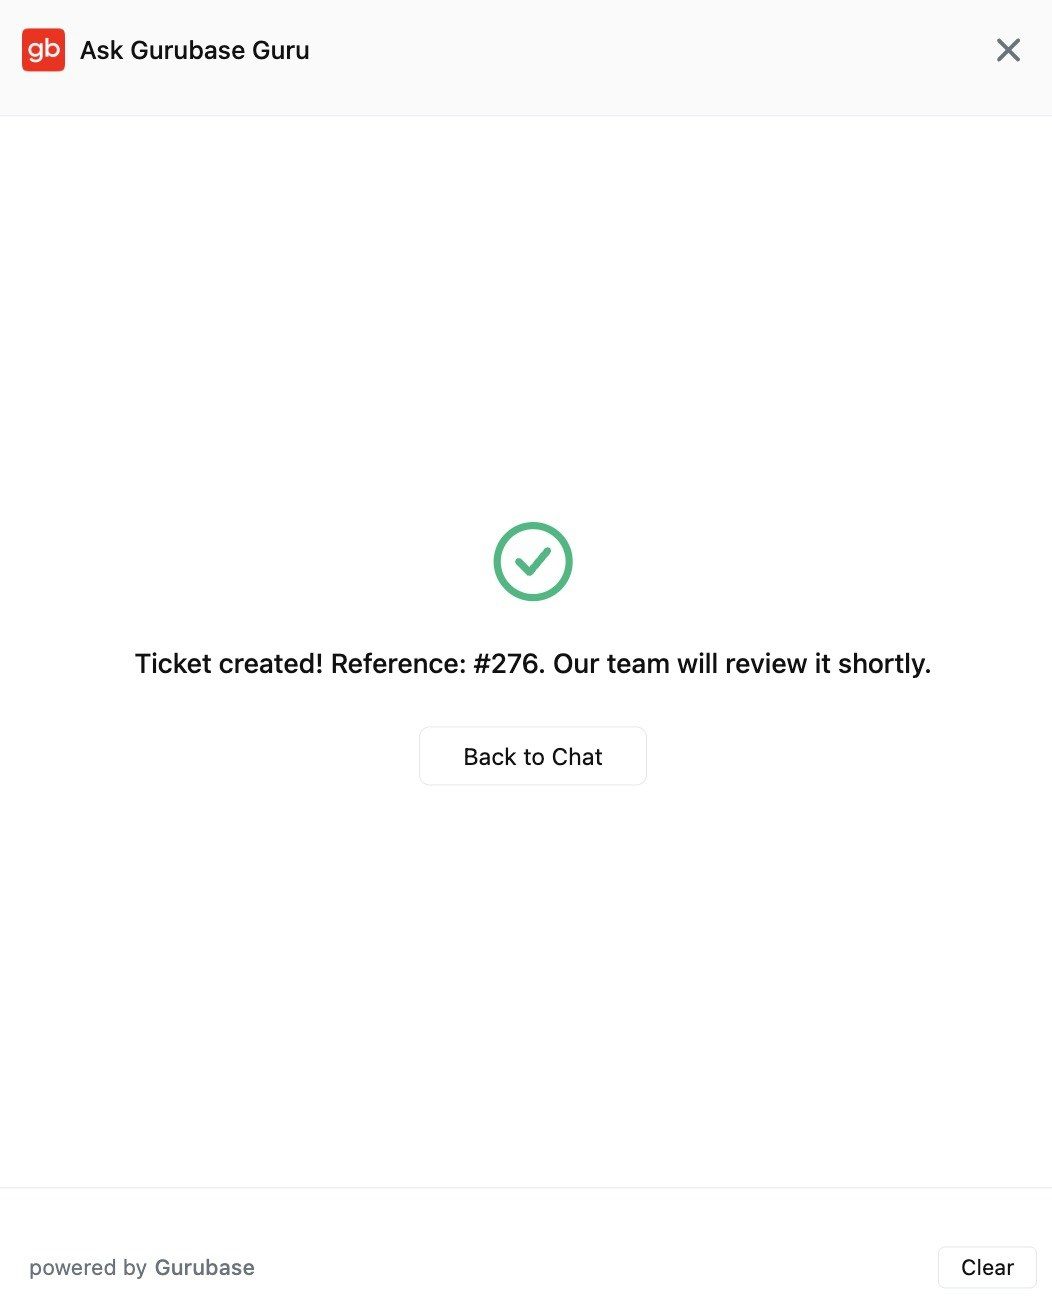 This means the ticket sent to your external system (Zendesk, Jira, Linear, GitHub, or any REST API) includes structured, machine-readable parameter values alongside the conversation context.
The standard form fields (subject, description, email, name) are automatically injected into the request body by Gurubase. You do not need to add placeholders for them. Gurubase replaces any static `"subject"` value with the form's subject, appends the conversation history to the content field, and adds a `requester` object with the user's email and name. Only your custom Action parameters need `{parameter_name}` placeholders in the body.
#### Example: Zendesk Ticket Action
To create tickets in Zendesk, set up an API Call action with these settings:
**Endpoint:** `POST https://{your-subdomain}.zendesk.com/api/v2/tickets.json`
**Authentication:** Enable Basic Auth with `your-email@company.com/token` as the username and create a `{ZENDESK_API_TOKEN}` secret for the password.
**Request Body:**
```json theme={null}
{
"ticket": {
"subject": "Bug report from Gurubase",
"tags": ["gurubase_ai_created"],
"comment": {
"body": "Ticket created via Gurubase"
},
"priority": "normal",
"custom_fields": [
{ "id": 12345, "value": "{operating_system}" },
{ "id": 12346, "value": "{version}" },
{ "id": 12347, "value": "{component}" }
]
}
}
```
You only need `{parameter_name}` placeholders for your custom Action parameters like `{operating_system}`, `{version}`, and `{component}`. Gurubase automatically handles the rest: the static `"subject"` value is replaced with the subject from the ticket form, the conversation history is appended to the `"body"` field, and a `requester` object with the user's email is added. Your support team sees structured metadata on every ticket without any manual data entry.
To get the most out of ticket creation with triage, name your Action
parameters to match your triage dimensions. When a triage dimension collects
"Operating System" and your Action parameter extracts "Operating System", the
value flows through automatically from triage to the ticket form.
***
## Best Practices
Don't overwhelm users with too many questions upfront. Focus on the dimensions that most improve answer quality. For example, operating system and product tier are common high-impact choices for technical support. You can always add more dimensions later once you see which ones make a meaningful difference in answer accuracy.
A good rule of thumb: if knowing a dimension value changes the answer significantly, make it required. If it only slightly improves the answer, make it optional.
The question template is shown verbatim to users in the widget. Make it conversational, specific, and easy to understand at a glance.
| Avoid | Use Instead |
| ------ | -------------------------------------------------------------------------------------- |
| "OS?" | "What operating system are you using?" |
| "Plan" | "What product plan are you on?" |
| "Env" | "What environment are you experiencing this in (production, staging, or development)?" |
Clear templates reduce confusion and improve response rates. Write them as if you're having a conversation with the user.
Buttons and dropdowns are faster than typing and produce more consistent data. A user clicking "Windows" is faster and cleaner than typing "windows", "Windows 11", "Win", or "win10".
Reserve free-text inputs for truly open-ended dimensions like error messages, log output, or detailed descriptions where predefined options wouldn't make sense.
The default limit of 2 rounds is a good starting point. This means the engine will ask for missing dimensions at most twice before answering with whatever context it has collected so far.
Higher limits may frustrate users who just want a quick answer. If you find that 2 rounds aren't enough, consider whether you need to restructure your dimensions (for example, combining two related dimensions into one) rather than increasing the limit.
Check which dimensions are most frequently resolved and whether they correlate with higher trust scores and fewer follow-up questions.
Questions to ask during review:
* Which dimensions are resolved most often? These are working well.
* Are users frequently clicking "Other"? You may need to expand your predefined options.
* Are optional dimensions rarely filled in? Consider removing them to simplify the experience.
* Are certain dimension combinations common? This might indicate you need a more targeted dimension.
***
## Importing and Exporting Rules
The triage editor includes **Export** and **Import** buttons next to **Add Rule**. Use them to back up a configuration, copy a setup between gurus, or restore from a snapshot.
### Export
Click **Export** to download the current guru's triage rules as a JSON file (`-triage-rules-.json`). The file contains every rule with its dimension, options, question template, required flag, display order, and conditions. Conditions reference other rules via a file-scoped `local_id`, not database IDs, so the same file imports cleanly into any guru.
### Import
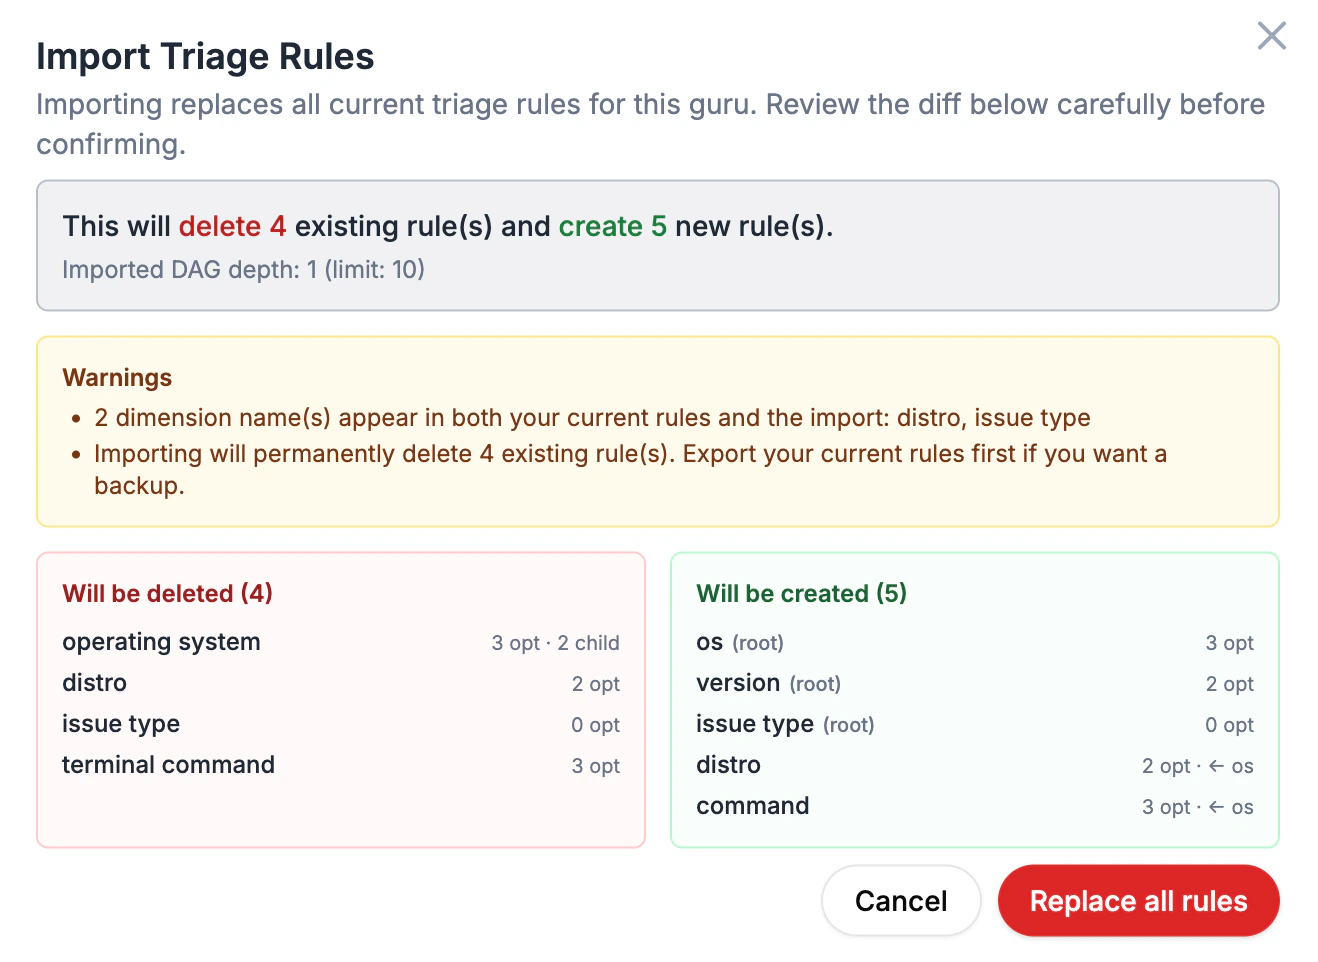
Importing **replaces all current triage rules** for the guru. Pick a JSON file and the editor will:
1. Validate the file (shape, parent references, free-text-parent rules, value containment, cycles, depth cap).
2. Show a preview dialog with the full diff: which existing rules will be deleted and which new rules will be created, plus warnings for things like name collisions.
3. Run the destructive replace only after you click **Replace all rules**.
The preview lays out the full diff and any warnings before anything is written:
This means the ticket sent to your external system (Zendesk, Jira, Linear, GitHub, or any REST API) includes structured, machine-readable parameter values alongside the conversation context.
The standard form fields (subject, description, email, name) are automatically injected into the request body by Gurubase. You do not need to add placeholders for them. Gurubase replaces any static `"subject"` value with the form's subject, appends the conversation history to the content field, and adds a `requester` object with the user's email and name. Only your custom Action parameters need `{parameter_name}` placeholders in the body.
#### Example: Zendesk Ticket Action
To create tickets in Zendesk, set up an API Call action with these settings:
**Endpoint:** `POST https://{your-subdomain}.zendesk.com/api/v2/tickets.json`
**Authentication:** Enable Basic Auth with `your-email@company.com/token` as the username and create a `{ZENDESK_API_TOKEN}` secret for the password.
**Request Body:**
```json theme={null}
{
"ticket": {
"subject": "Bug report from Gurubase",
"tags": ["gurubase_ai_created"],
"comment": {
"body": "Ticket created via Gurubase"
},
"priority": "normal",
"custom_fields": [
{ "id": 12345, "value": "{operating_system}" },
{ "id": 12346, "value": "{version}" },
{ "id": 12347, "value": "{component}" }
]
}
}
```
You only need `{parameter_name}` placeholders for your custom Action parameters like `{operating_system}`, `{version}`, and `{component}`. Gurubase automatically handles the rest: the static `"subject"` value is replaced with the subject from the ticket form, the conversation history is appended to the `"body"` field, and a `requester` object with the user's email is added. Your support team sees structured metadata on every ticket without any manual data entry.
To get the most out of ticket creation with triage, name your Action
parameters to match your triage dimensions. When a triage dimension collects
"Operating System" and your Action parameter extracts "Operating System", the
value flows through automatically from triage to the ticket form.
***
## Best Practices
Don't overwhelm users with too many questions upfront. Focus on the dimensions that most improve answer quality. For example, operating system and product tier are common high-impact choices for technical support. You can always add more dimensions later once you see which ones make a meaningful difference in answer accuracy.
A good rule of thumb: if knowing a dimension value changes the answer significantly, make it required. If it only slightly improves the answer, make it optional.
The question template is shown verbatim to users in the widget. Make it conversational, specific, and easy to understand at a glance.
| Avoid | Use Instead |
| ------ | -------------------------------------------------------------------------------------- |
| "OS?" | "What operating system are you using?" |
| "Plan" | "What product plan are you on?" |
| "Env" | "What environment are you experiencing this in (production, staging, or development)?" |
Clear templates reduce confusion and improve response rates. Write them as if you're having a conversation with the user.
Buttons and dropdowns are faster than typing and produce more consistent data. A user clicking "Windows" is faster and cleaner than typing "windows", "Windows 11", "Win", or "win10".
Reserve free-text inputs for truly open-ended dimensions like error messages, log output, or detailed descriptions where predefined options wouldn't make sense.
The default limit of 2 rounds is a good starting point. This means the engine will ask for missing dimensions at most twice before answering with whatever context it has collected so far.
Higher limits may frustrate users who just want a quick answer. If you find that 2 rounds aren't enough, consider whether you need to restructure your dimensions (for example, combining two related dimensions into one) rather than increasing the limit.
Check which dimensions are most frequently resolved and whether they correlate with higher trust scores and fewer follow-up questions.
Questions to ask during review:
* Which dimensions are resolved most often? These are working well.
* Are users frequently clicking "Other"? You may need to expand your predefined options.
* Are optional dimensions rarely filled in? Consider removing them to simplify the experience.
* Are certain dimension combinations common? This might indicate you need a more targeted dimension.
***
## Importing and Exporting Rules
The triage editor includes **Export** and **Import** buttons next to **Add Rule**. Use them to back up a configuration, copy a setup between gurus, or restore from a snapshot.
### Export
Click **Export** to download the current guru's triage rules as a JSON file (`-triage-rules-.json`). The file contains every rule with its dimension, options, question template, required flag, display order, and conditions. Conditions reference other rules via a file-scoped `local_id`, not database IDs, so the same file imports cleanly into any guru.
### Import
Importing **replaces all current triage rules** for the guru. Pick a JSON file and the editor will:
1. Validate the file (shape, parent references, free-text-parent rules, value containment, cycles, depth cap).
2. Show a preview dialog with the full diff: which existing rules will be deleted and which new rules will be created, plus warnings for things like name collisions.
3. Run the destructive replace only after you click **Replace all rules**.
The preview lays out the full diff and any warnings before anything is written:
 If validation fails the dialog lists every error with its path and code so you can fix the file in one pass instead of re-uploading after each error.
Import is destructive. Export the current rules first if you want a backup, then import the new file.
The replace is wrapped in a single transaction and inserts rules in topological order (roots first, then their children). If anything goes wrong mid-import, the existing rules are untouched.
***
## Next Steps
Create API Call actions for ticket creation and other integrations
Monitor triage effectiveness and question patterns
Configure the widget that powers the triage UX
If validation fails the dialog lists every error with its path and code so you can fix the file in one pass instead of re-uploading after each error.
Import is destructive. Export the current rules first if you want a backup, then import the new file.
The replace is wrapped in a single transaction and inserts rules in topological order (roots first, then their children). If anything goes wrong mid-import, the existing rules are untouched.
***
## Next Steps
Create API Call actions for ticket creation and other integrations
Monitor triage effectiveness and question patterns
Configure the widget that powers the triage UX