> ## Documentation Index
> Fetch the complete documentation index at: https://docs.gurubase.ai/llms.txt
> Use this file to discover all available pages before exploring further.
# GitHub Bot
> AI-powered issue triage and answers directly in your GitHub repositories
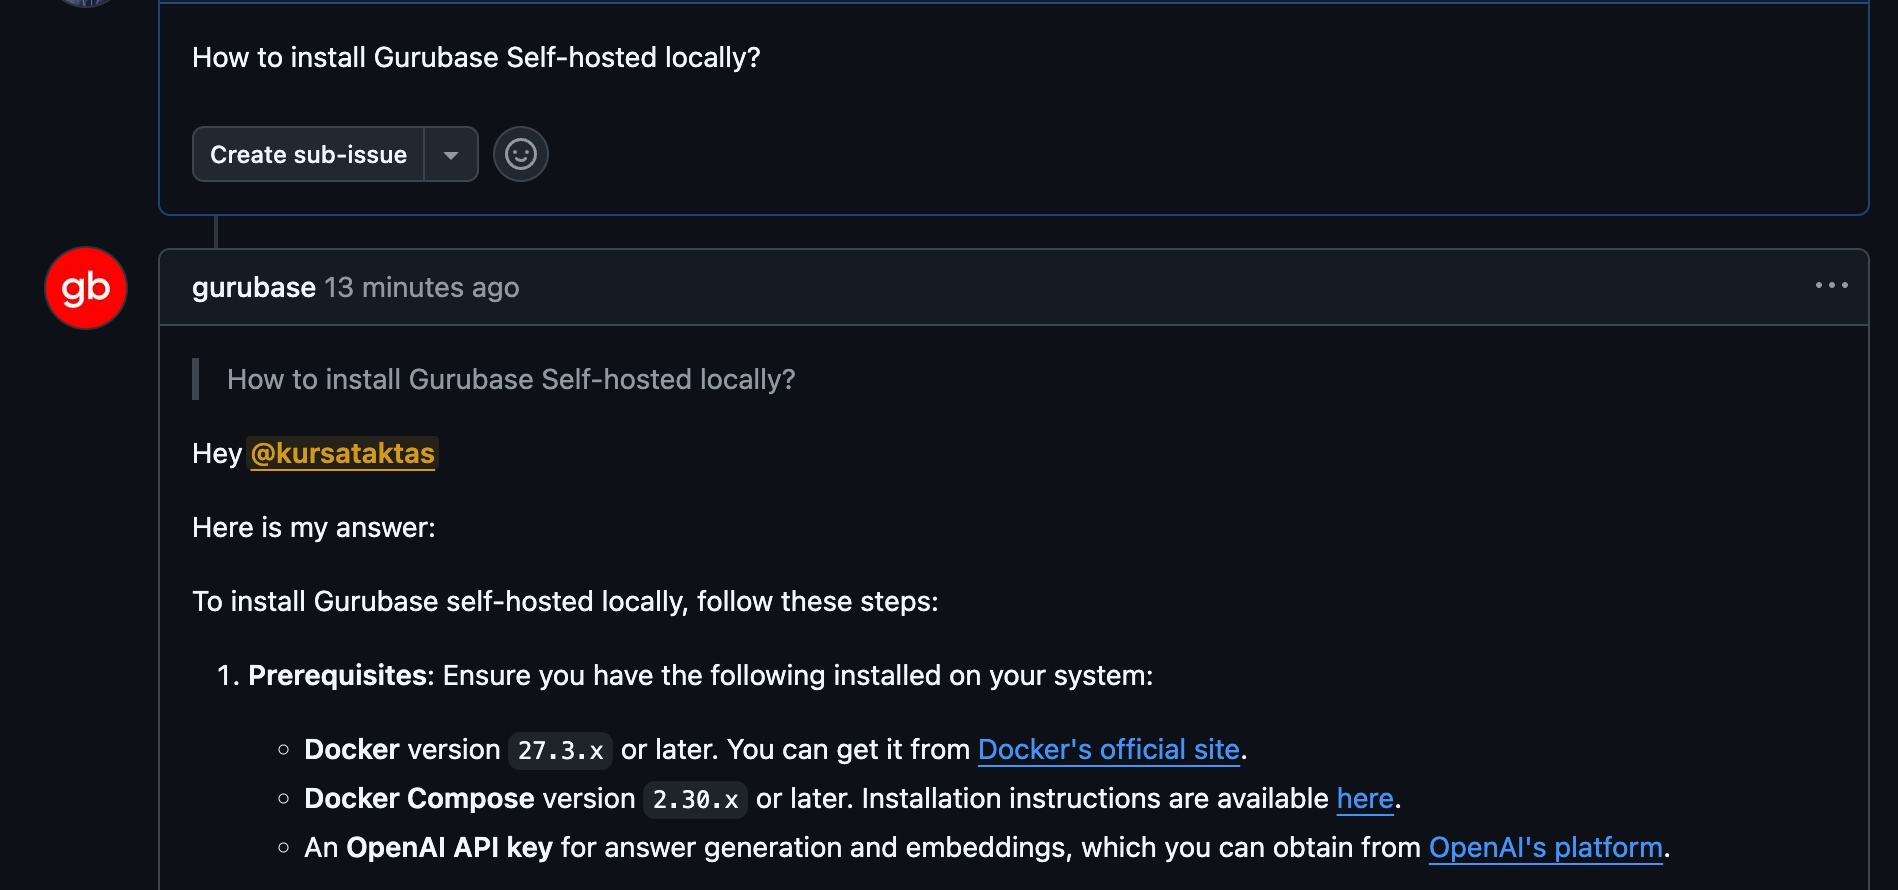
Add Gurubase to your GitHub repositories to automatically answer issues, help with triage, and provide instant documentation lookups — all without leaving GitHub.
 ## Why Use the GitHub Bot?
Bot automatically responds to new issues with relevant documentation and answers
Common questions get answered automatically, freeing maintainers for complex issues
Bot considers issue title, body, and comments to provide relevant responses
Answers are grounded in your actual documentation, README, and knowledge base
## How It Works
| Mode | Behavior |
| ---------- | ---------------------------------------------------------------------------------------------- |
| **Auto** | Bot automatically replies when issues are created. For follow-up comments, mention `@gurubase` |
| **Manual** | Bot only responds when explicitly mentioned with `@gurubase` |
You can set different modes per repository and always mention the bot for on-demand answers.
**Self-hosted users:** You'll need to create your own GitHub App first. See [GitHub App Setup for Self-hosted](#github-app-setup-for-self-hosted-version).
***
## Setup (Gurubase Cloud)
Go to **Gurubase Dashboard** → Select your Guru → **Integrations** → **Deployments** → **GitHub**
Click **Connect** and authorize Gurubase to access your repositories. You can grant access to all repositories or select specific ones.
## Why Use the GitHub Bot?
Bot automatically responds to new issues with relevant documentation and answers
Common questions get answered automatically, freeing maintainers for complex issues
Bot considers issue title, body, and comments to provide relevant responses
Answers are grounded in your actual documentation, README, and knowledge base
## How It Works
| Mode | Behavior |
| ---------- | ---------------------------------------------------------------------------------------------- |
| **Auto** | Bot automatically replies when issues are created. For follow-up comments, mention `@gurubase` |
| **Manual** | Bot only responds when explicitly mentioned with `@gurubase` |
You can set different modes per repository and always mention the bot for on-demand answers.
**Self-hosted users:** You'll need to create your own GitHub App first. See [GitHub App Setup for Self-hosted](#github-app-setup-for-self-hosted-version).
***
## Setup (Gurubase Cloud)
Go to **Gurubase Dashboard** → Select your Guru → **Integrations** → **Deployments** → **GitHub**
Click **Connect** and authorize Gurubase to access your repositories. You can grant access to all repositories or select specific ones.
 For each repository, choose **Auto** or **Manual** mode from the dropdown.
Click **Manage** at the bottom to add or remove repositories via GitHub's app settings. Refresh the Gurubase page to see changes.
You can connect up to 100 repositories per Guru.
***
## Using the Bot
Mention `@gurubase` in any issue to ask a question:
```markdown theme={null}
@gurubase How do I configure authentication in this project?
```
The bot considers:
* The comment that mentions it
* Issue title and description
* Previous comments in the thread
**Self-hosted:** Mention `@your-app-slug` instead of `@gurubase`. Find your slug in the GitHub App URL.
***
## Permissions
| Permission | Access | Purpose |
| ------------- | ------------ | ------------------------------ |
| Metadata | Read | View repository information |
| Issues | Read & Write | Respond to issues |
| Discussions | Read & Write | Future: respond to discussions |
| Pull Requests | Read & Write | Future: respond to PR comments |
Currently, the bot only works in **Issues**. Discussions and Pull Request support is coming soon.
## GitHub App Setup for Self-hosted version
For self-hosted version, you need to create your own GitHub app to create a bot to integrate with your Gurubase Self-hosted instance. Gurubase needs **Client ID**, **Installation ID**, **Private Key**, and **Webhook Secret (Optional)** from GitHub to integrate with your repositories.
For each repository, choose **Auto** or **Manual** mode from the dropdown.
Click **Manage** at the bottom to add or remove repositories via GitHub's app settings. Refresh the Gurubase page to see changes.
You can connect up to 100 repositories per Guru.
***
## Using the Bot
Mention `@gurubase` in any issue to ask a question:
```markdown theme={null}
@gurubase How do I configure authentication in this project?
```
The bot considers:
* The comment that mentions it
* Issue title and description
* Previous comments in the thread
**Self-hosted:** Mention `@your-app-slug` instead of `@gurubase`. Find your slug in the GitHub App URL.
***
## Permissions
| Permission | Access | Purpose |
| ------------- | ------------ | ------------------------------ |
| Metadata | Read | View repository information |
| Issues | Read & Write | Respond to issues |
| Discussions | Read & Write | Future: respond to discussions |
| Pull Requests | Read & Write | Future: respond to PR comments |
Currently, the bot only works in **Issues**. Discussions and Pull Request support is coming soon.
## GitHub App Setup for Self-hosted version
For self-hosted version, you need to create your own GitHub app to create a bot to integrate with your Gurubase Self-hosted instance. Gurubase needs **Client ID**, **Installation ID**, **Private Key**, and **Webhook Secret (Optional)** from GitHub to integrate with your repositories.
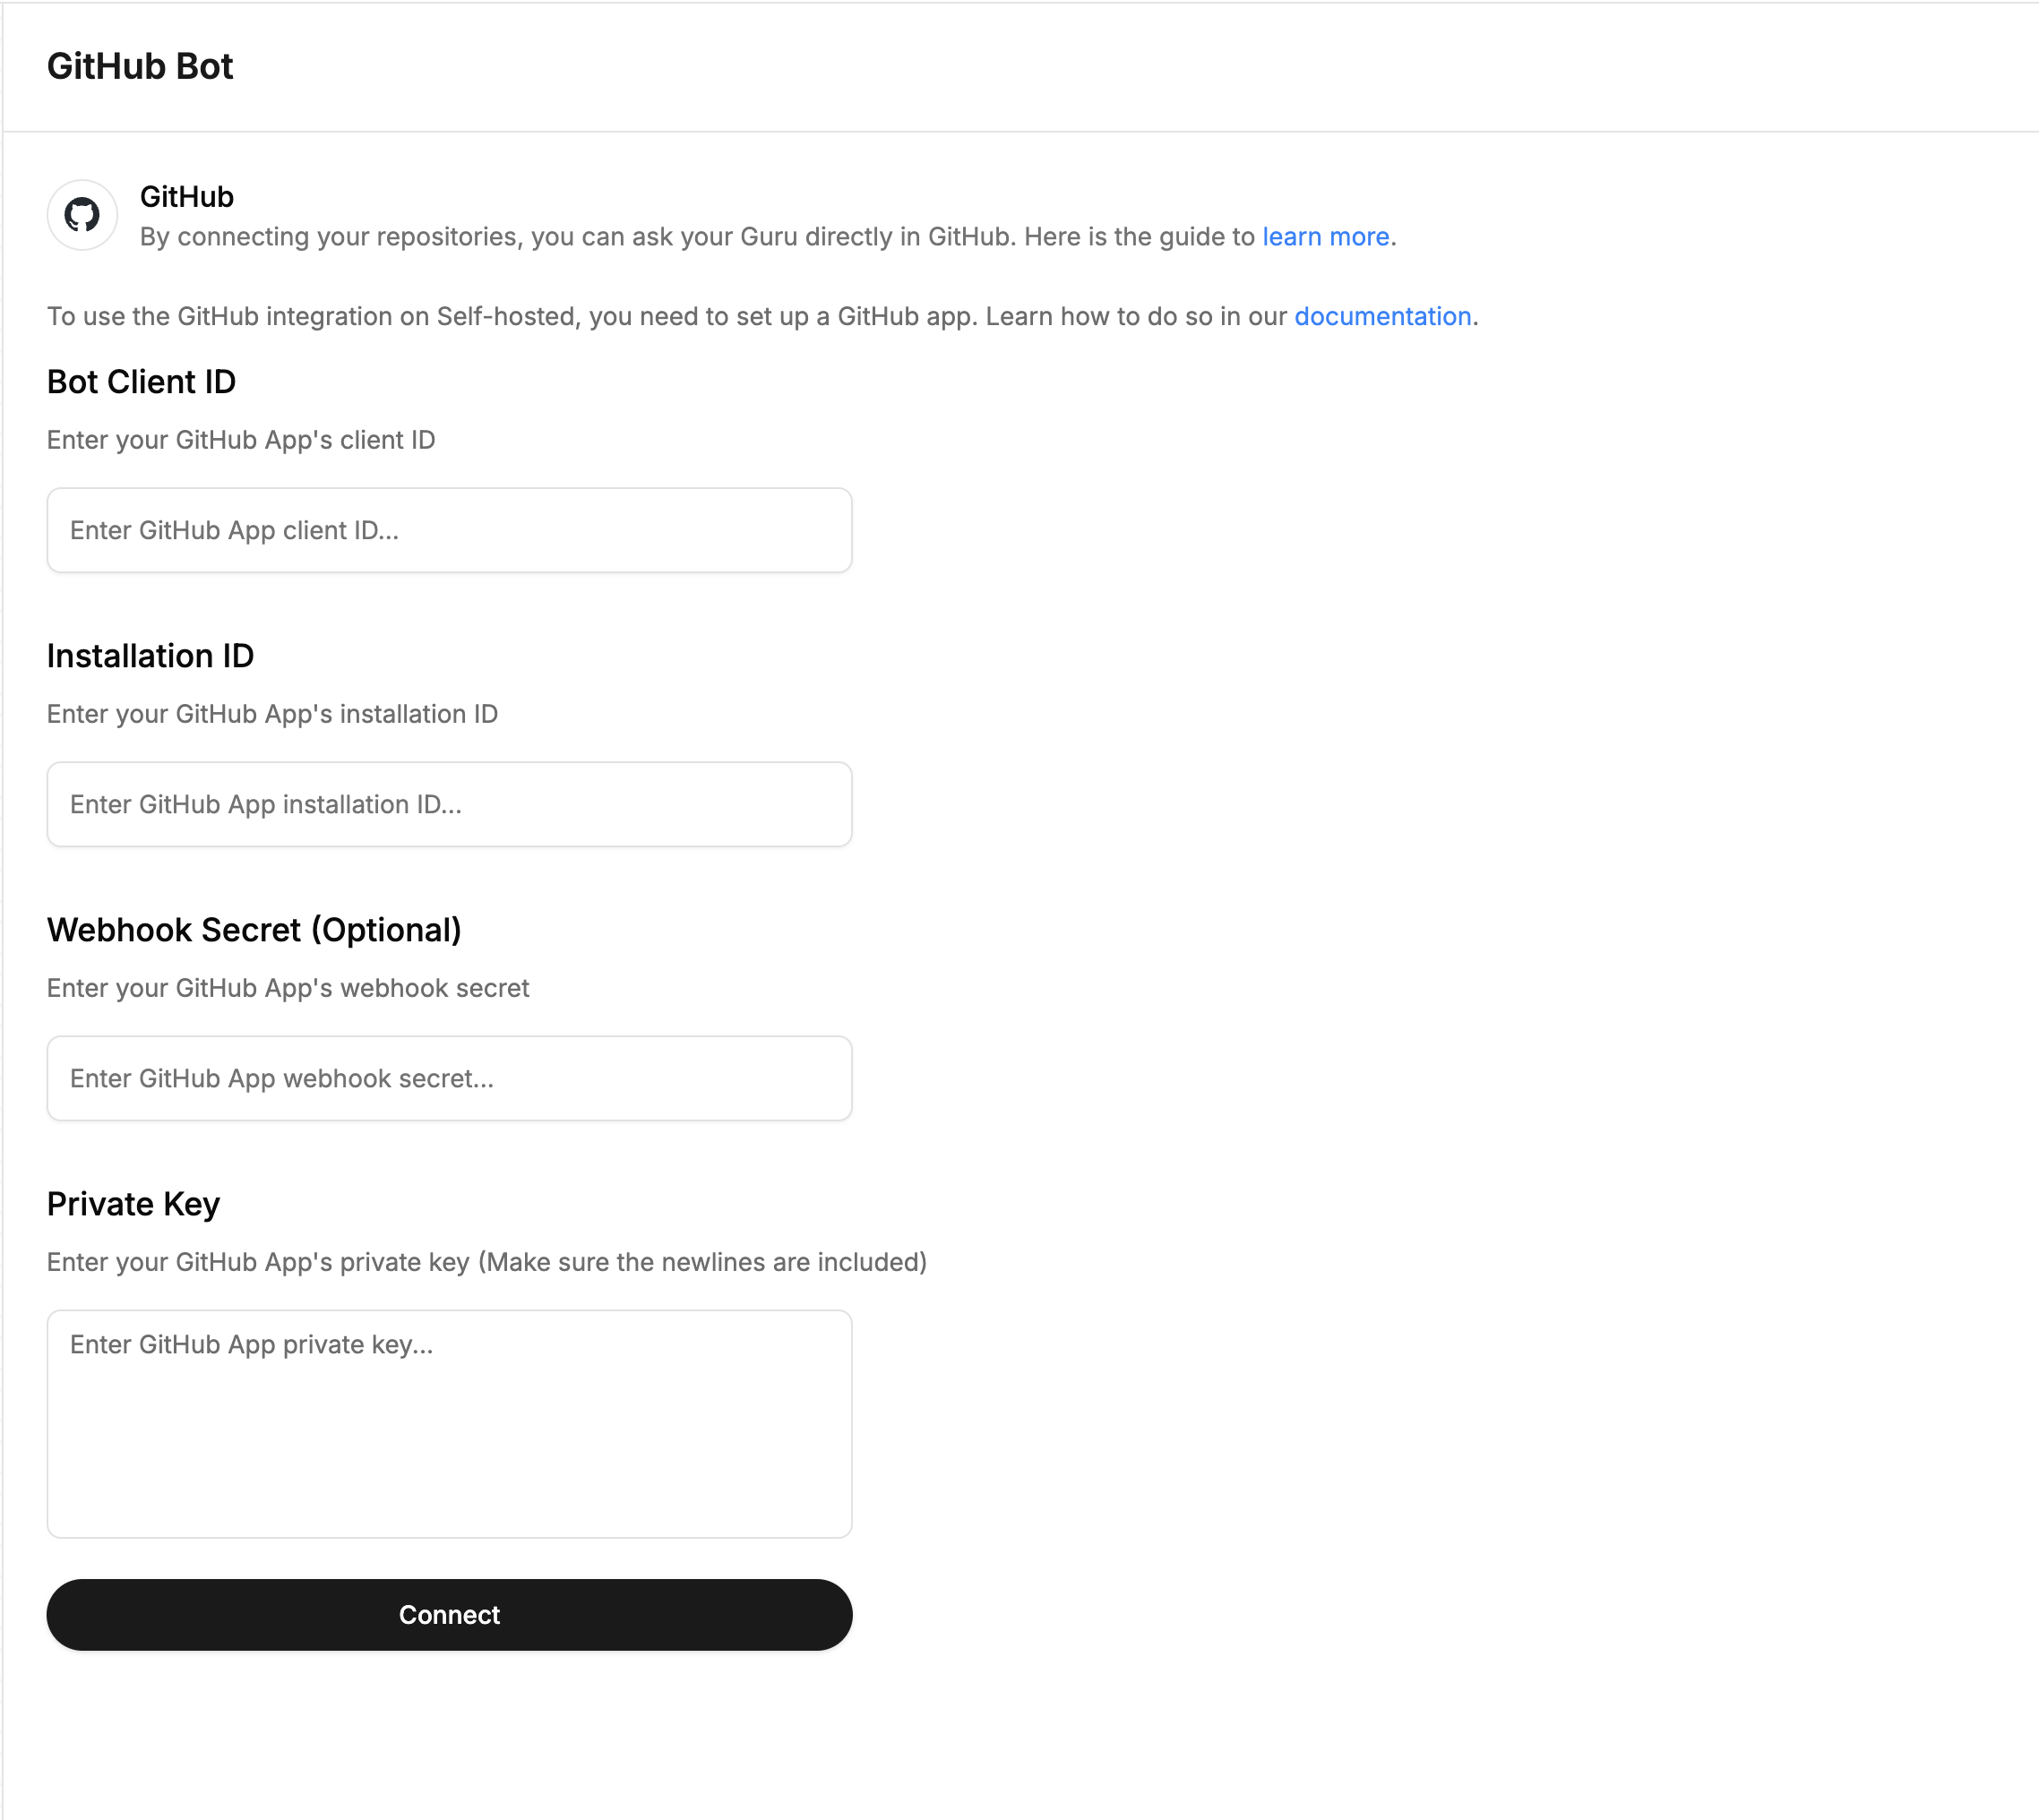 Below are the steps to create the app and get these values.
1. GitHub will send events to `/api/github/` endpoint of your Gurubase instance. If the Gurubase instance URL is not public, you need to open it to public. You can use [ngrok](https://ngrok.com/) to do this:
* If you haven't changed, the default port of Gurubase instance is 8029. You need to use this to make it publicly accessible.
* Make Gurubase instance URL public with `ngrok http http://localhost:8029`
* Copy the public URL from the ngrok terminal as shown below:
Below are the steps to create the app and get these values.
1. GitHub will send events to `/api/github/` endpoint of your Gurubase instance. If the Gurubase instance URL is not public, you need to open it to public. You can use [ngrok](https://ngrok.com/) to do this:
* If you haven't changed, the default port of Gurubase instance is 8029. You need to use this to make it publicly accessible.
* Make Gurubase instance URL public with `ngrok http http://localhost:8029`
* Copy the public URL from the ngrok terminal as shown below:
 2. Go to [https://github.com/settings/apps](https://github.com/settings/apps) and click "New GitHub App".
3. Type in the name, description, and homepage URL. You can specify `https://gurubase.io/` for the Homepage URL.
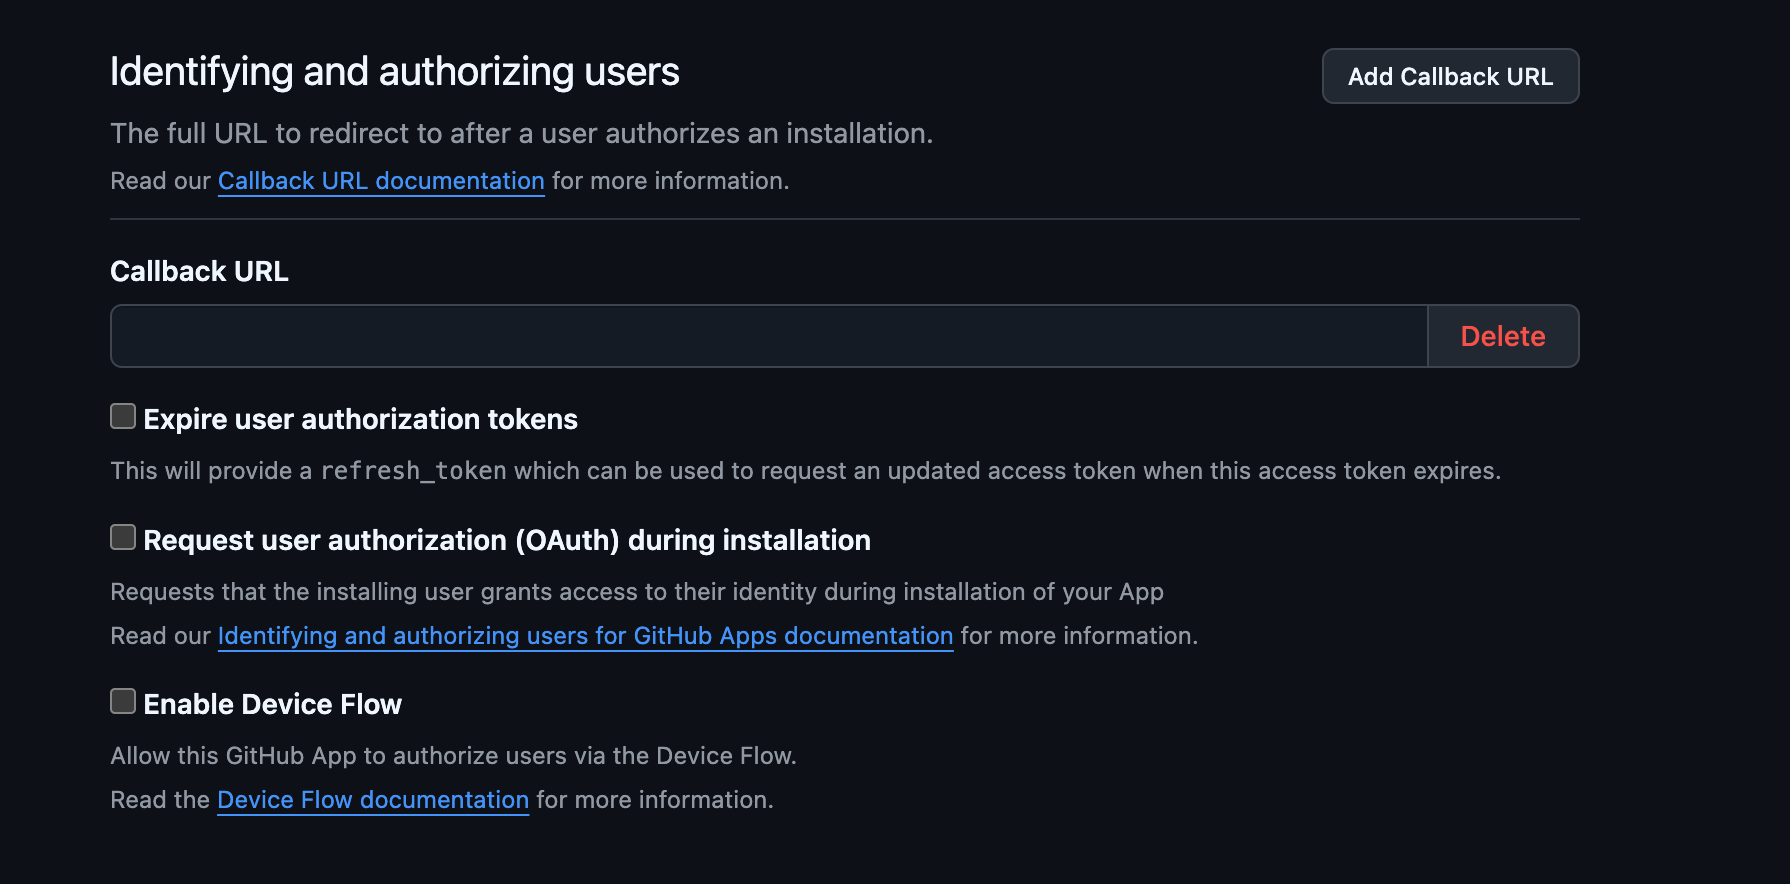
4. Leave the "Callback URL" empty and untick all of the checkboxes below it.
2. Go to [https://github.com/settings/apps](https://github.com/settings/apps) and click "New GitHub App".
3. Type in the name, description, and homepage URL. You can specify `https://gurubase.io/` for the Homepage URL.
4. Leave the "Callback URL" empty and untick all of the checkboxes below it.
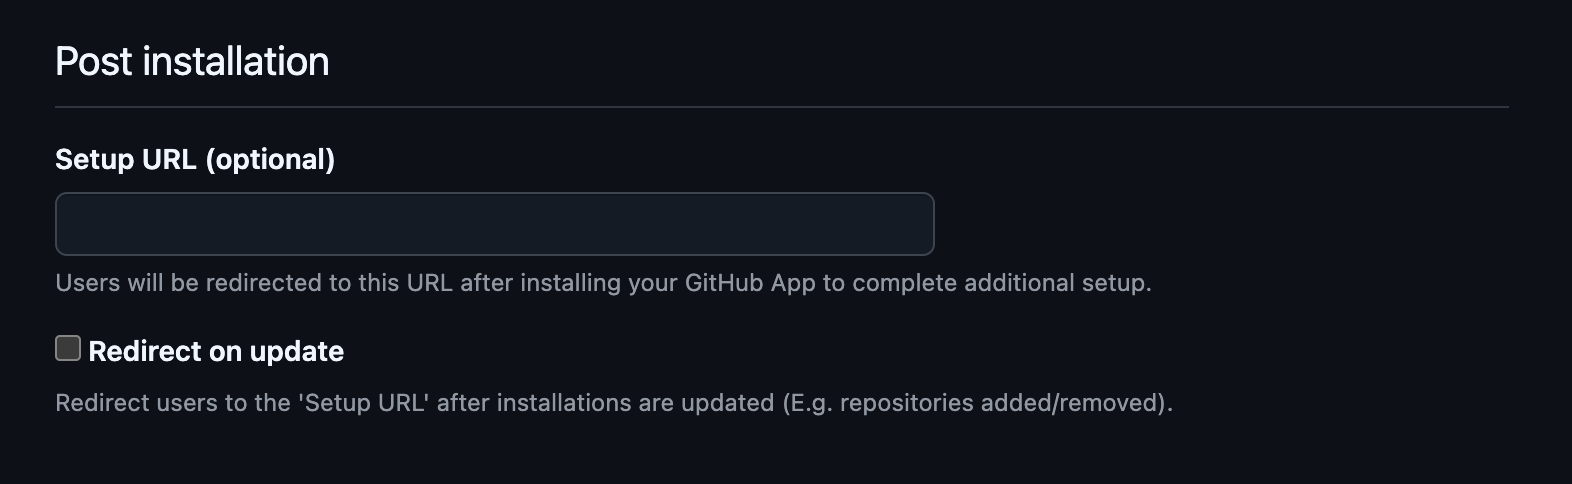
 5. Under "Post installation", keep the "Setup URL" empty and untick "Redirect on update".
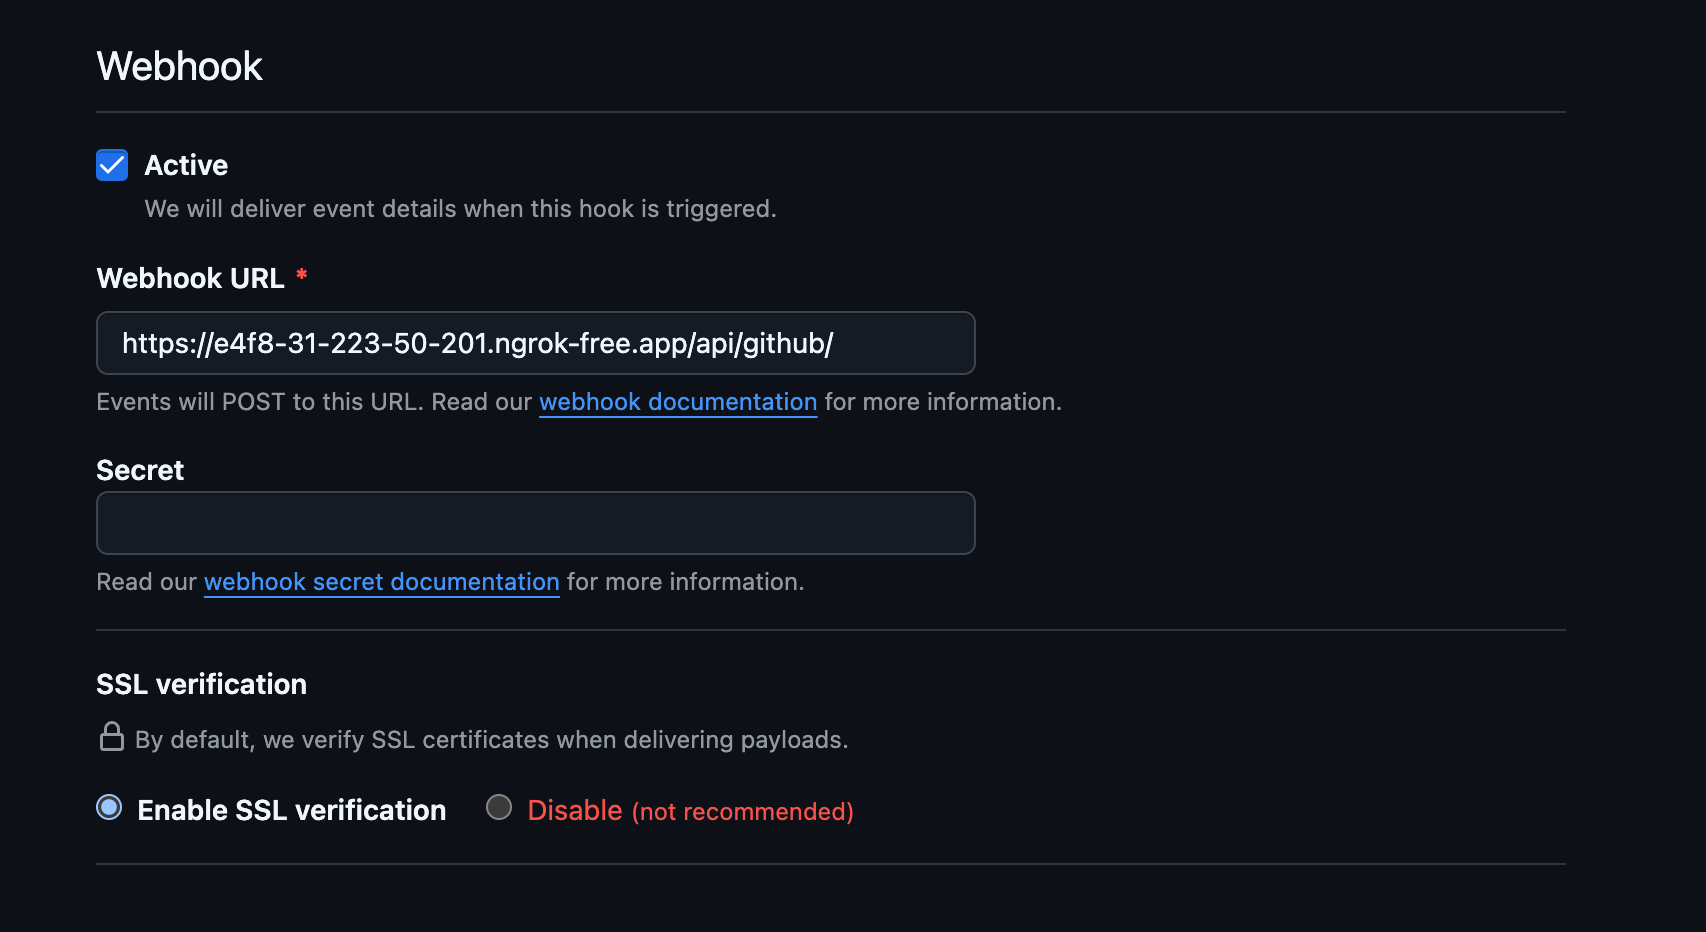
 6. Under "Webhook", make it active.
7. Set the Webhook URL as `${your_public_gurubase_url}/api/github/`
Make sure you keep the `/` at the end.
8. Optionally, you can set a secret for the webhook. If you set a secret, copy it and paste it in the **Webhook Secret** field in the GitHub integration page on Gurubase.
9. Keep SSL verification enabled.
6. Under "Webhook", make it active.
7. Set the Webhook URL as `${your_public_gurubase_url}/api/github/`
Make sure you keep the `/` at the end.
8. Optionally, you can set a secret for the webhook. If you set a secret, copy it and paste it in the **Webhook Secret** field in the GitHub integration page on Gurubase.
9. Keep SSL verification enabled.
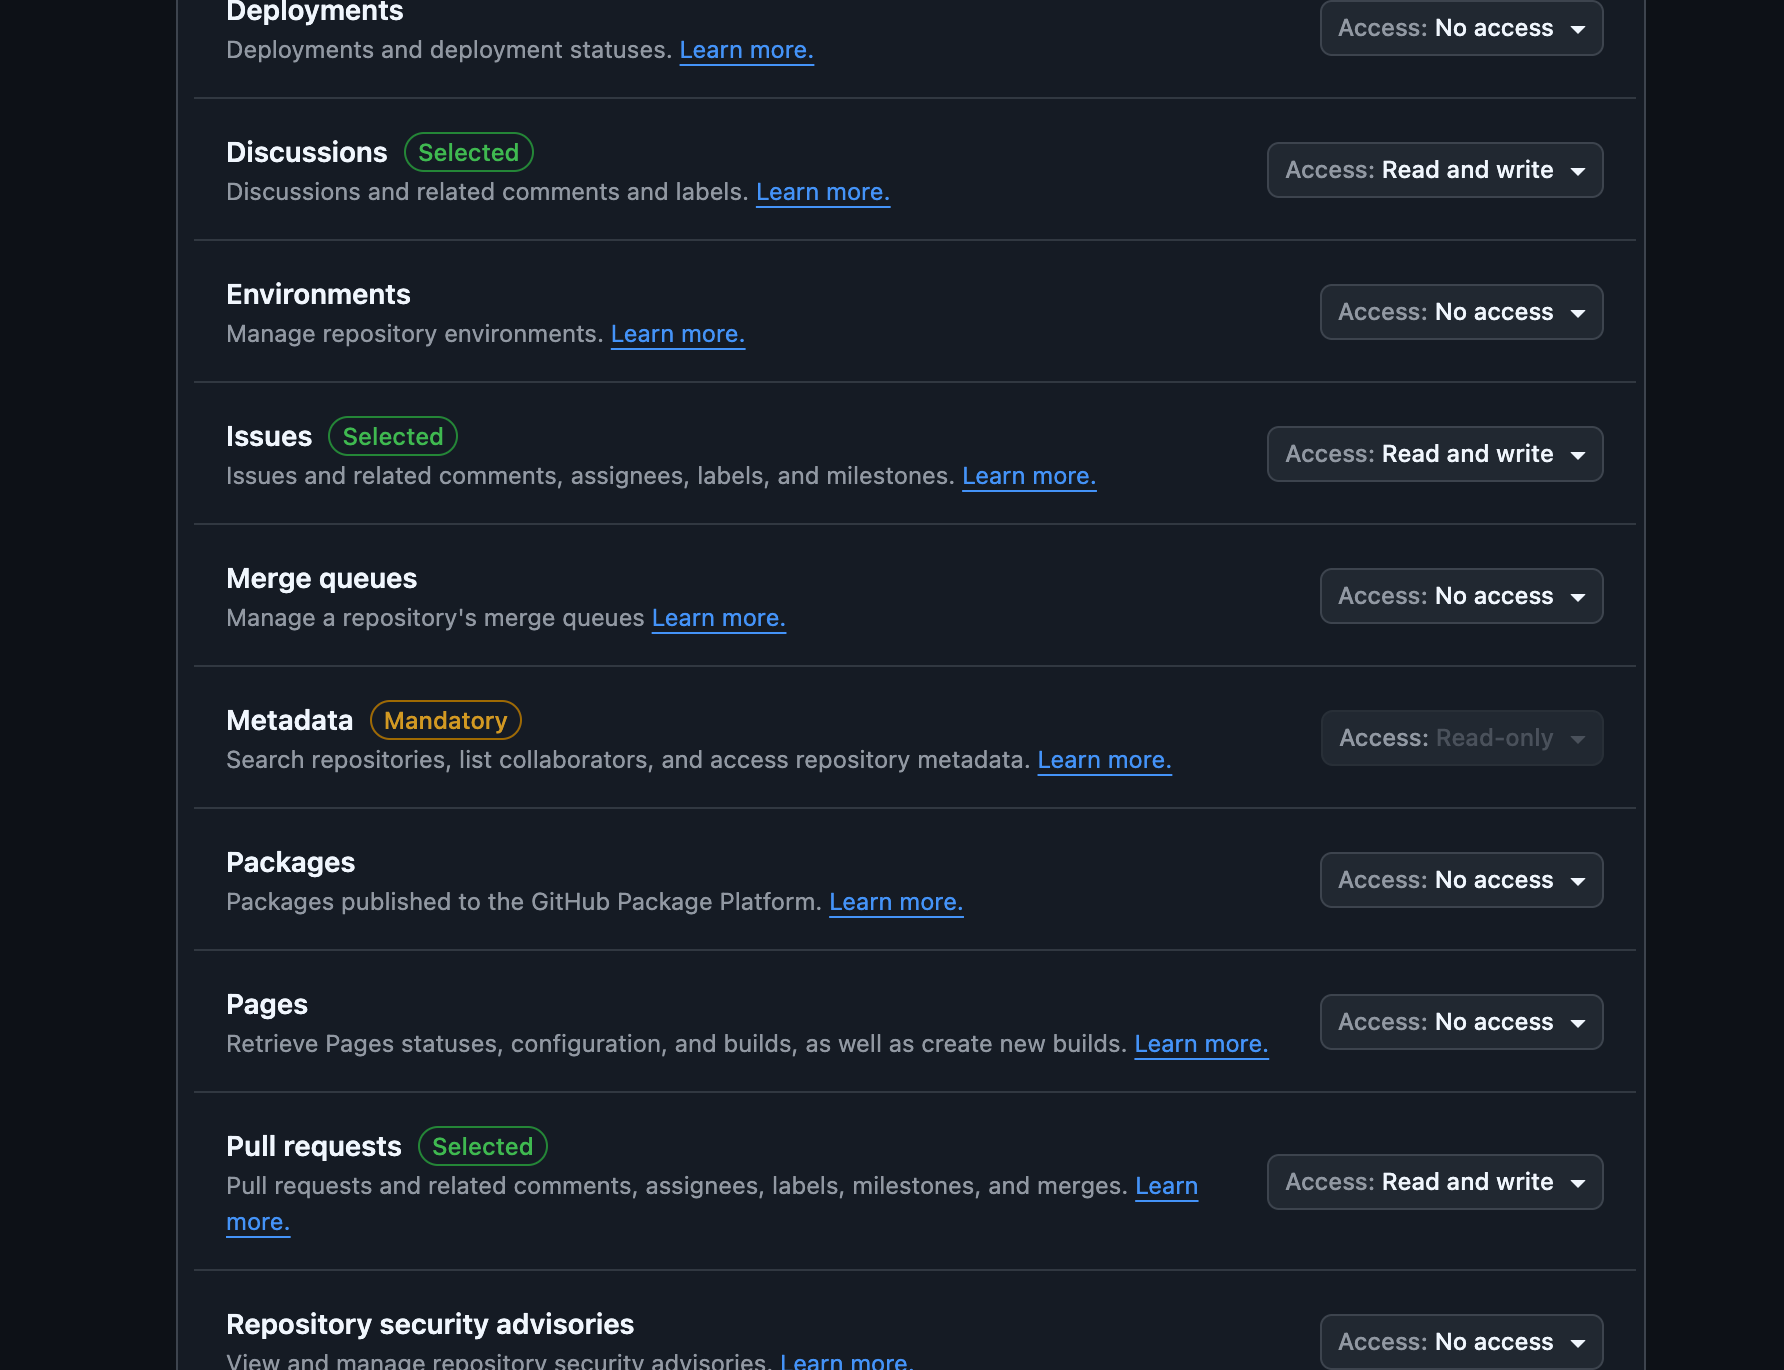
 10. Under "Permissions", click "Repository permissions"
11. Select "Read and write" for these:
* Discussions
* Issues
* Pull requests
This will also add Read-only permission to Metadata. Keep it.
10. Under "Permissions", click "Repository permissions"
11. Select "Read and write" for these:
* Discussions
* Issues
* Pull requests
This will also add Read-only permission to Metadata. Keep it.
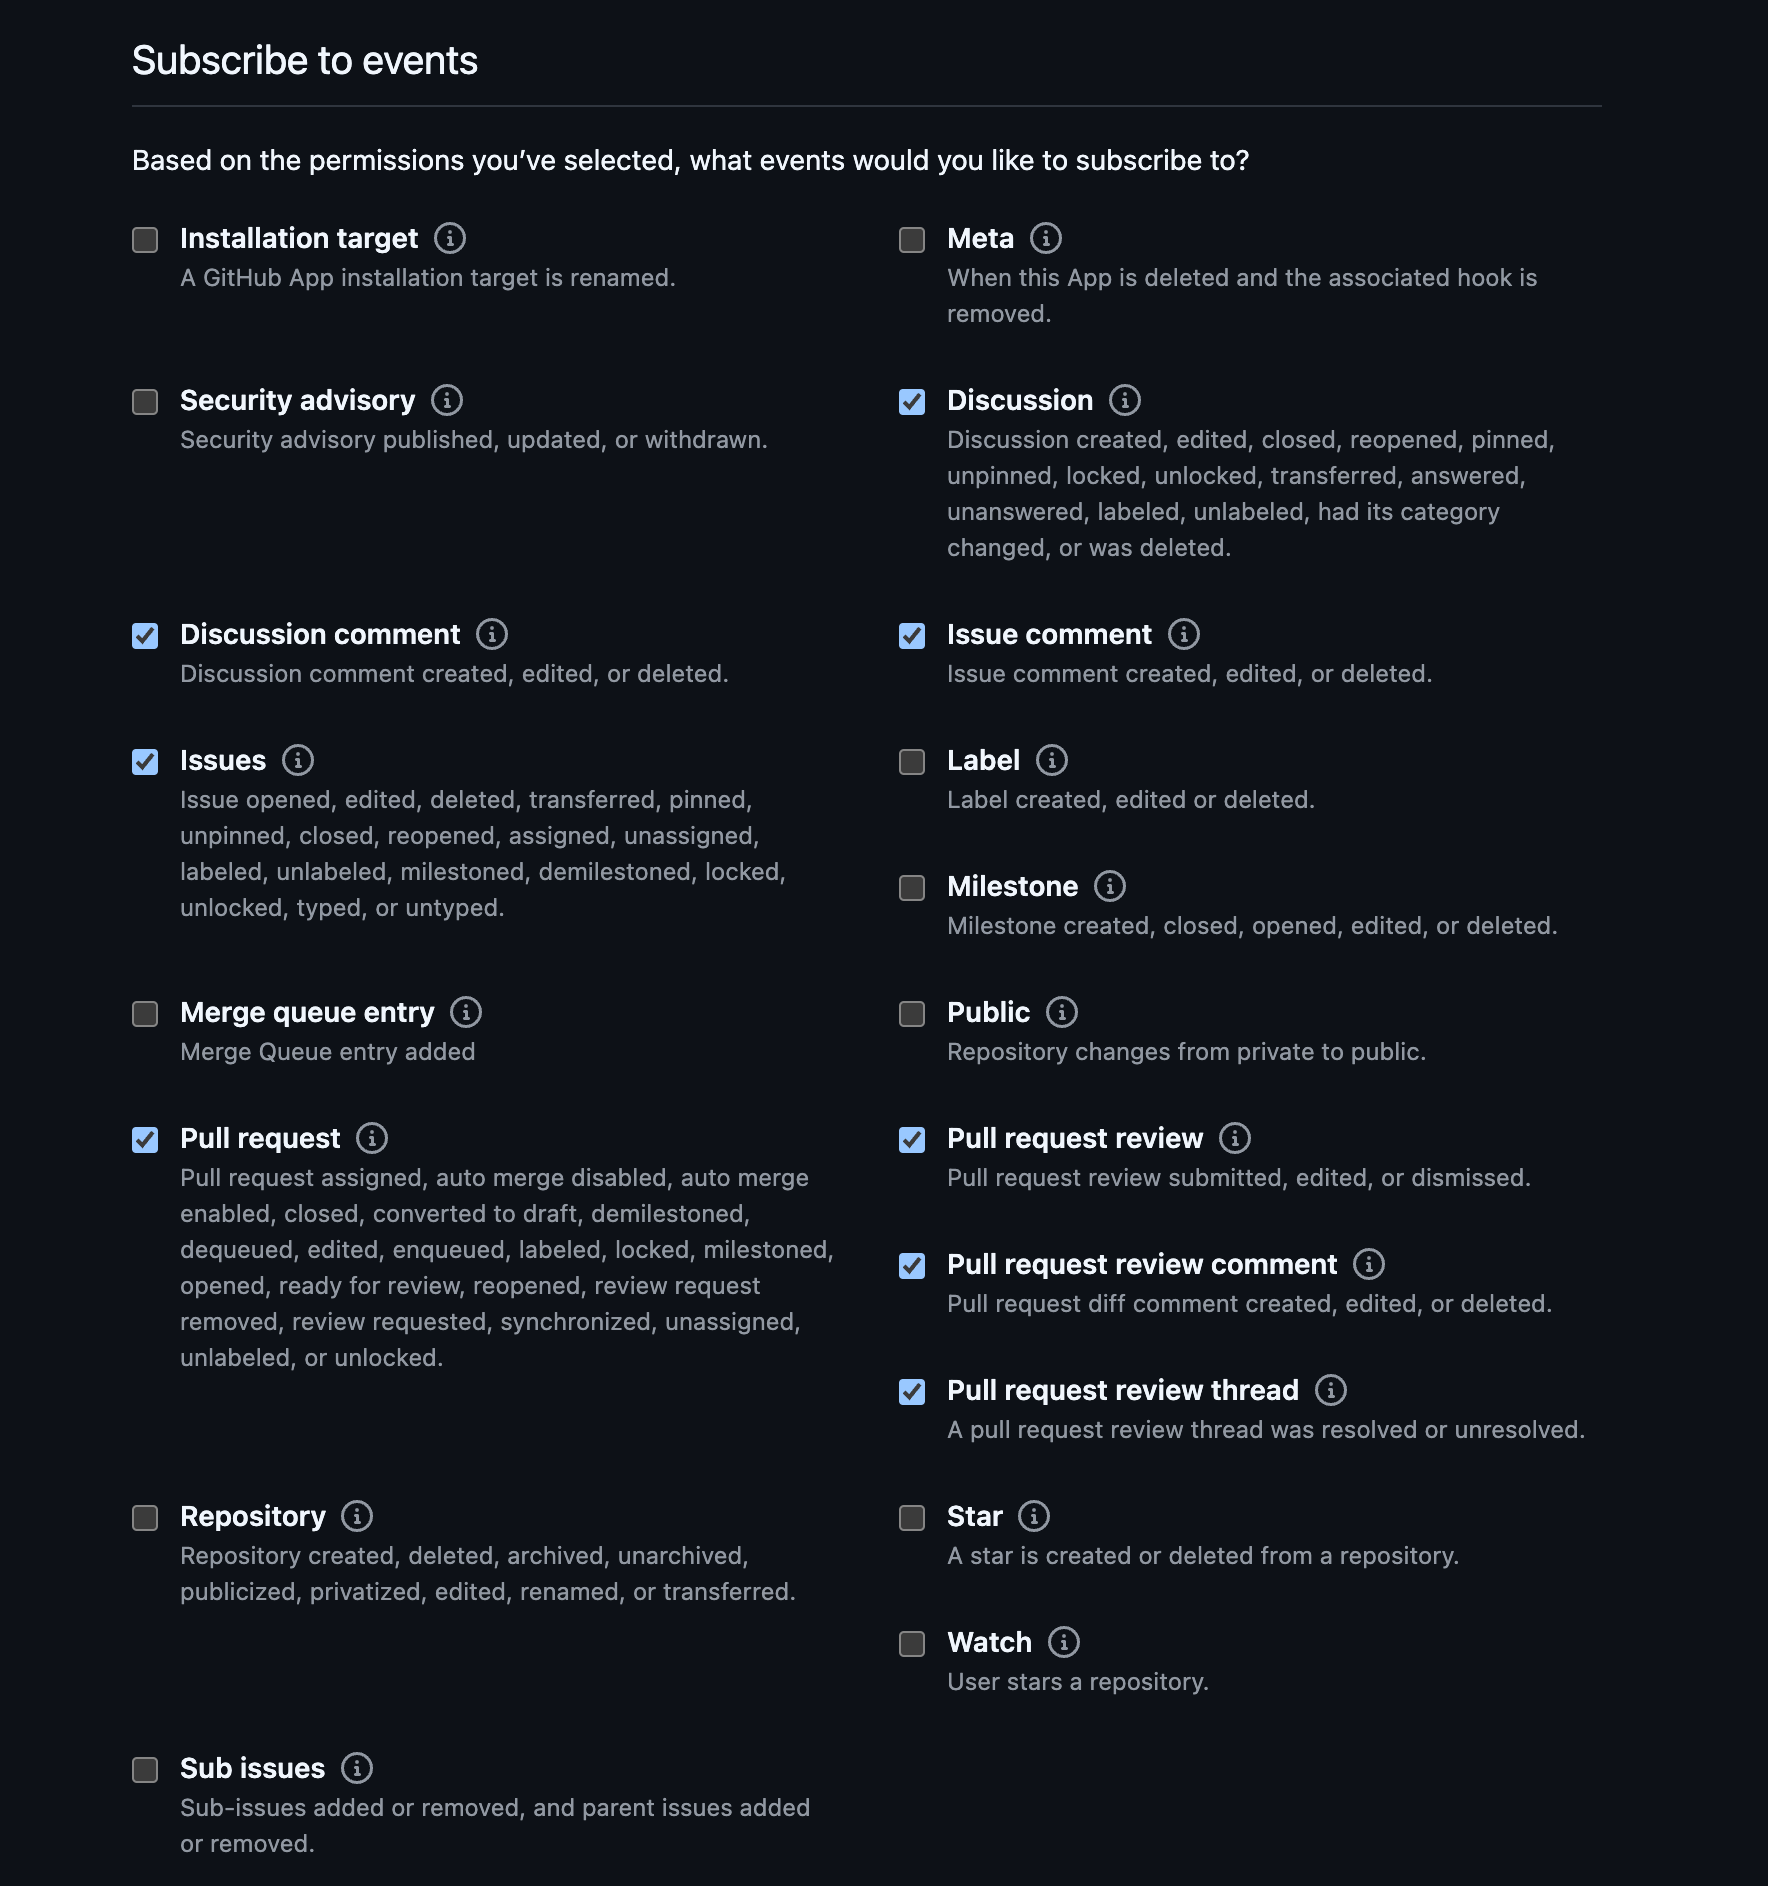
 12. Under "Subscribe to events", tick these:
* Discussion
* Discussion comment
* Issues
* Issue comment
* Pull request
* Pull request review
* Pull request review comment
* Pull request review thread
12. Under "Subscribe to events", tick these:
* Discussion
* Discussion comment
* Issues
* Issue comment
* Pull request
* Pull request review
* Pull request review comment
* Pull request review thread
 13. In the final section "Where can this GitHub App be installed?
", keep "Only on this account".
14. Then, create the app. This will take you to the app settings page.
15. Get the "Client ID" from this page and paste it in the **Client ID** field in the GitHub integration page on Gurubase.
16. Scroll down to the "Private keys" section on GitHub and click "Generate a private key" button. This will download the generated private key. Open the file in a text editor and copy the private key. Paste it in the **Private Key** field in the GitHub integration page on Gurubase.
17. On the left menu in GitHub, click "Install App" option. On the next page, click "Install" button and follow the instructions and install the app to your GitHub account by configuring the repository permissions and repositories.
You can also add/remove repositories to the app after it is installed as explained in the [Steps to Integrate](#steps-to-integrate) section.
18. Once done, it will take you to a page with URL `https://github.com/settings/installations/`. Get the installation ID from the URL and paste it in the **Installation ID** field in the GitHub integration page on Gurubase.
19. Now, open Gurubase and go to the GitHub integration page and click "Connect" button.
If you do not provide a webhook secret, it will not be checked even if it is configured on GitHub.
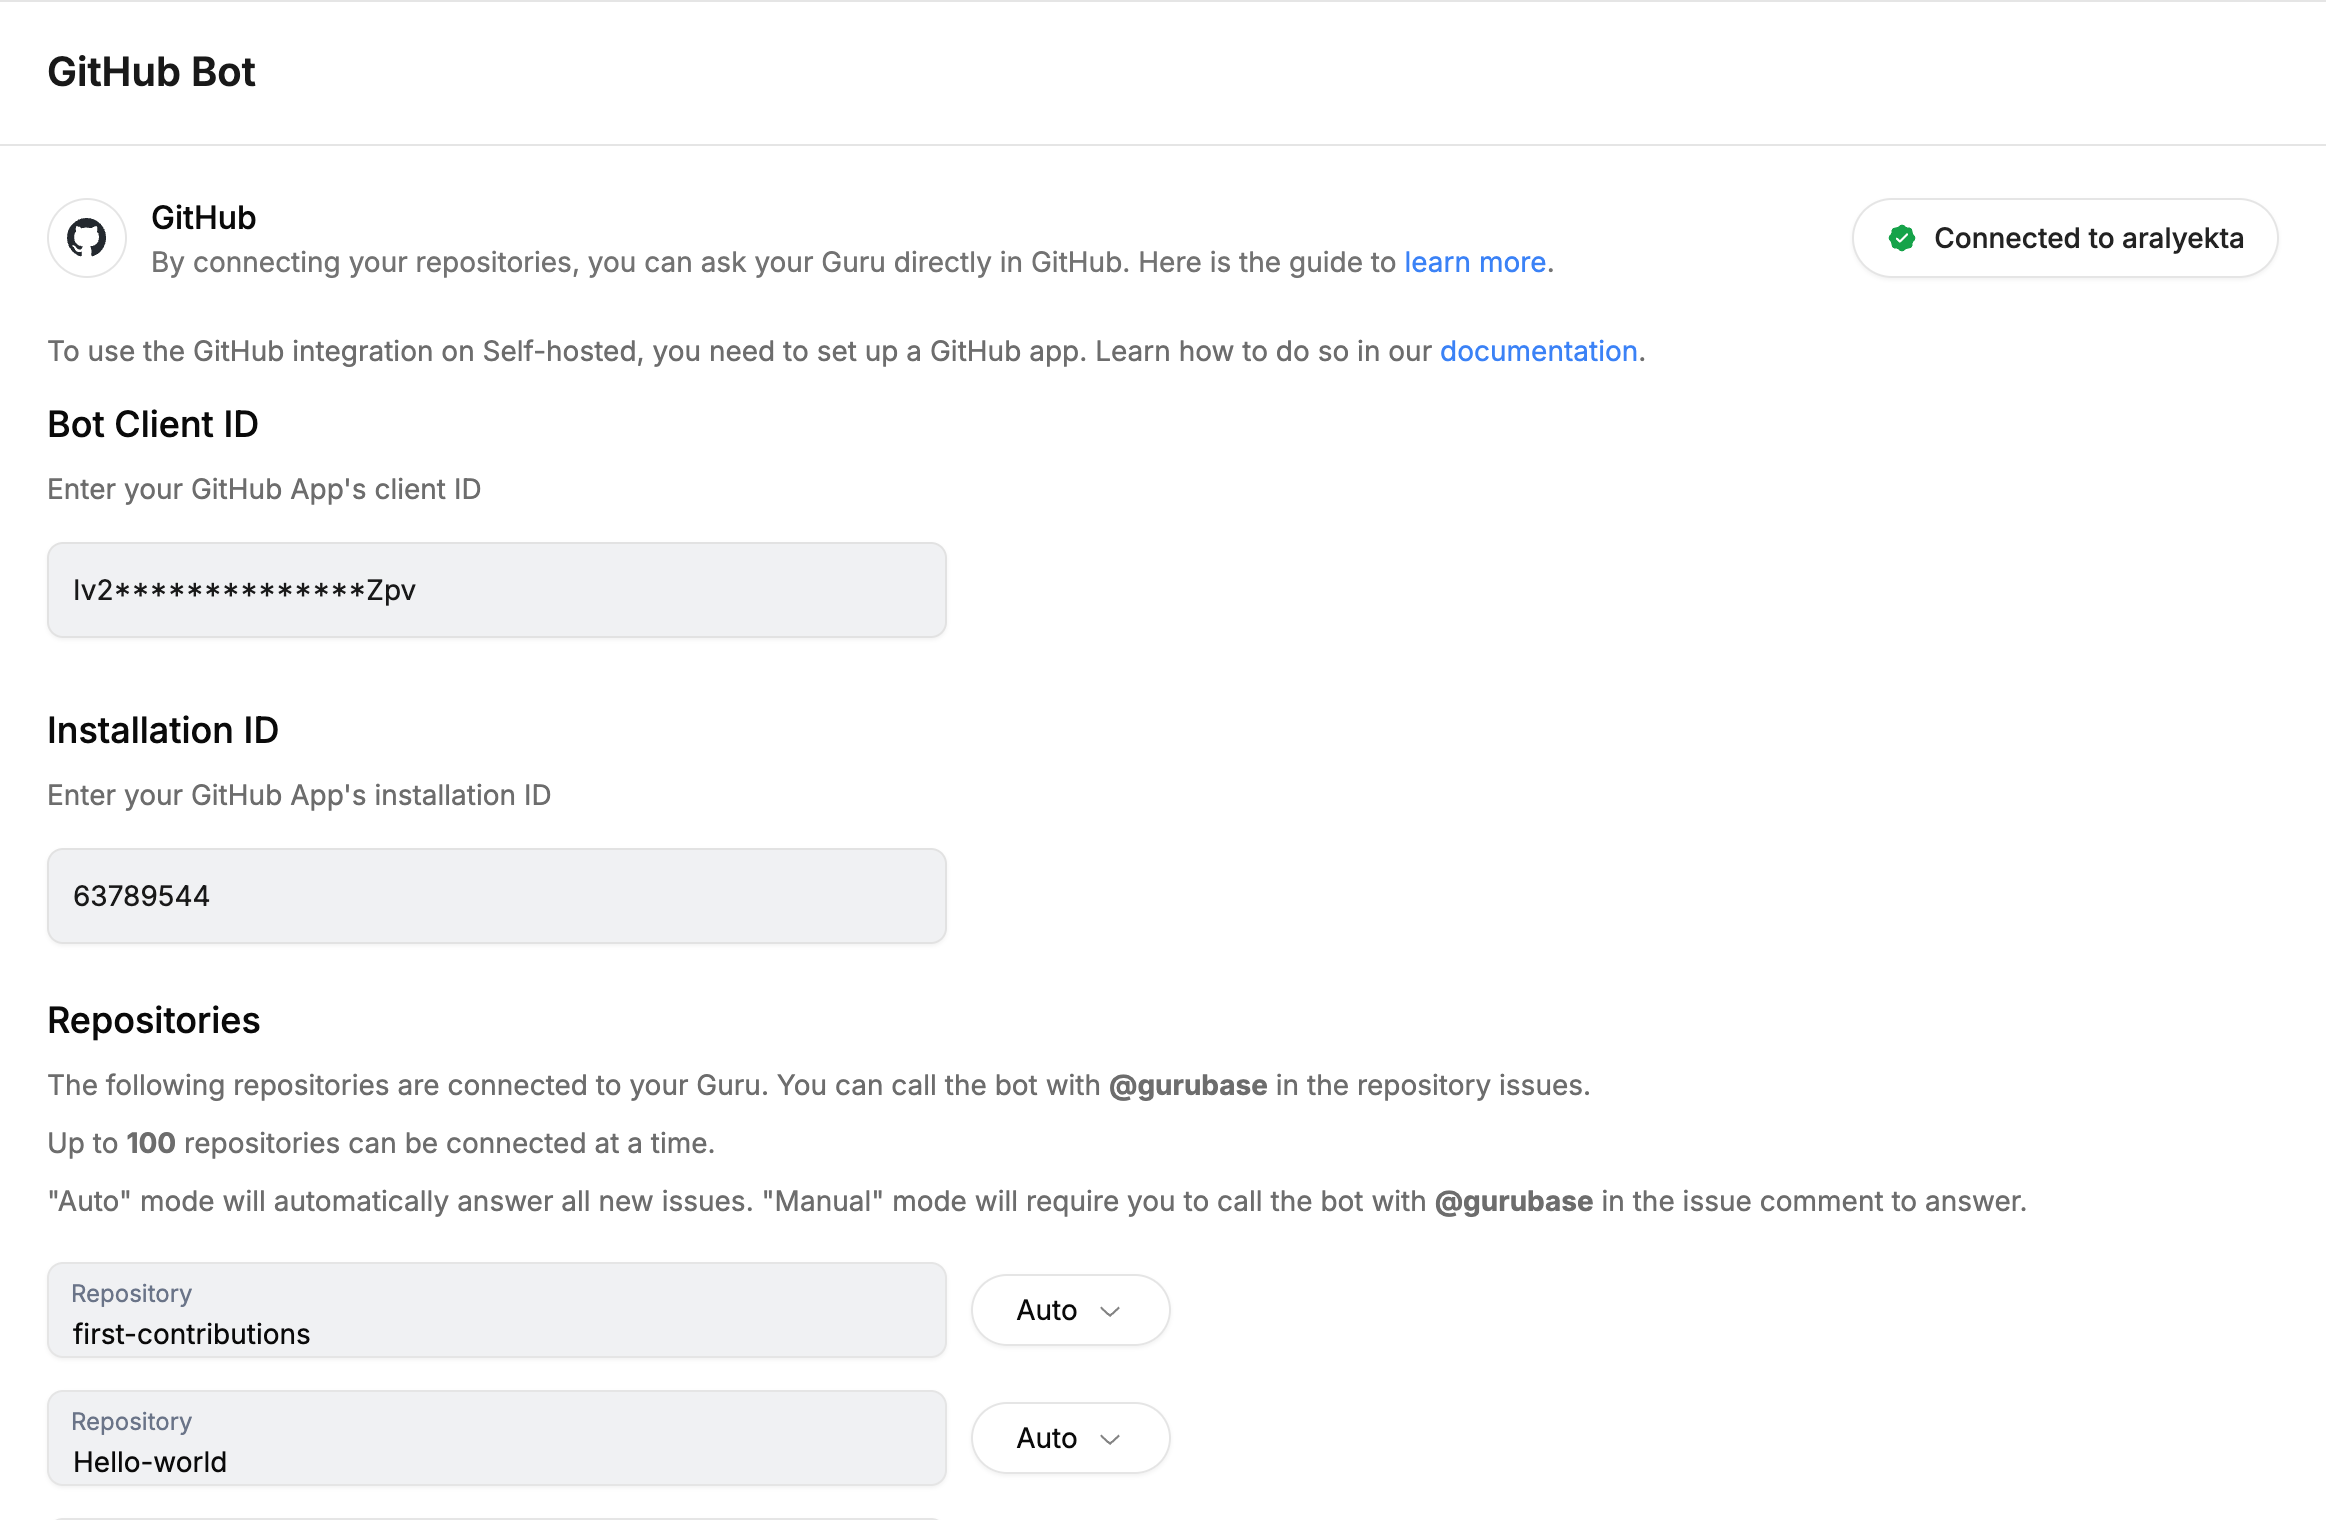
20. If everything is done correctly, you will see the repositories you have connected to Gurubase as shown below.
13. In the final section "Where can this GitHub App be installed?
", keep "Only on this account".
14. Then, create the app. This will take you to the app settings page.
15. Get the "Client ID" from this page and paste it in the **Client ID** field in the GitHub integration page on Gurubase.
16. Scroll down to the "Private keys" section on GitHub and click "Generate a private key" button. This will download the generated private key. Open the file in a text editor and copy the private key. Paste it in the **Private Key** field in the GitHub integration page on Gurubase.
17. On the left menu in GitHub, click "Install App" option. On the next page, click "Install" button and follow the instructions and install the app to your GitHub account by configuring the repository permissions and repositories.
You can also add/remove repositories to the app after it is installed as explained in the [Steps to Integrate](#steps-to-integrate) section.
18. Once done, it will take you to a page with URL `https://github.com/settings/installations/`. Get the installation ID from the URL and paste it in the **Installation ID** field in the GitHub integration page on Gurubase.
19. Now, open Gurubase and go to the GitHub integration page and click "Connect" button.
If you do not provide a webhook secret, it will not be checked even if it is configured on GitHub.
20. If everything is done correctly, you will see the repositories you have connected to Gurubase as shown below.
 21. You can follow the [Steps to Integrate](#steps-to-integrate) section to learn more about the usage of the bot.
***
## Next Steps
Add documentation the bot will reference
Add Gurubase to your Slack workspace
Add Gurubase to your Discord server
Embed Gurubase on your documentation site
21. You can follow the [Steps to Integrate](#steps-to-integrate) section to learn more about the usage of the bot.
***
## Next Steps
Add documentation the bot will reference
Add Gurubase to your Slack workspace
Add Gurubase to your Discord server
Embed Gurubase on your documentation site