> ## Documentation Index
> Fetch the complete documentation index at: https://docs.gurubase.ai/llms.txt
> Use this file to discover all available pages before exploring further.
# Microsoft Teams
> Ask your Guru directly in Microsoft Teams 1-1 chats and channels
## Introduction
Integrate Gurubase with Microsoft Teams to chat with your Guru in personal chats, group chats, and team channels. Unlike Slack and Discord (which use a single OAuth flow), Teams requires you to register your own bot in the Microsoft developer portal and paste its credentials into Gurubase. This guide walks through the full process step by step.
Each Gurubase guru needs its **own** Microsoft Teams bot. You cannot reuse one bot across multiple gurus — the bot id is how Gurubase routes incoming messages back to the correct guru. If you want a bot per product / per team, repeat this guide once per guru, each time creating a fresh bot in `dev.teams.microsoft.com`.
***
## Setup
Go to [dev.teams.microsoft.com](https://dev.teams.microsoft.com/apps) and sign in with the Microsoft account that owns the Teams tenant you'll deploy the bot to. You'll land on the **Apps** screen.
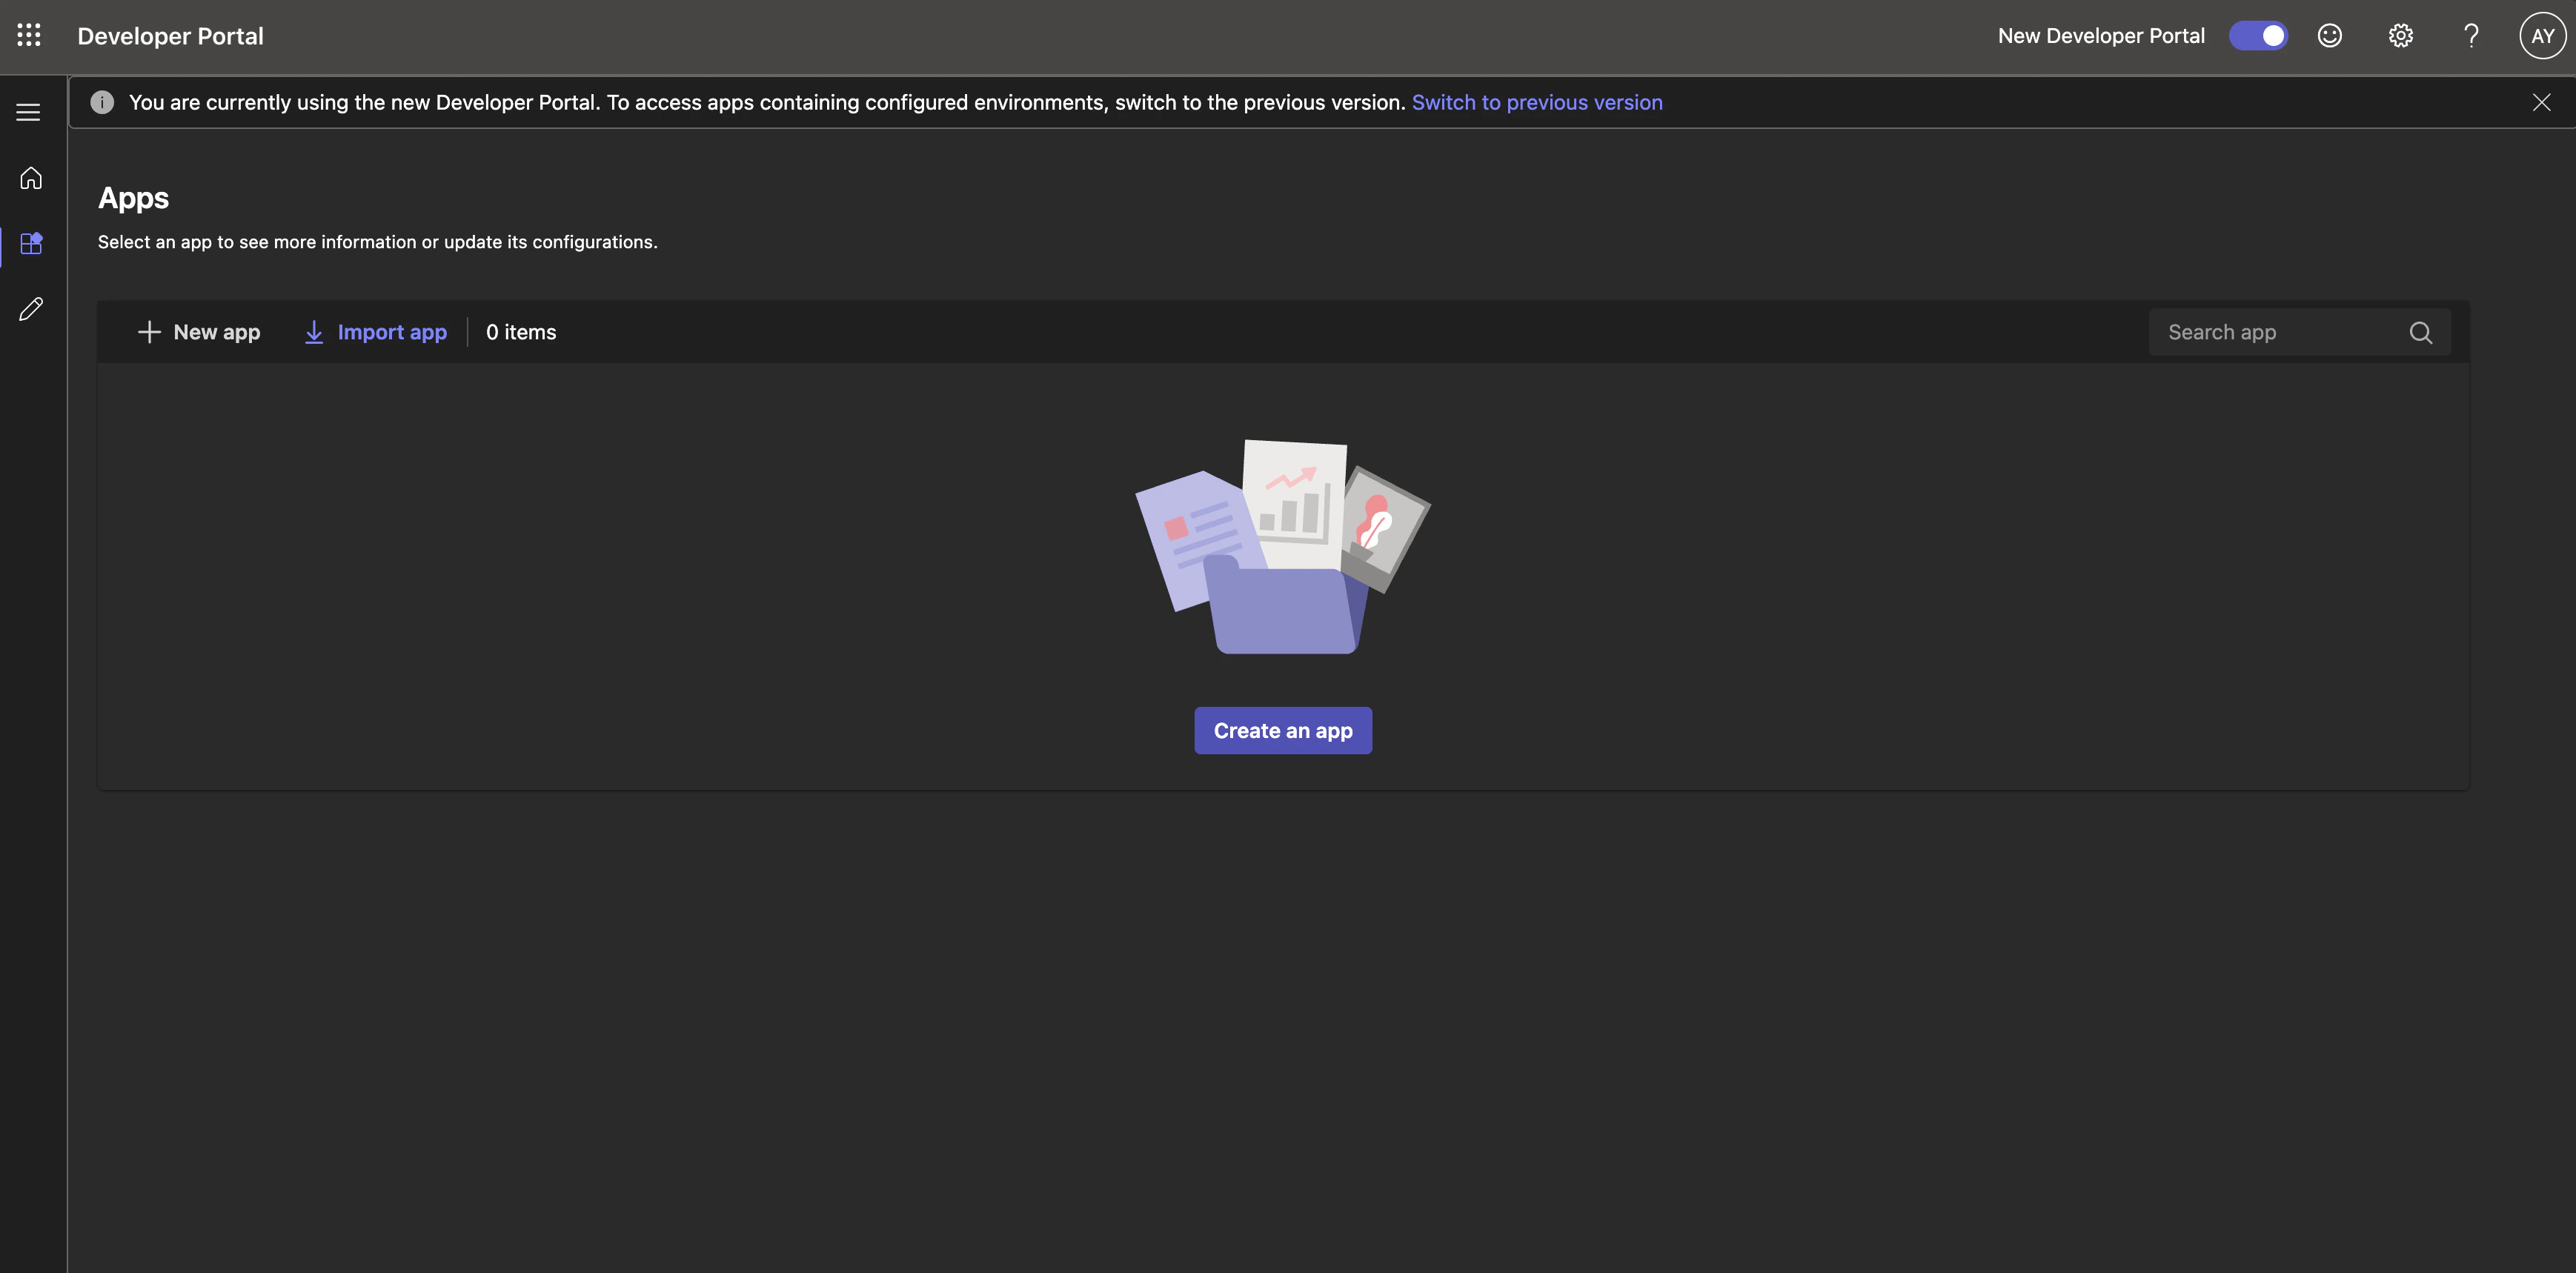 Click **+ New app**, give it a name (e.g. `Gurubase`), and create it.
In the left sidebar of your new app, open **App features**.
Click **+ New app**, give it a name (e.g. `Gurubase`), and create it.
In the left sidebar of your new app, open **App features**.
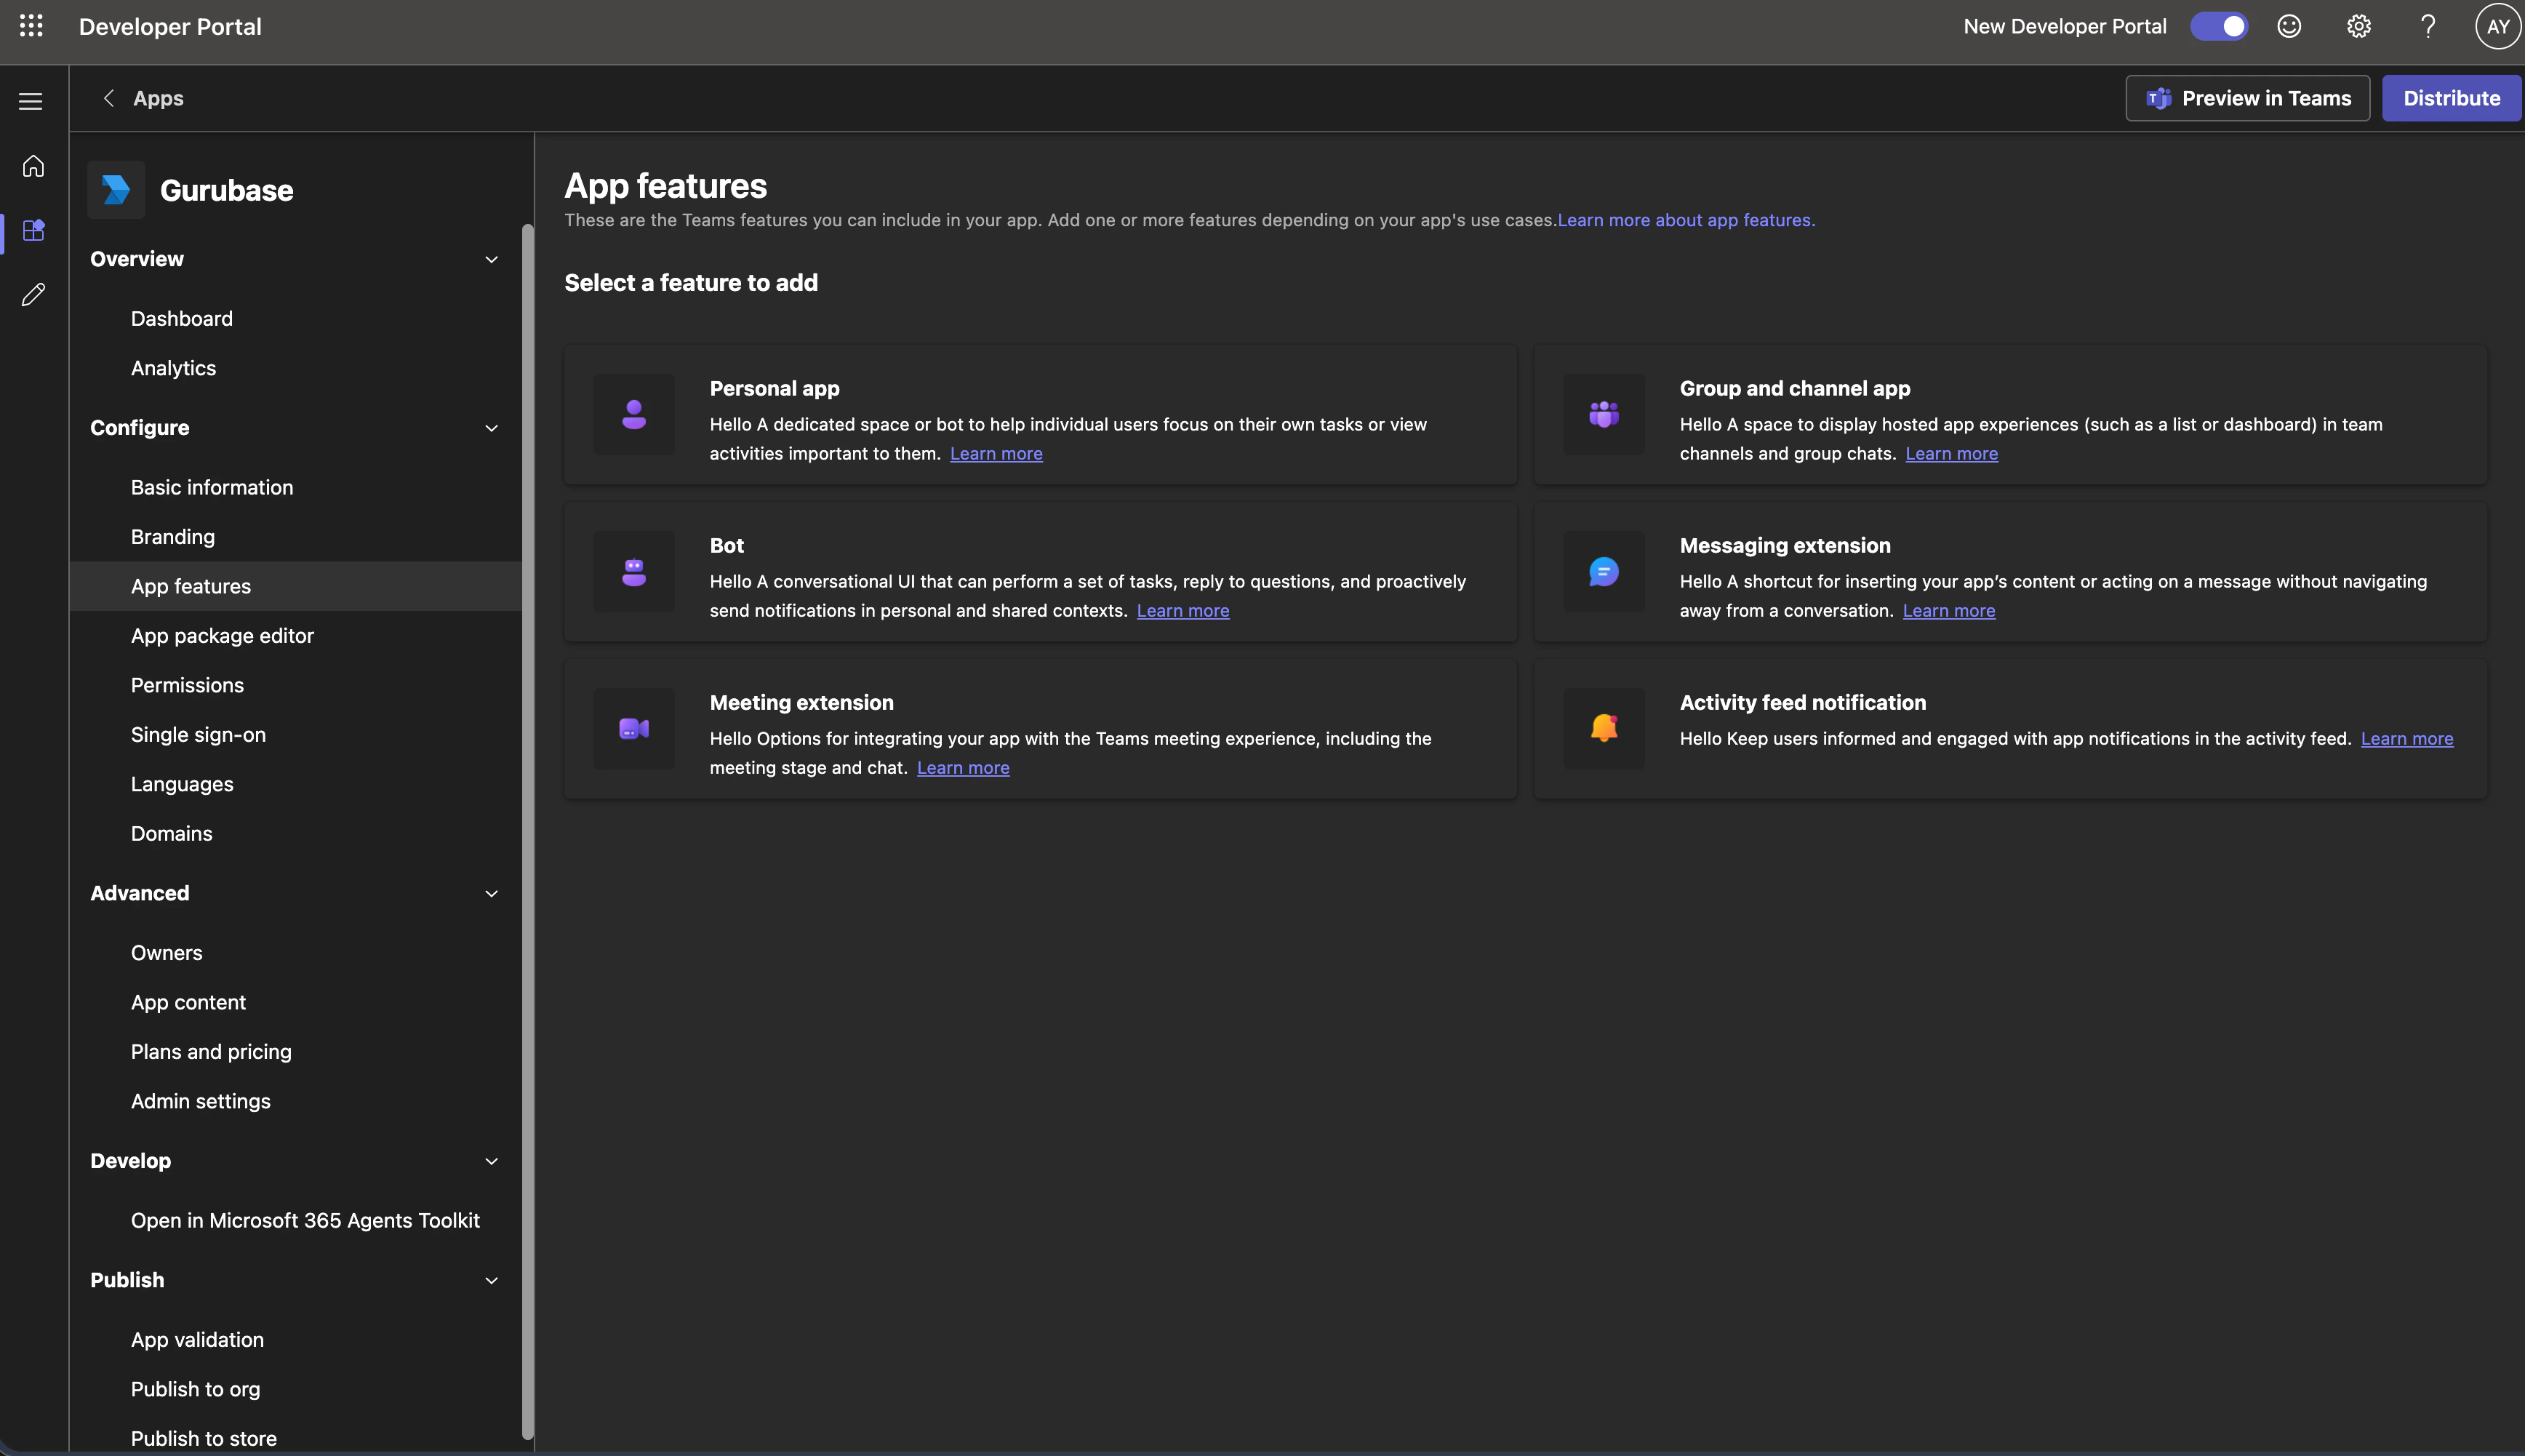 Click the **Bot** card.
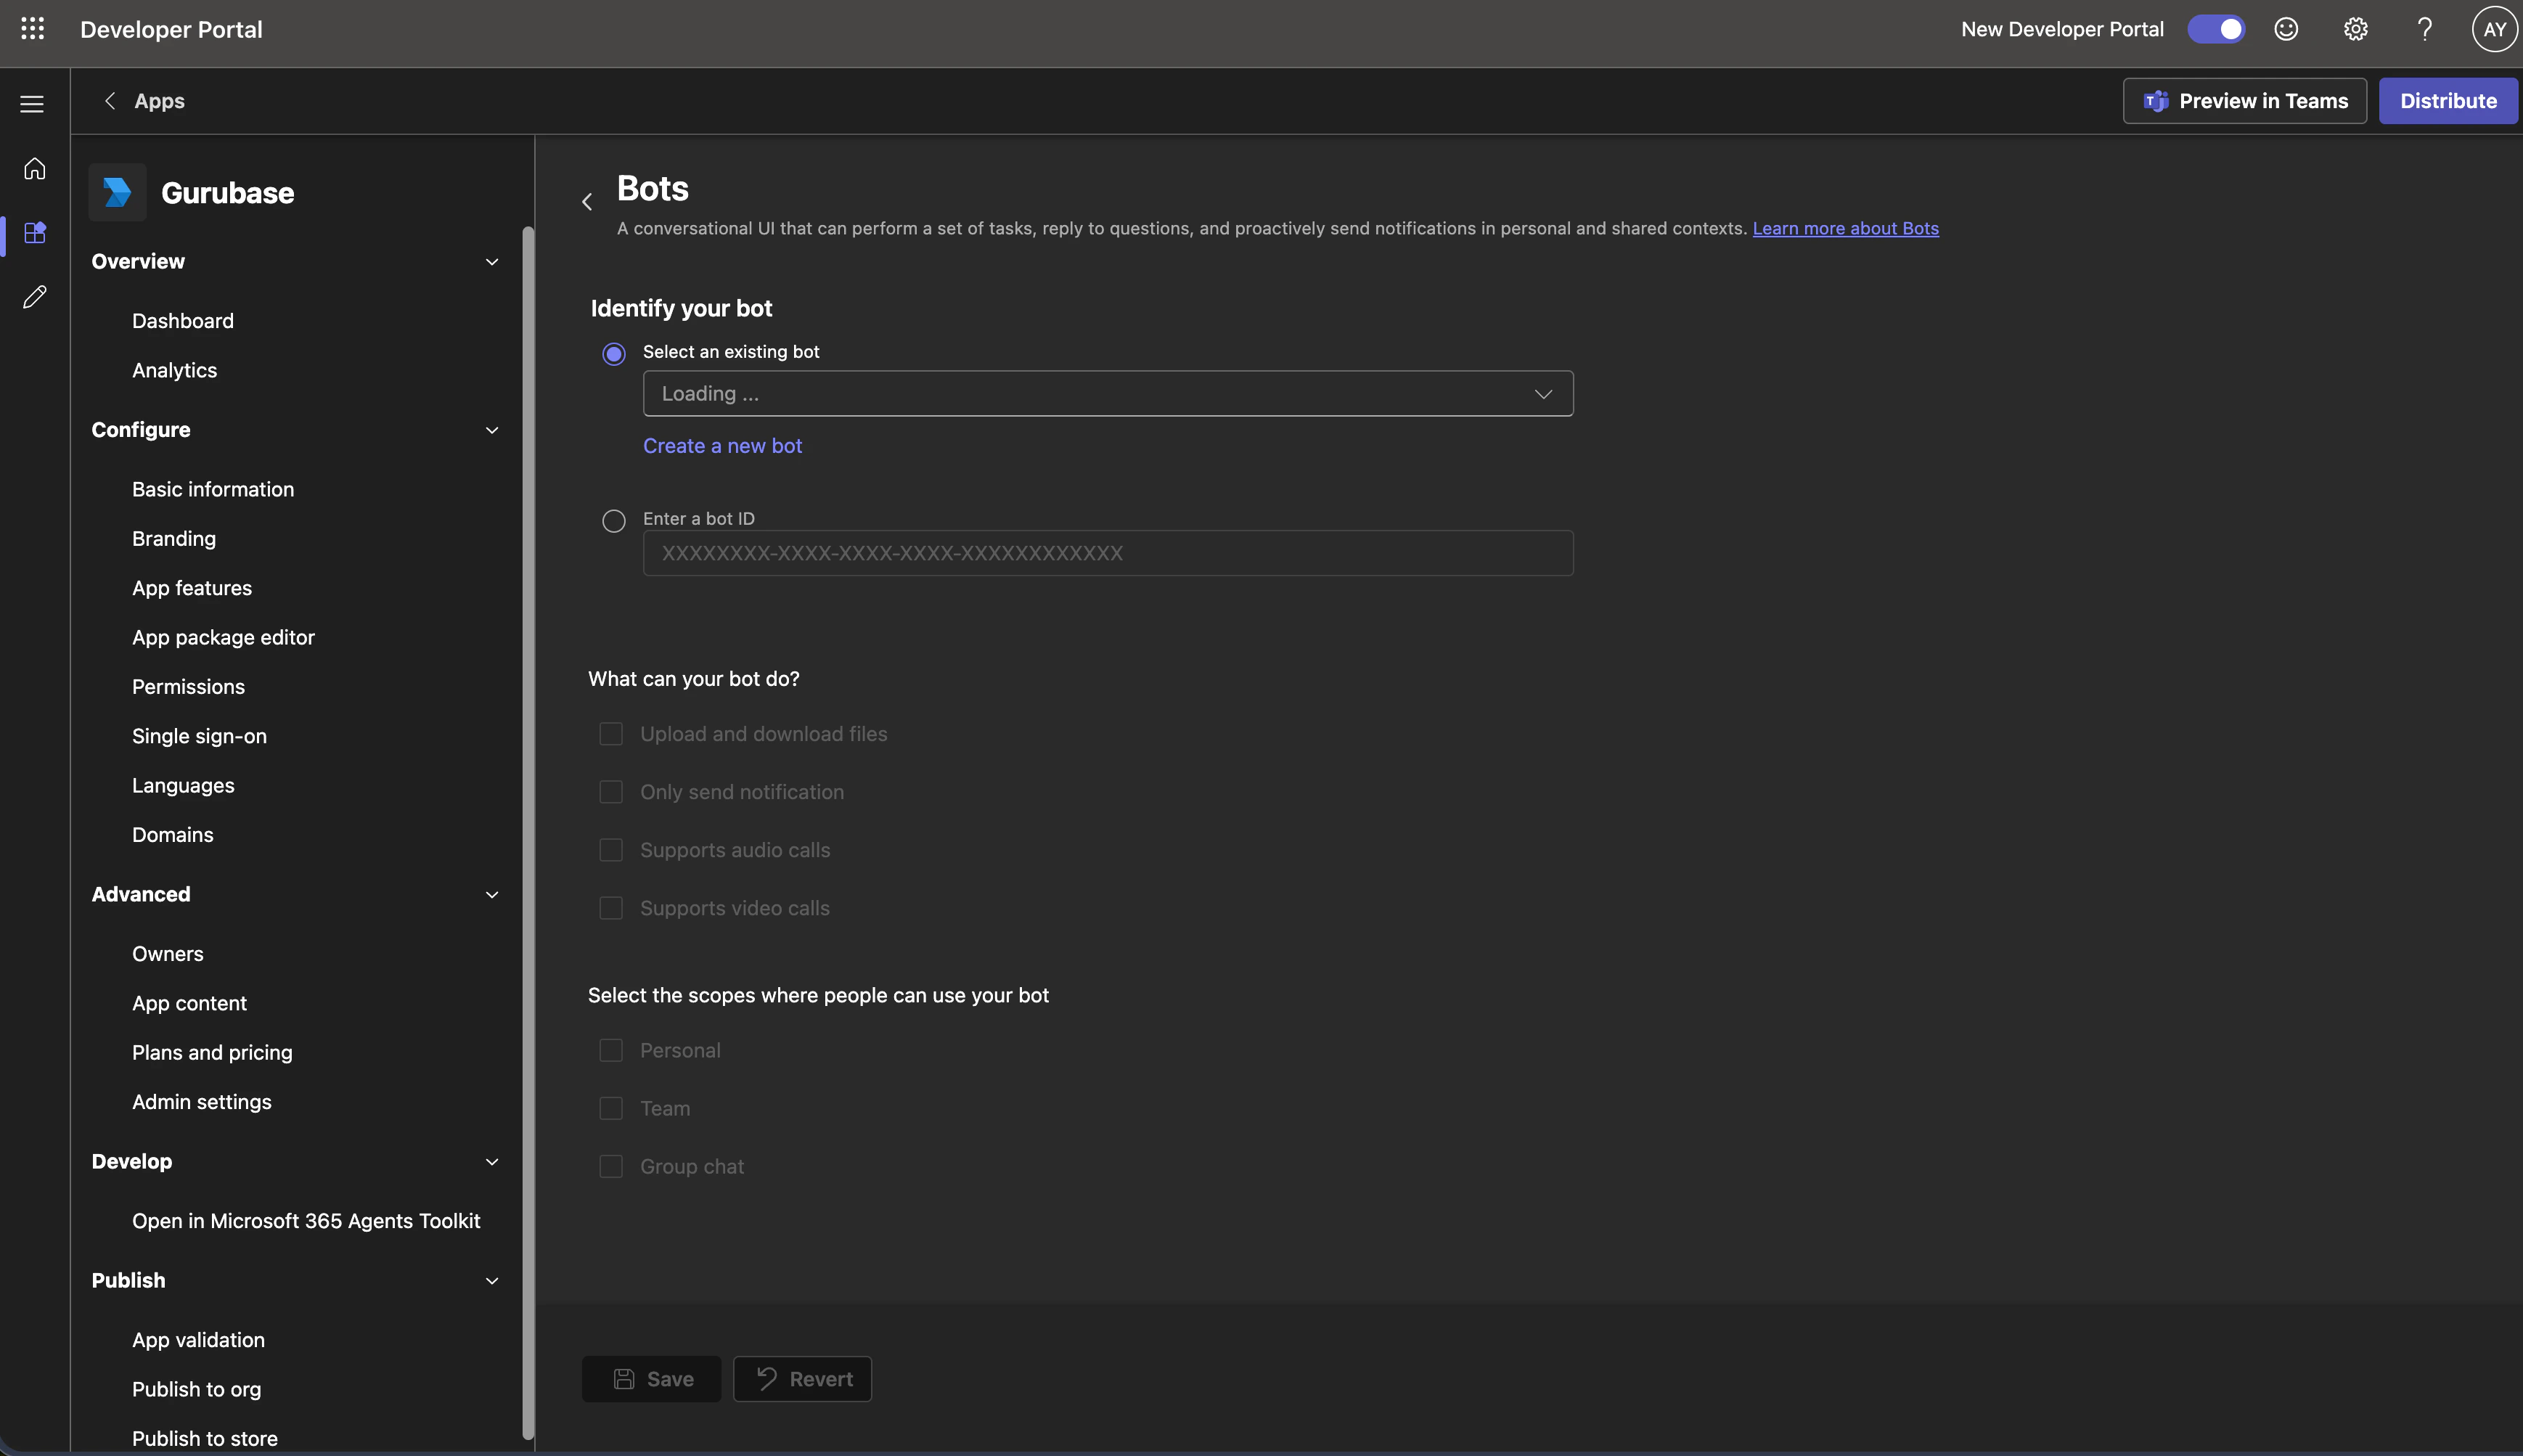
On the Bot configuration screen, click **Create a new bot**. Leave the capability checkboxes and scopes alone for now — you'll configure them in Step 6 after the bot exists.
Click the **Bot** card.
On the Bot configuration screen, click **Create a new bot**. Leave the capability checkboxes and scopes alone for now — you'll configure them in Step 6 after the bot exists.
 You'll land on the **Bot management** page (a list of your bots). Click **+ New bot** in the top toolbar, give it a name, and confirm.
You'll be redirected to a URL like `https://dev.teams.microsoft.com/tools/bots//configure`. The GUID in the URL is your **Bot ID** — copy it somewhere safe.
On the bot configuration page you've been redirected to:
You'll land on the **Bot management** page (a list of your bots). Click **+ New bot** in the top toolbar, give it a name, and confirm.
You'll be redirected to a URL like `https://dev.teams.microsoft.com/tools/bots//configure`. The GUID in the URL is your **Bot ID** — copy it somewhere safe.
On the bot configuration page you've been redirected to:
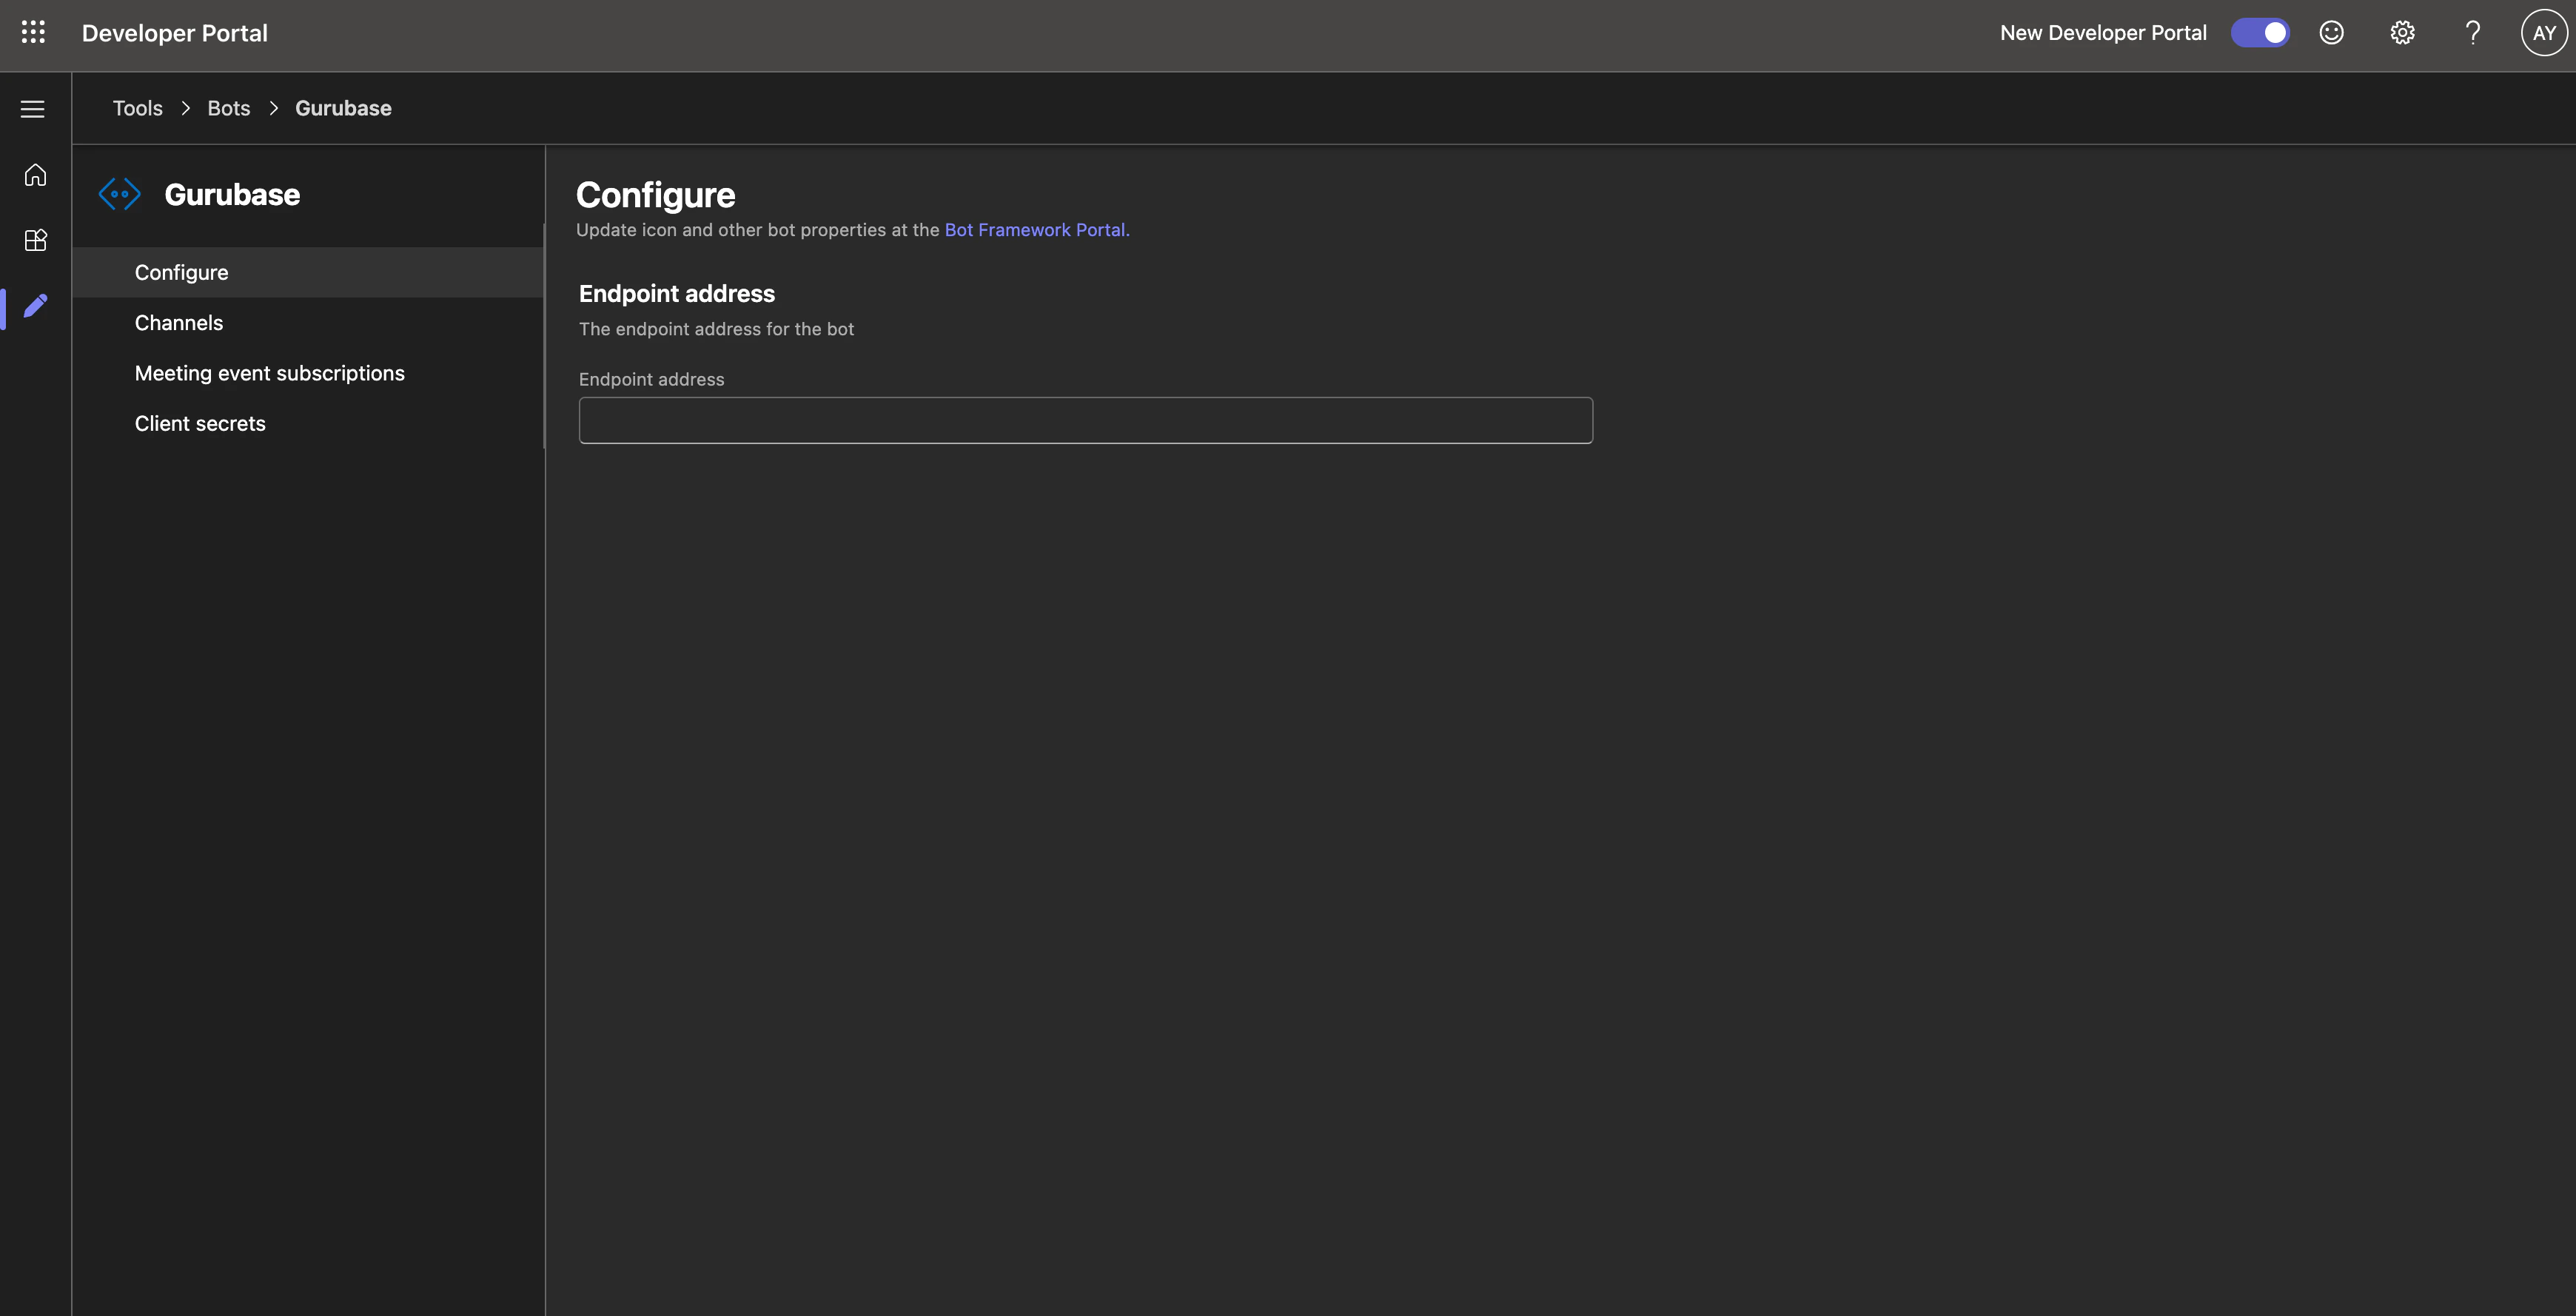 In a separate tab, open the Gurubase integration page (Step 13 below) and copy the **Messaging Endpoint** shown there. Paste it into the **Endpoint address** field and click **Save**.
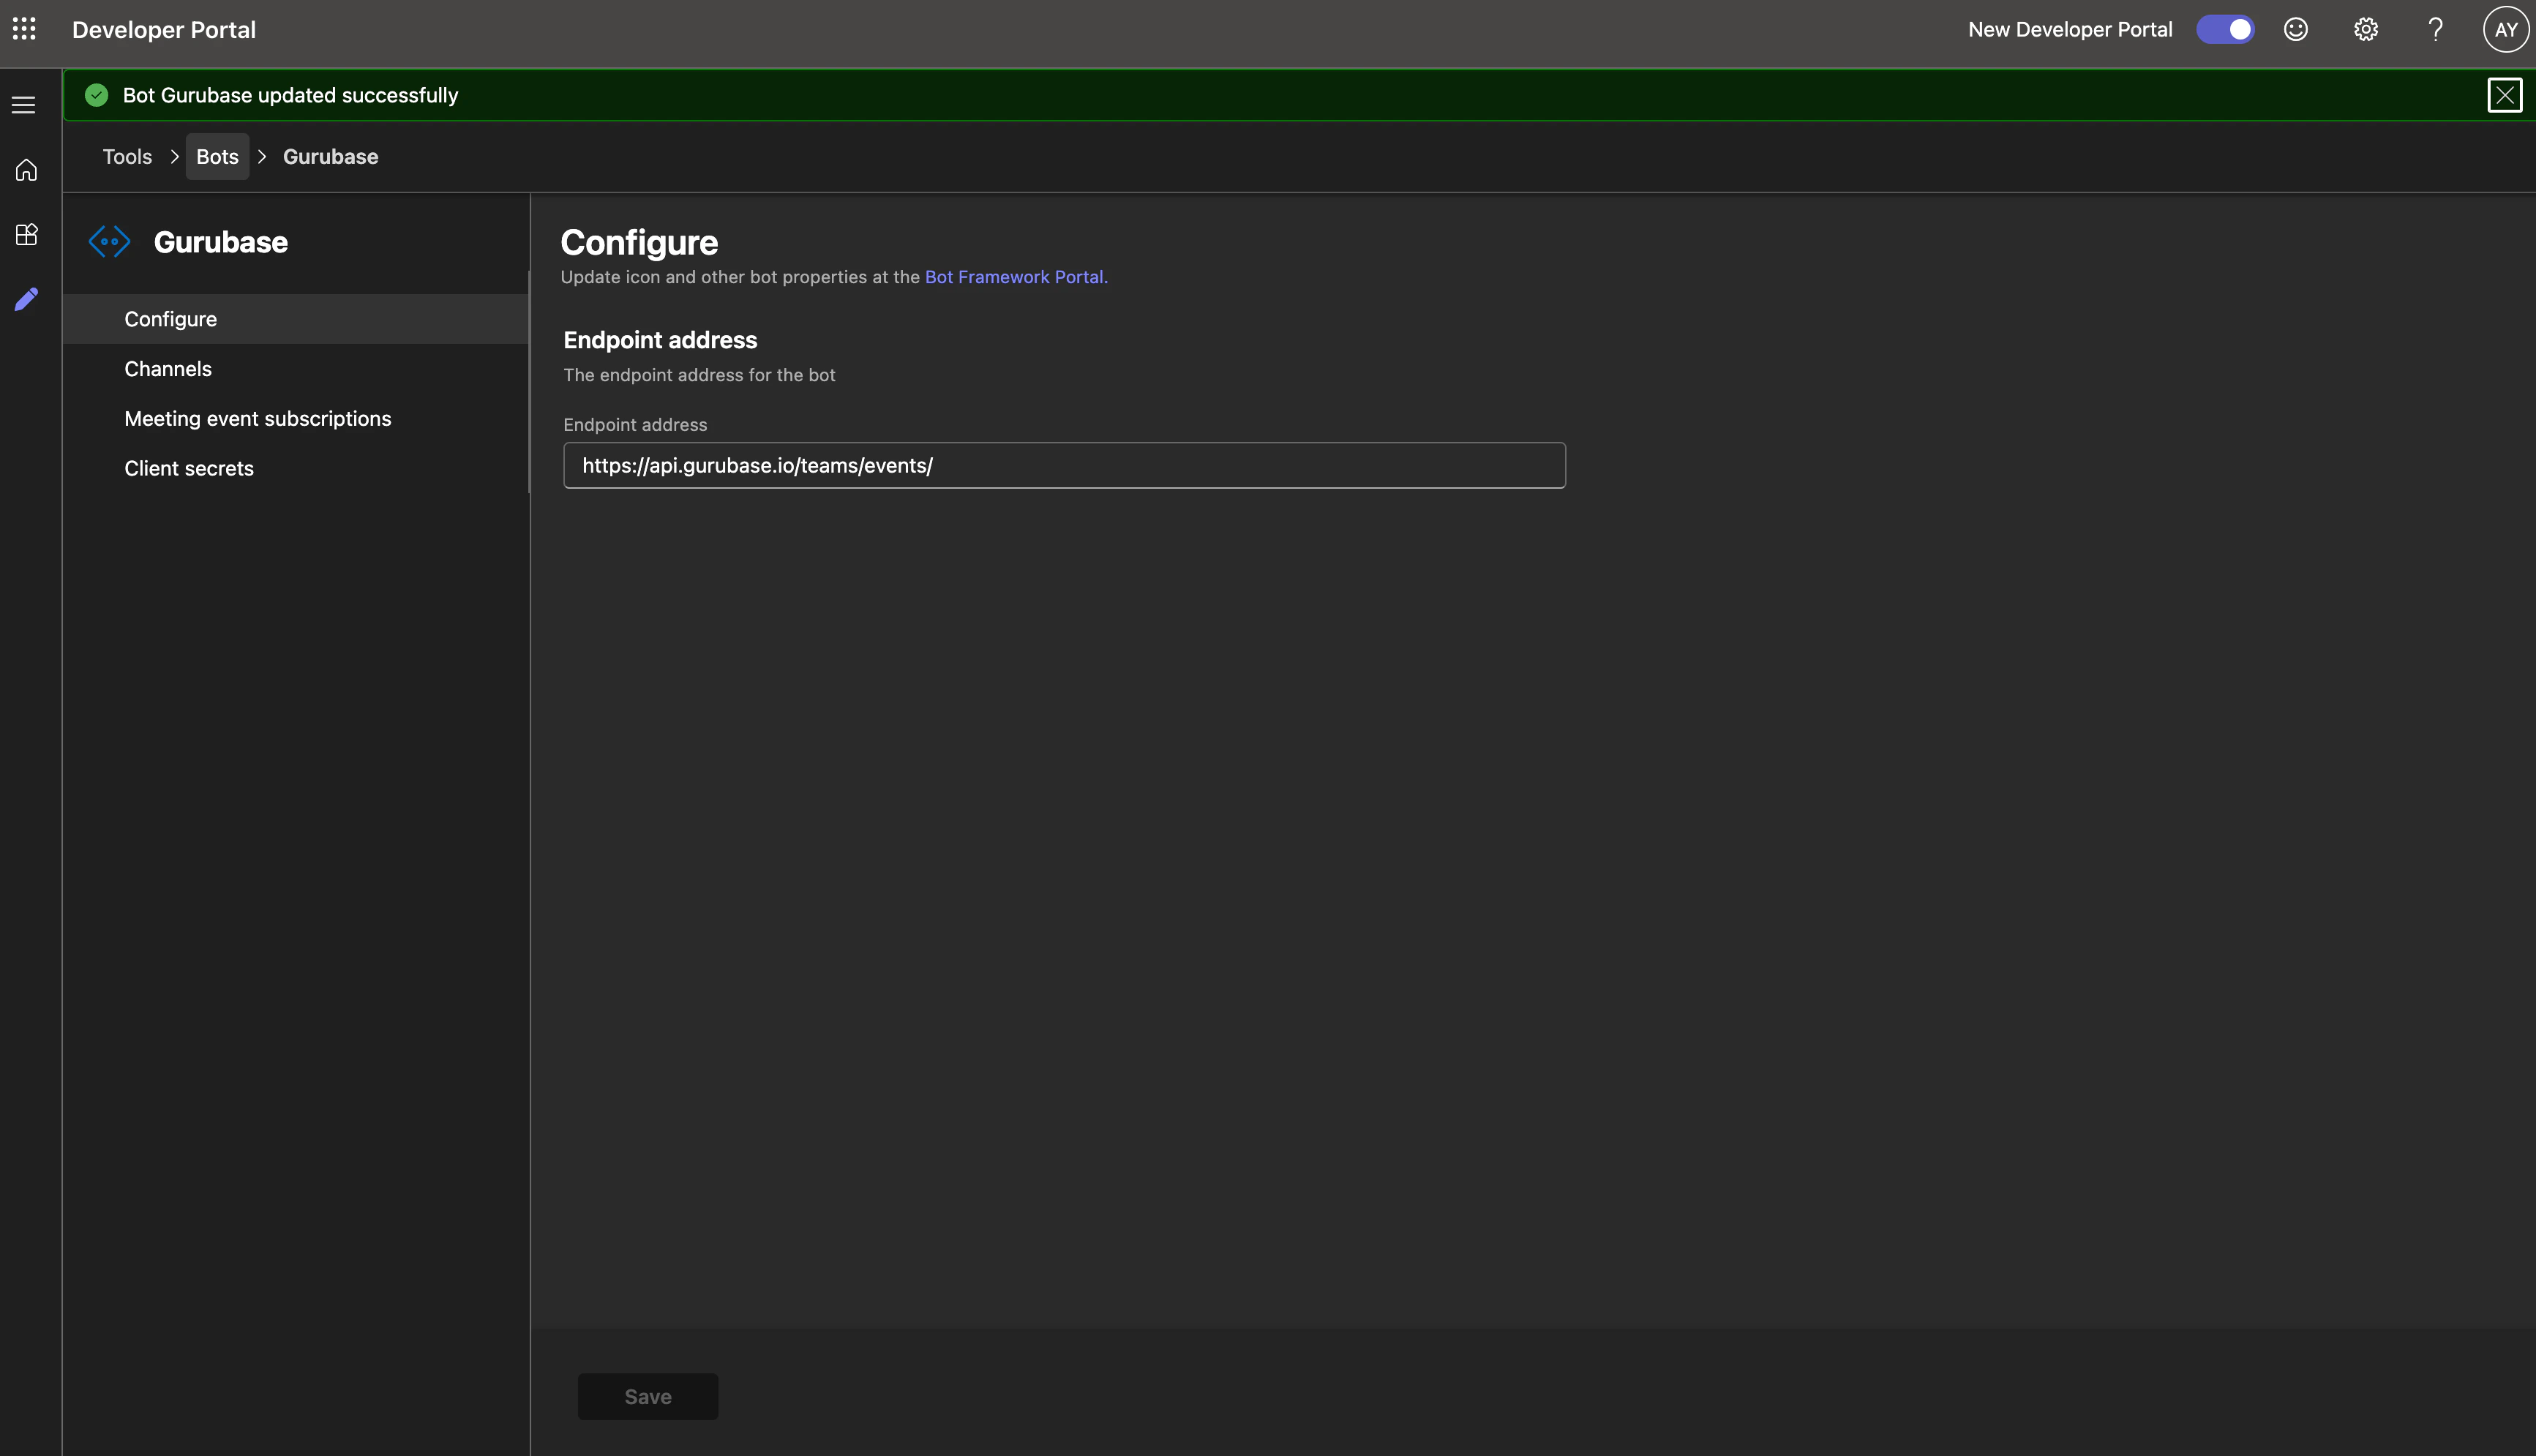 **Self-hosted users:** Teams delivers every message to Gurubase as a webhook, so the messaging endpoint must be reachable from Microsoft's servers on the public internet. A `localhost` or private LAN address (`192.168.x.x`, `10.x.x.x`, etc.) will not work. You only need to expose your Gurubase **frontend** publicly — requests are routed internally from there to the backend. If your frontend isn't already public, front it with a tunnel like [ngrok](https://ngrok.com) or [Cloudflare Tunnel](https://developers.cloudflare.com/cloudflare-one/connections/connect-networks/) and replace the host prefix before `/api/...` in the Gurubase-provided messaging endpoint with your tunnel URL.
In the same bot configuration sidebar, open **Client secrets** → **Create your first client secret**.
**Self-hosted users:** Teams delivers every message to Gurubase as a webhook, so the messaging endpoint must be reachable from Microsoft's servers on the public internet. A `localhost` or private LAN address (`192.168.x.x`, `10.x.x.x`, etc.) will not work. You only need to expose your Gurubase **frontend** publicly — requests are routed internally from there to the backend. If your frontend isn't already public, front it with a tunnel like [ngrok](https://ngrok.com) or [Cloudflare Tunnel](https://developers.cloudflare.com/cloudflare-one/connections/connect-networks/) and replace the host prefix before `/api/...` in the Gurubase-provided messaging endpoint with your tunnel URL.
In the same bot configuration sidebar, open **Client secrets** → **Create your first client secret**.
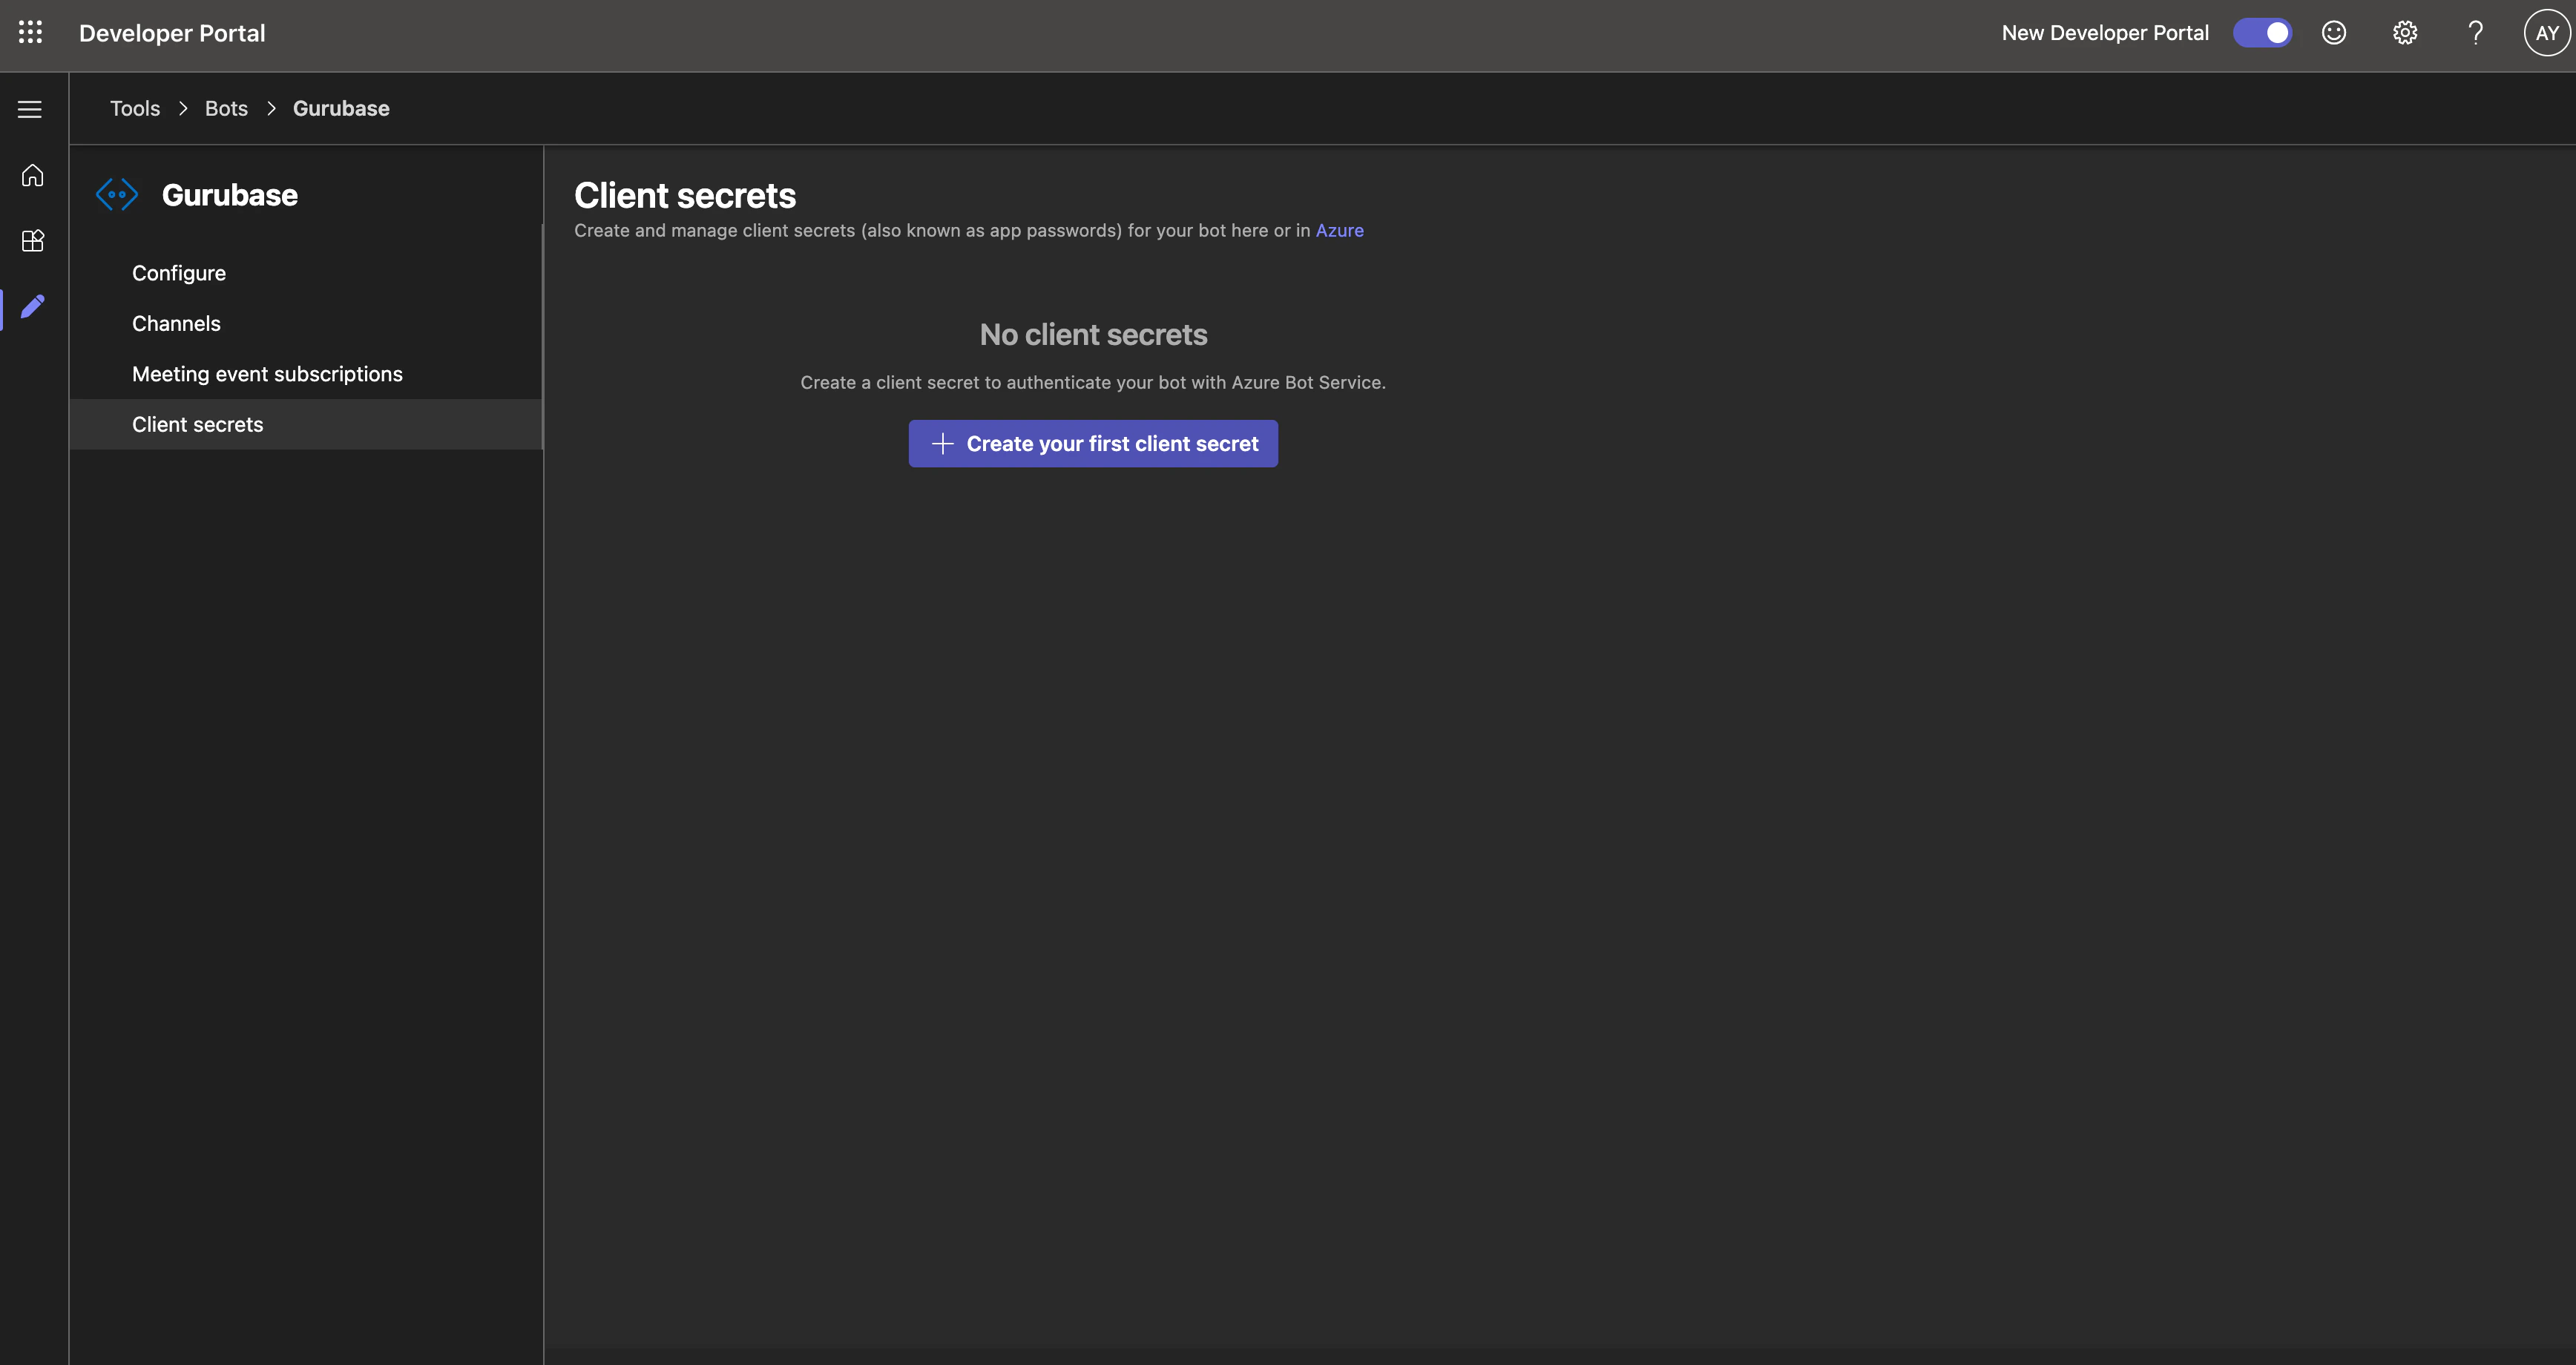 The portal will show the secret **Value** once, right after creation. **Copy the Value immediately** — not the Secret ID. If you miss it, generate another and copy the new one.
Go back to **App features** → **Bot** in your app and refresh the page. The **Select an existing bot** dropdown will now list the bot you just created — pick it.
The portal will show the secret **Value** once, right after creation. **Copy the Value immediately** — not the Secret ID. If you miss it, generate another and copy the new one.
Go back to **App features** → **Bot** in your app and refresh the page. The **Select an existing bot** dropdown will now list the bot you just created — pick it.
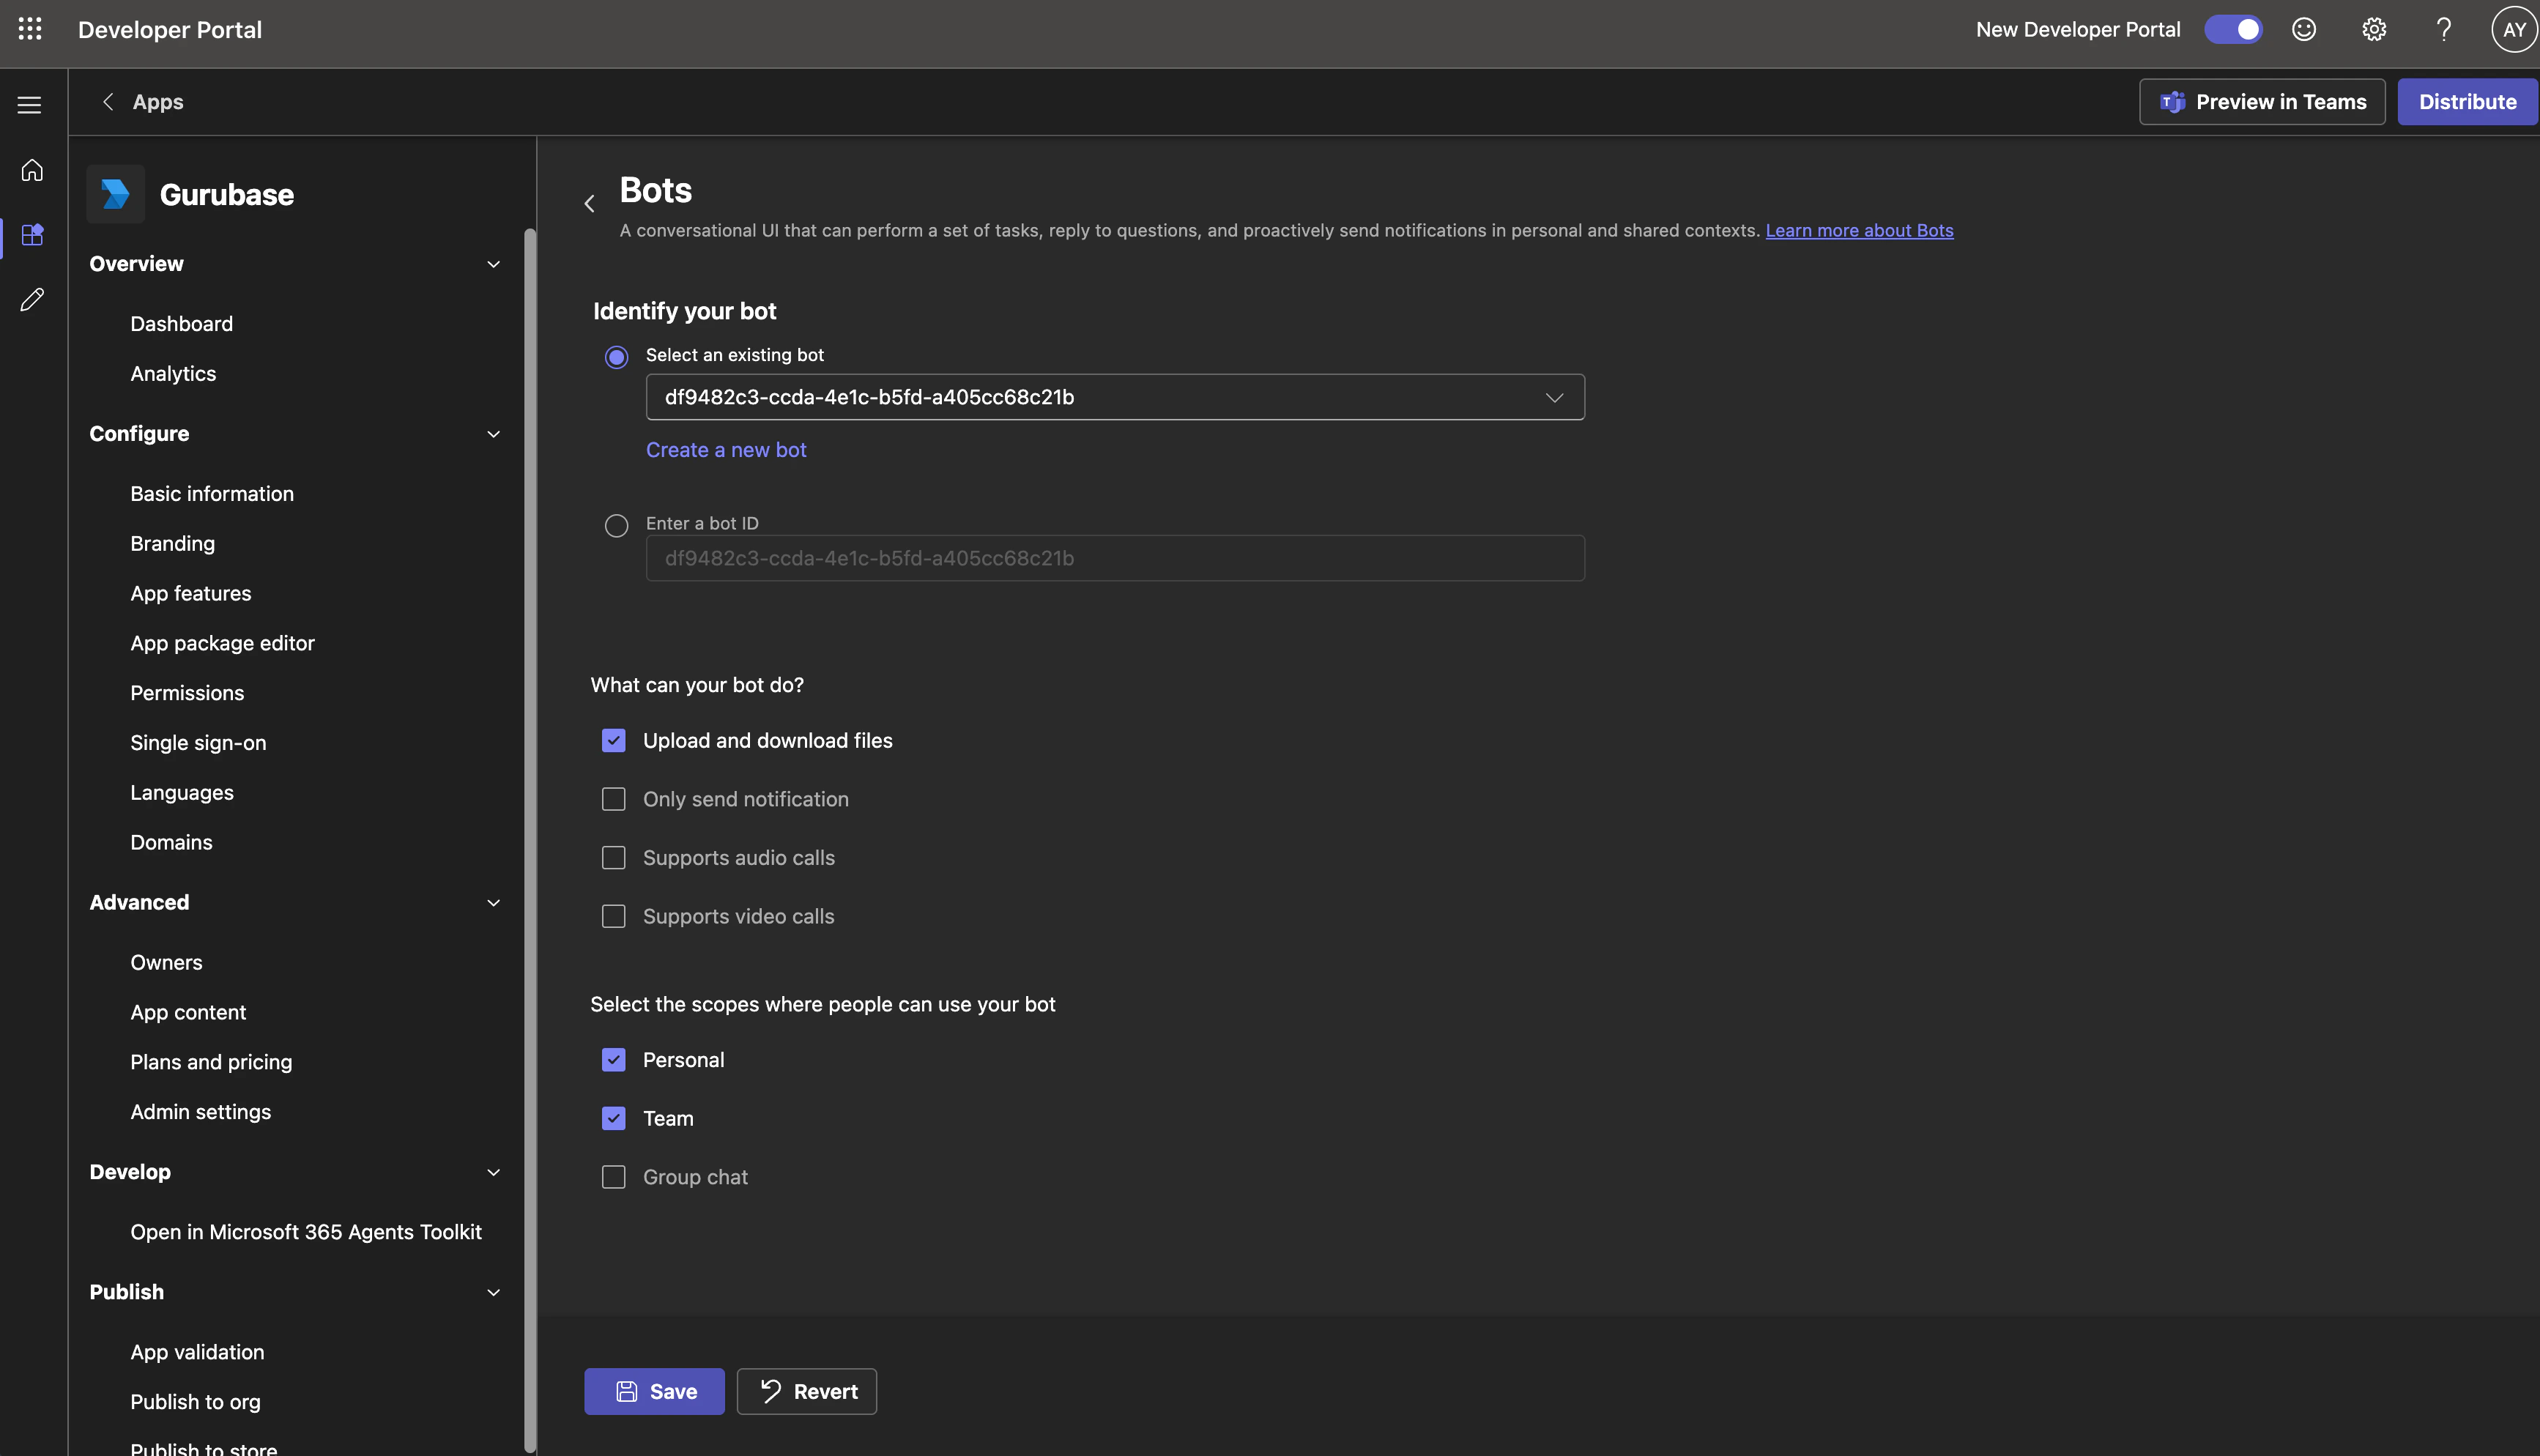 Now configure the bot's capabilities on this screen:
1. Under **What can your bot do?**, check **Upload and download files** (required for PDF / log / img attachments in 1-1 DMs).
2. Under **Select the scopes where people can use your bot**, check **Personal** and **Team**.
Click **Save**.
Open **Basic information** in the left sidebar. Fill in the required fields (descriptions, version, developer info, privacy URL, terms URL). All fields marked with `*` must be set before the app can be published.
Now configure the bot's capabilities on this screen:
1. Under **What can your bot do?**, check **Upload and download files** (required for PDF / log / img attachments in 1-1 DMs).
2. Under **Select the scopes where people can use your bot**, check **Personal** and **Team**.
Click **Save**.
Open **Basic information** in the left sidebar. Fill in the required fields (descriptions, version, developer info, privacy URL, terms URL). All fields marked with `*` must be set before the app can be published.
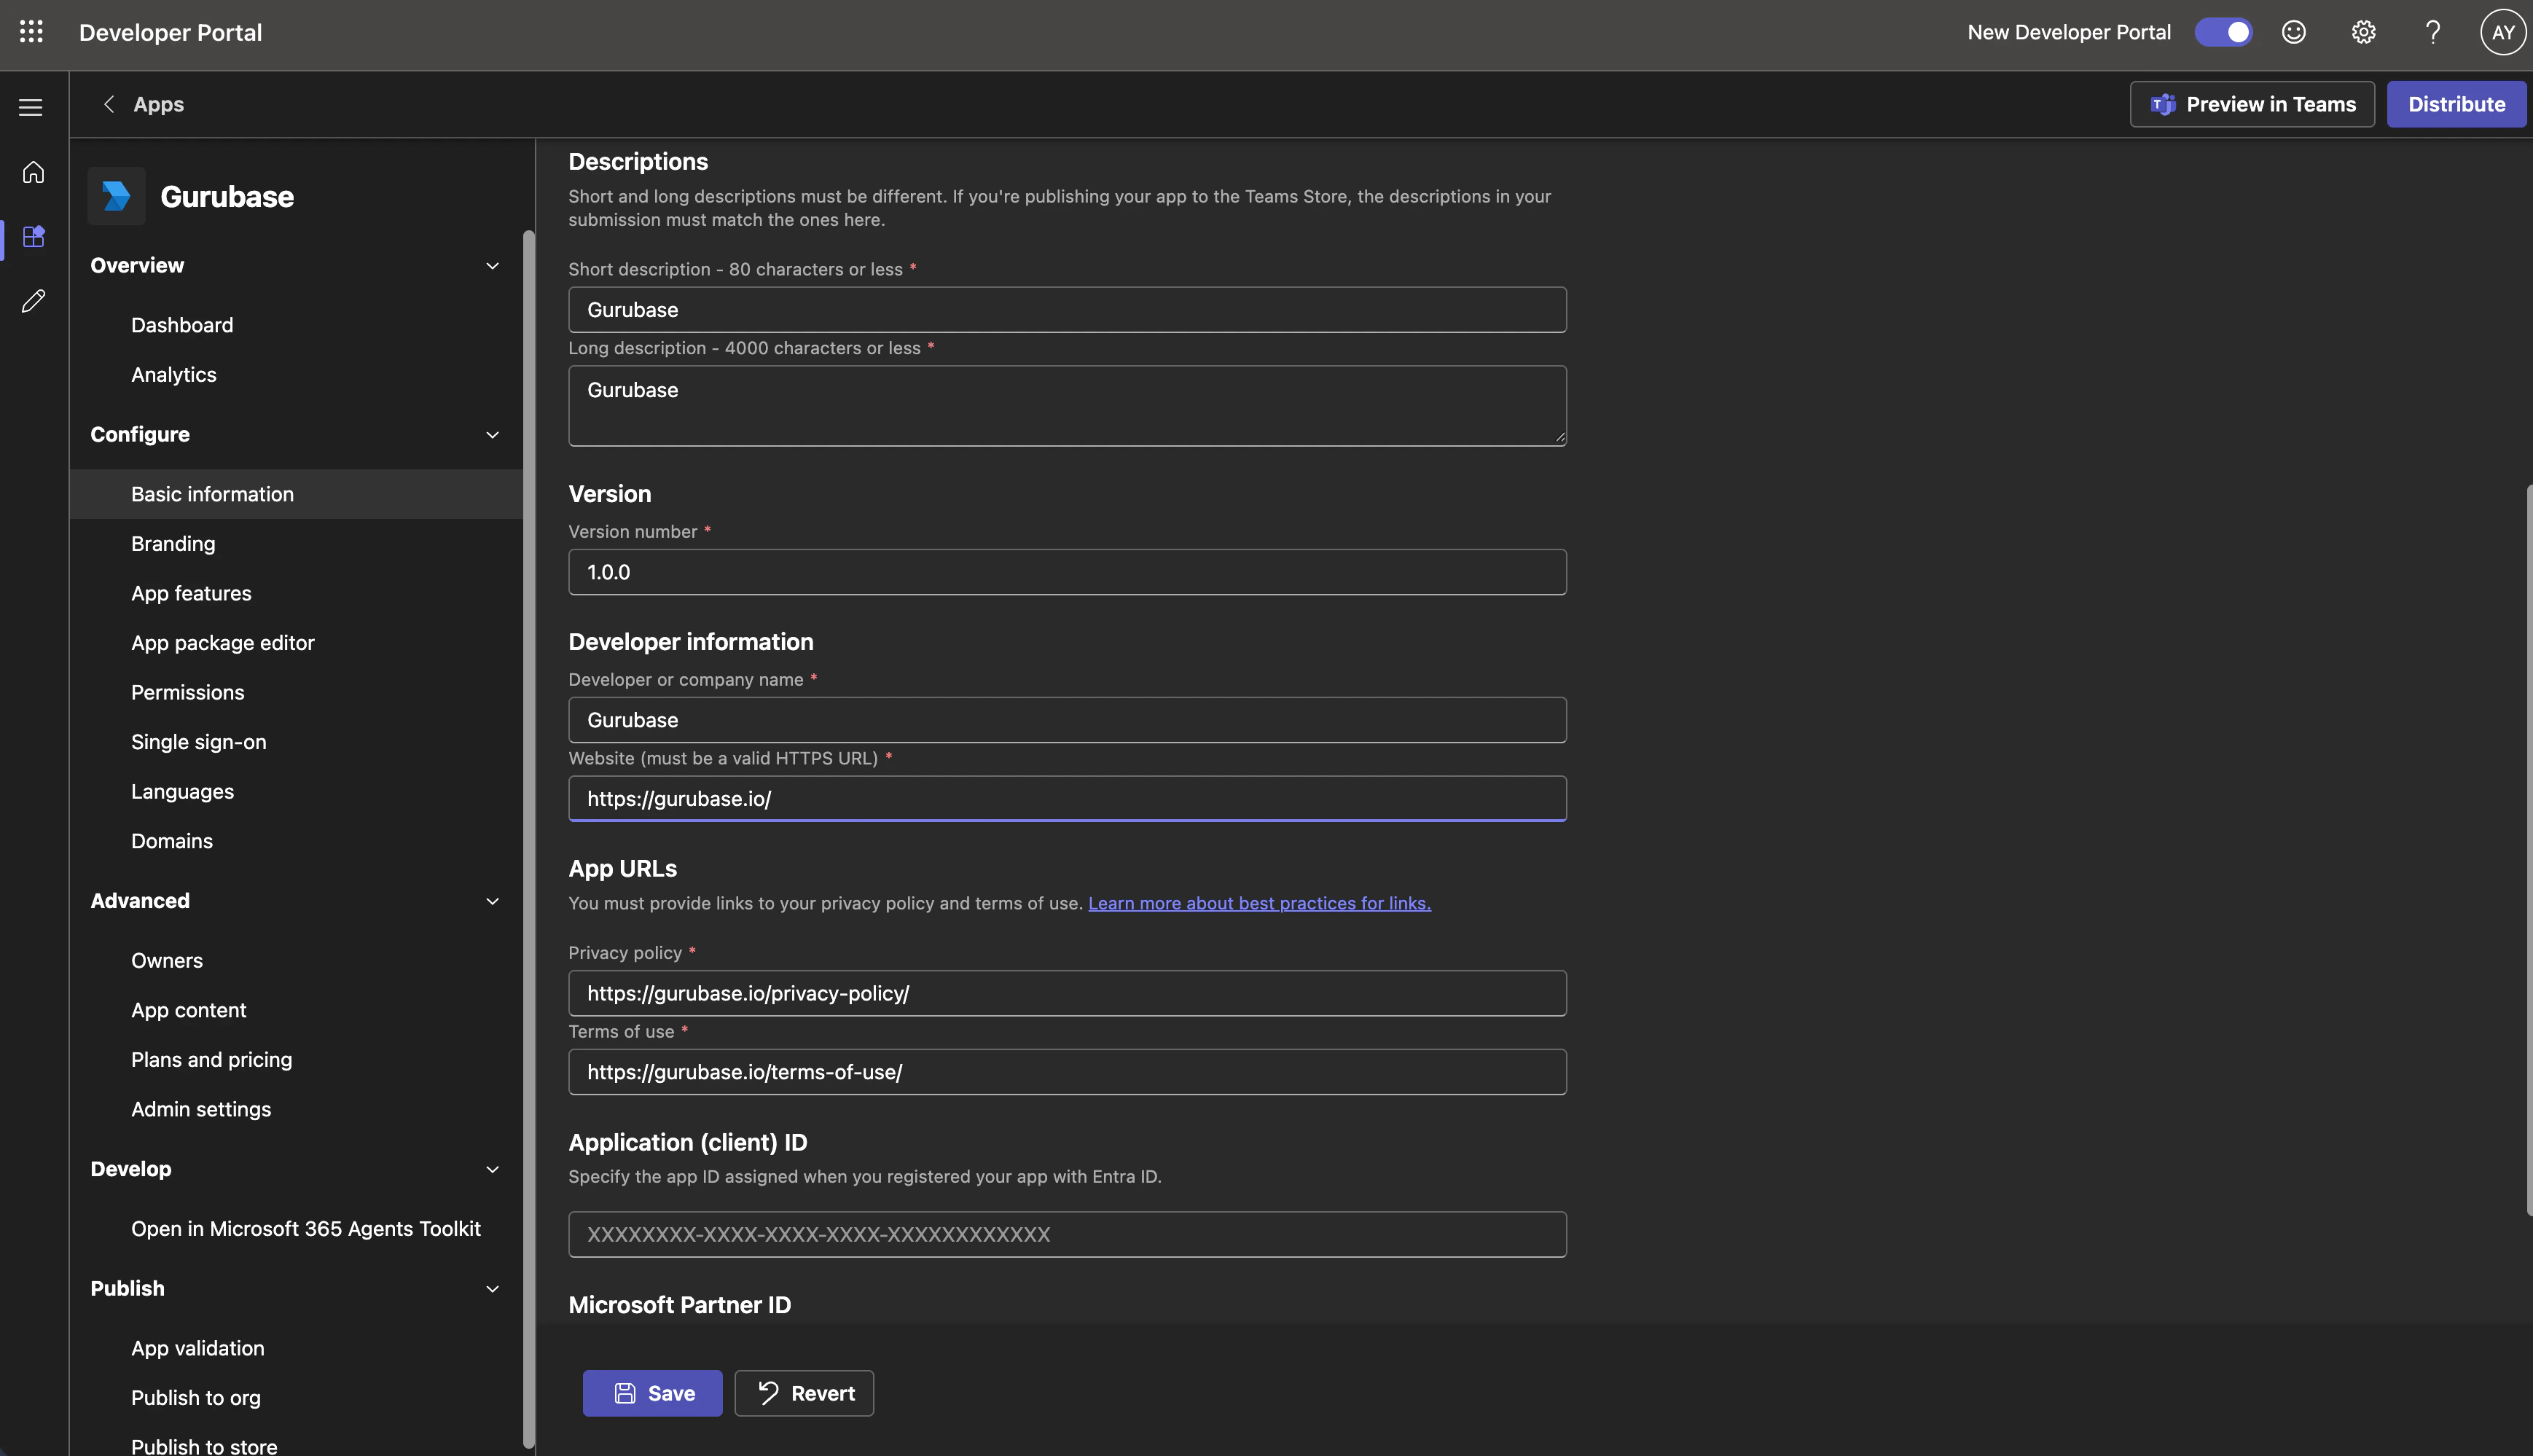 You can use:
| Field | Value |
| ------------------ | ------------------------------------ |
| **Privacy policy** | `https://gurubase.io/privacy-policy` |
| **Terms of use** | `https://gurubase.io/terms-of-use` |
| **Website** | `https://gurubase.io` |
Open **App package editor** in the left sidebar and click **manifest.json**.
You can use:
| Field | Value |
| ------------------ | ------------------------------------ |
| **Privacy policy** | `https://gurubase.io/privacy-policy` |
| **Terms of use** | `https://gurubase.io/terms-of-use` |
| **Website** | `https://gurubase.io` |
Open **App package editor** in the left sidebar and click **manifest.json**.
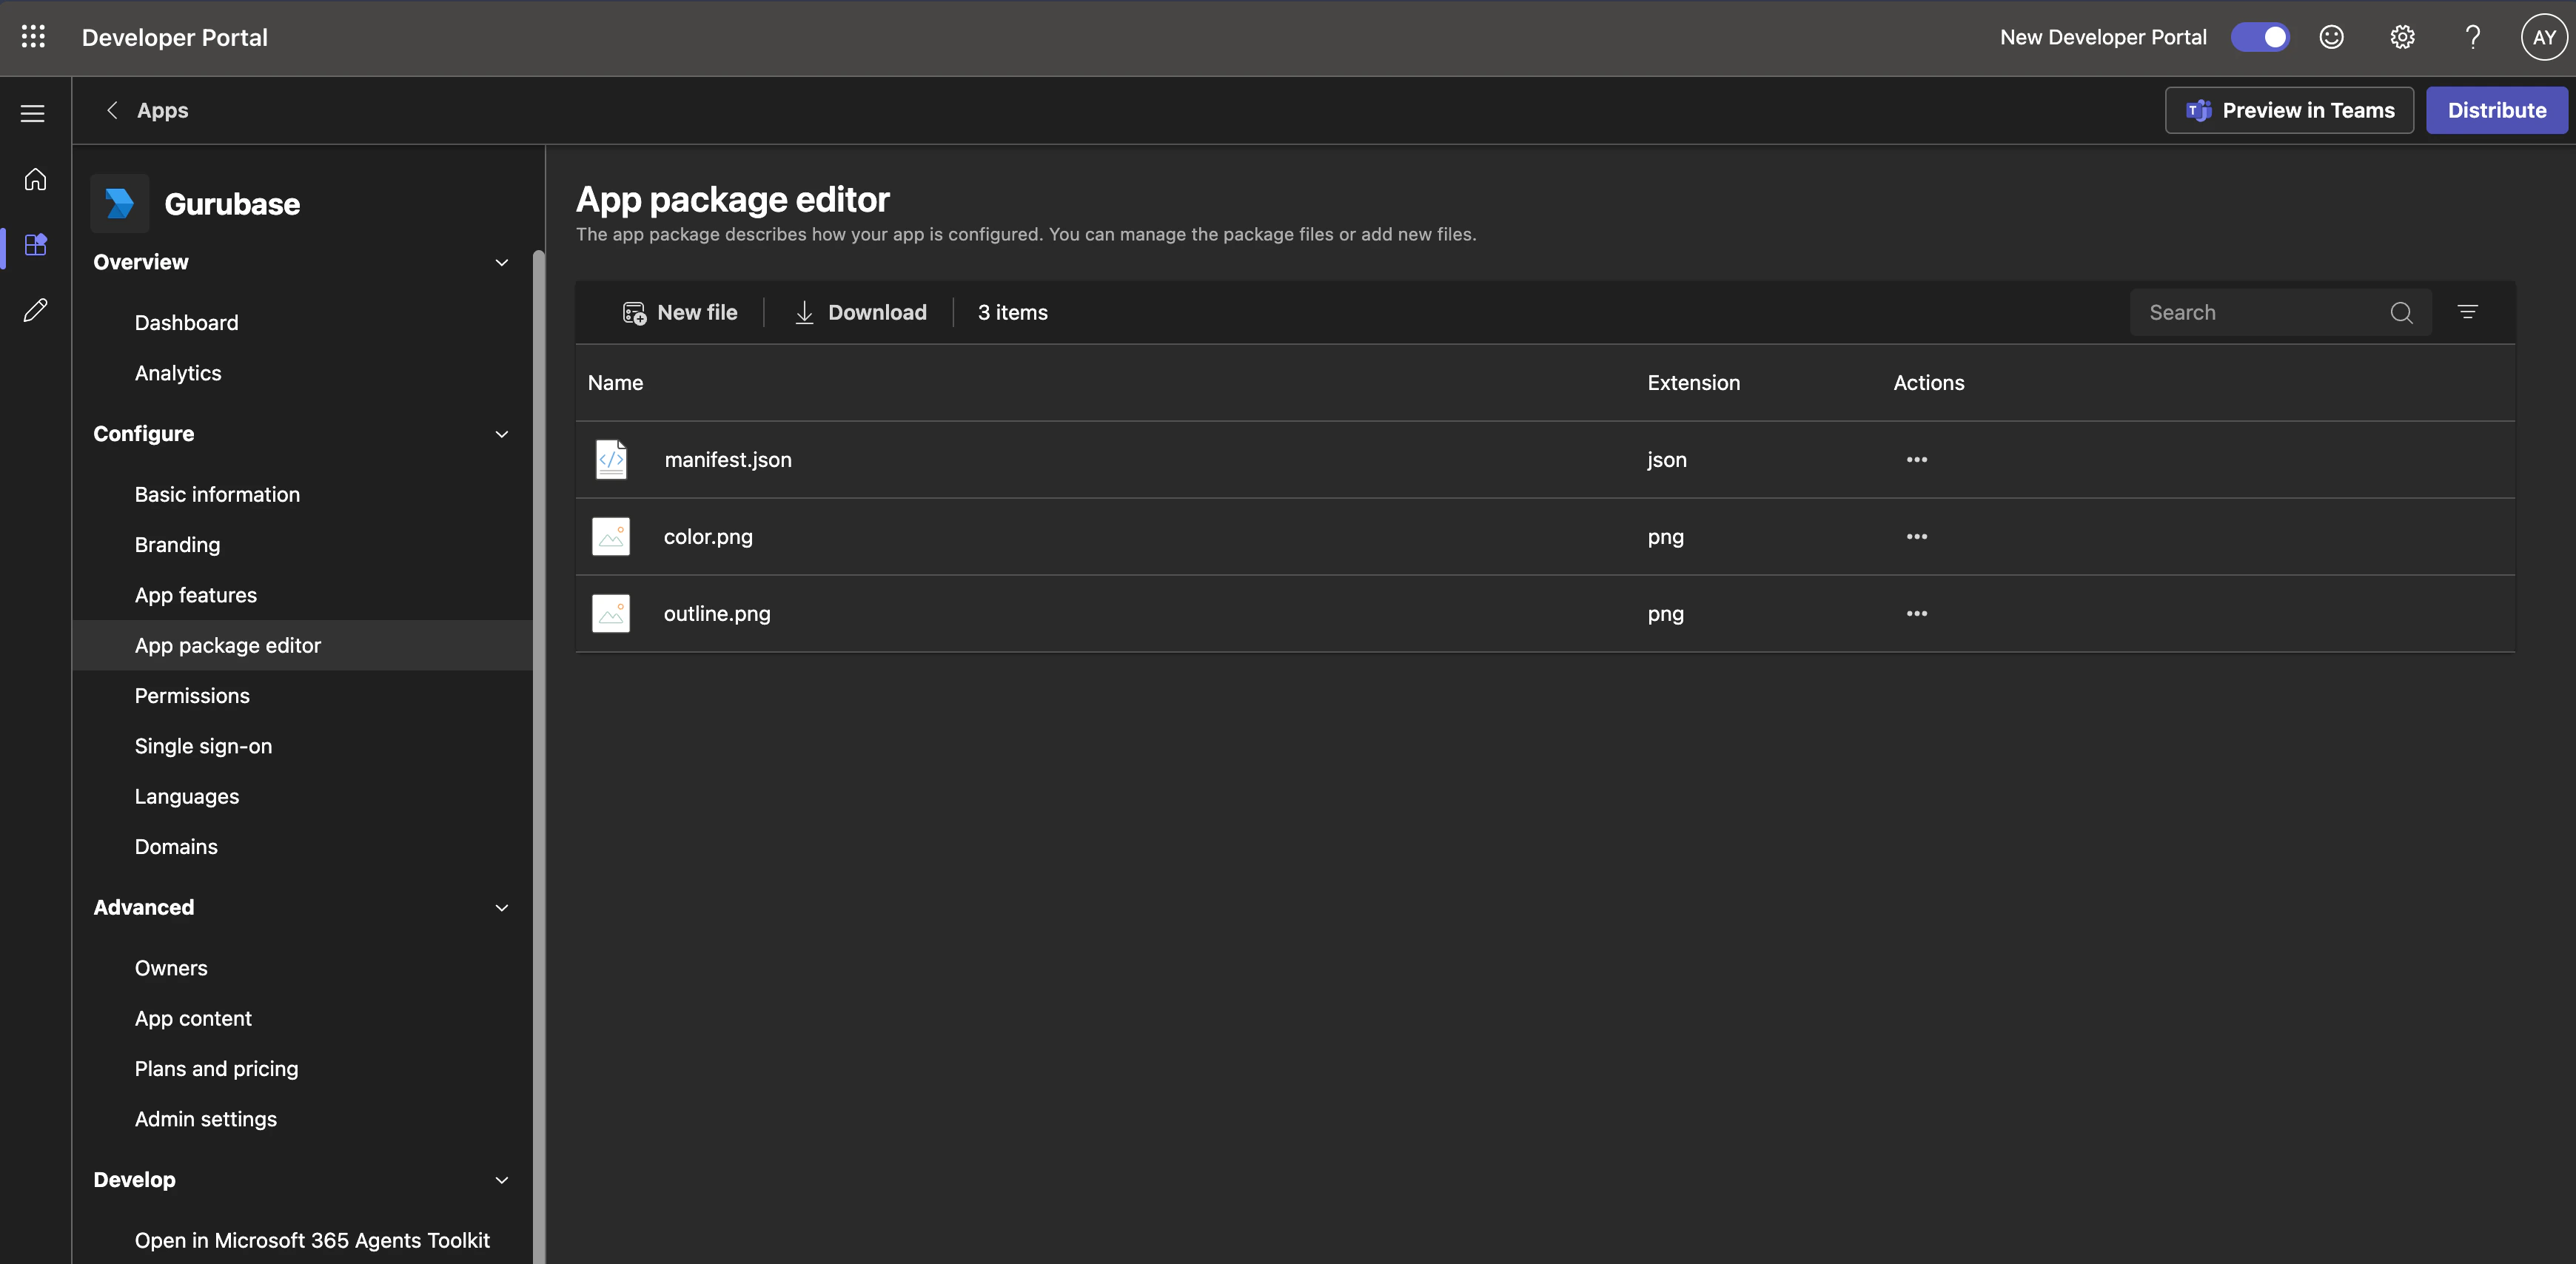 Find the top-level field:
```json theme={null}
"manifestVersion": "1.25"
```
Change it to:
```json theme={null}
"manifestVersion": "1.19"
```
Save the file.
Manifest schema 1.25+ requires a `supportsChannelFeatures` declaration for the `team` scope, which the dev portal UI doesn't expose yet. Downgrading to 1.19 sidesteps this check without changing any functionality you care about.
Open **Publish → Publish to your org** in the left sidebar and click **Get started** (or **Publish your app**).
Find the top-level field:
```json theme={null}
"manifestVersion": "1.25"
```
Change it to:
```json theme={null}
"manifestVersion": "1.19"
```
Save the file.
Manifest schema 1.25+ requires a `supportsChannelFeatures` declaration for the `team` scope, which the dev portal UI doesn't expose yet. Downgrading to 1.19 sidesteps this check without changing any functionality you care about.
Open **Publish → Publish to your org** in the left sidebar and click **Get started** (or **Publish your app**).
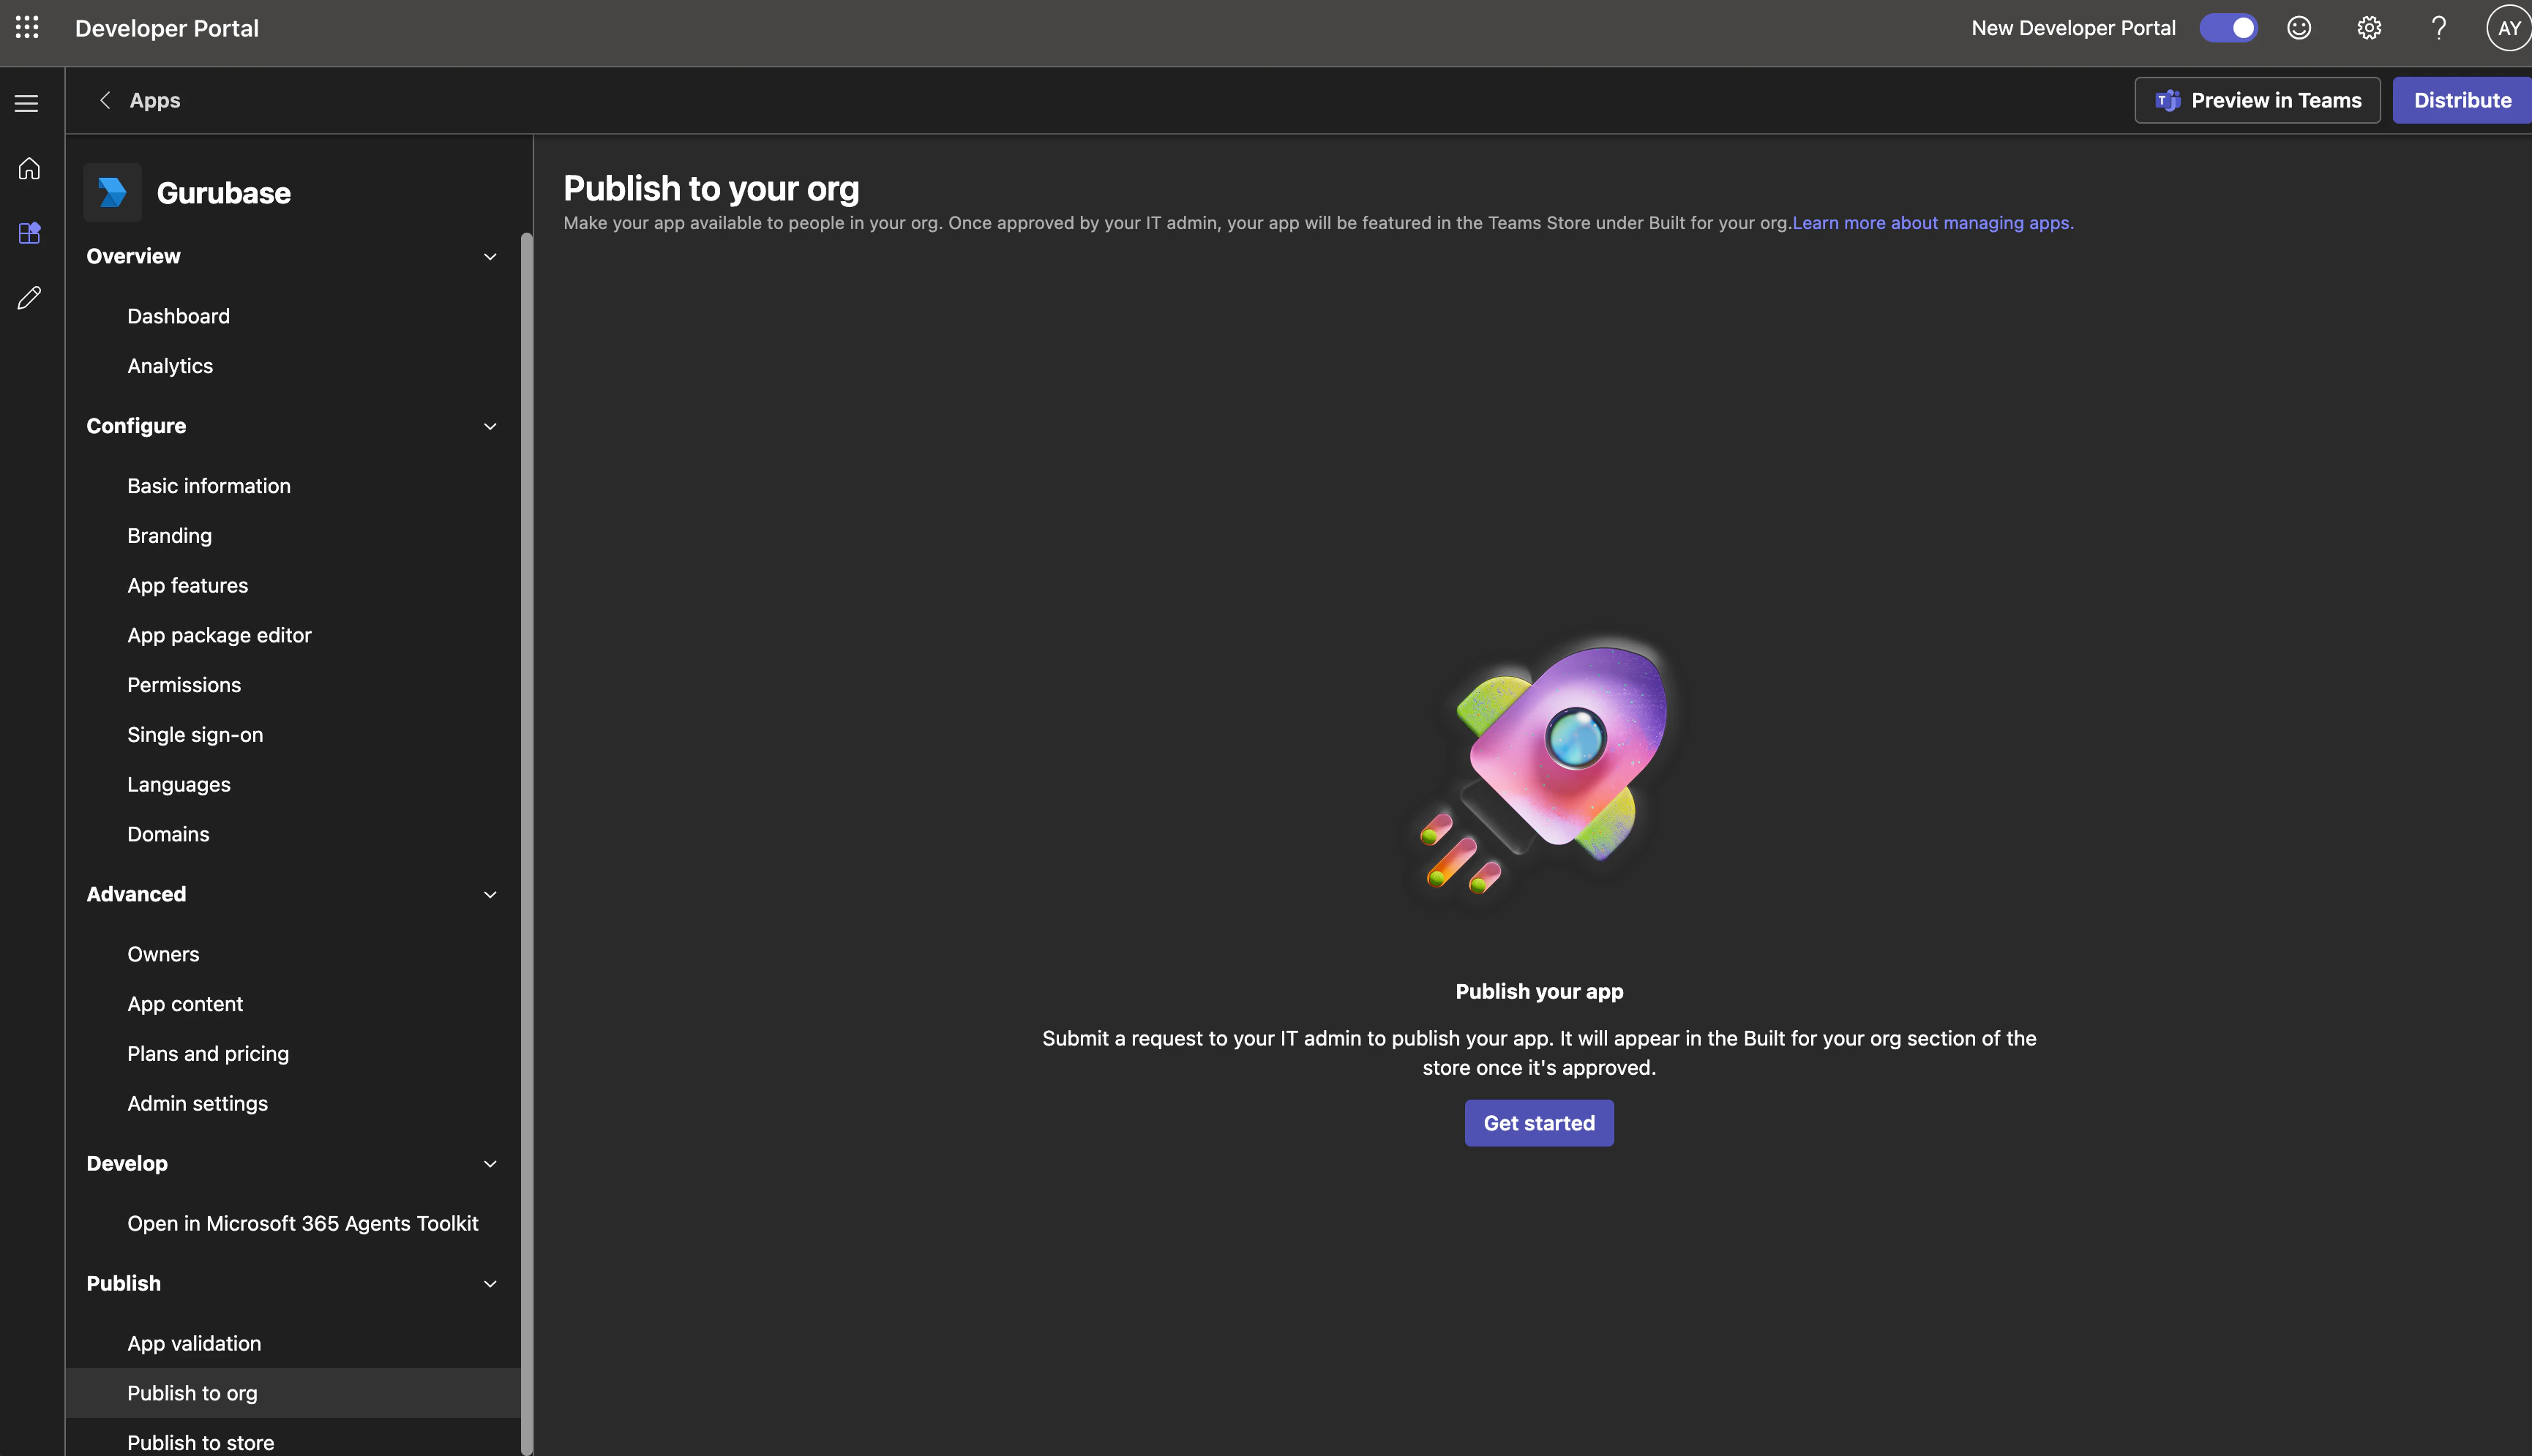 This sends the app to your Teams admin for approval.
Go to the [Teams admin center → Manage apps](https://admin.teams.microsoft.com/policies/manage-apps), search for your app, and click it.
This sends the app to your Teams admin for approval.
Go to the [Teams admin center → Manage apps](https://admin.teams.microsoft.com/policies/manage-apps), search for your app, and click it.
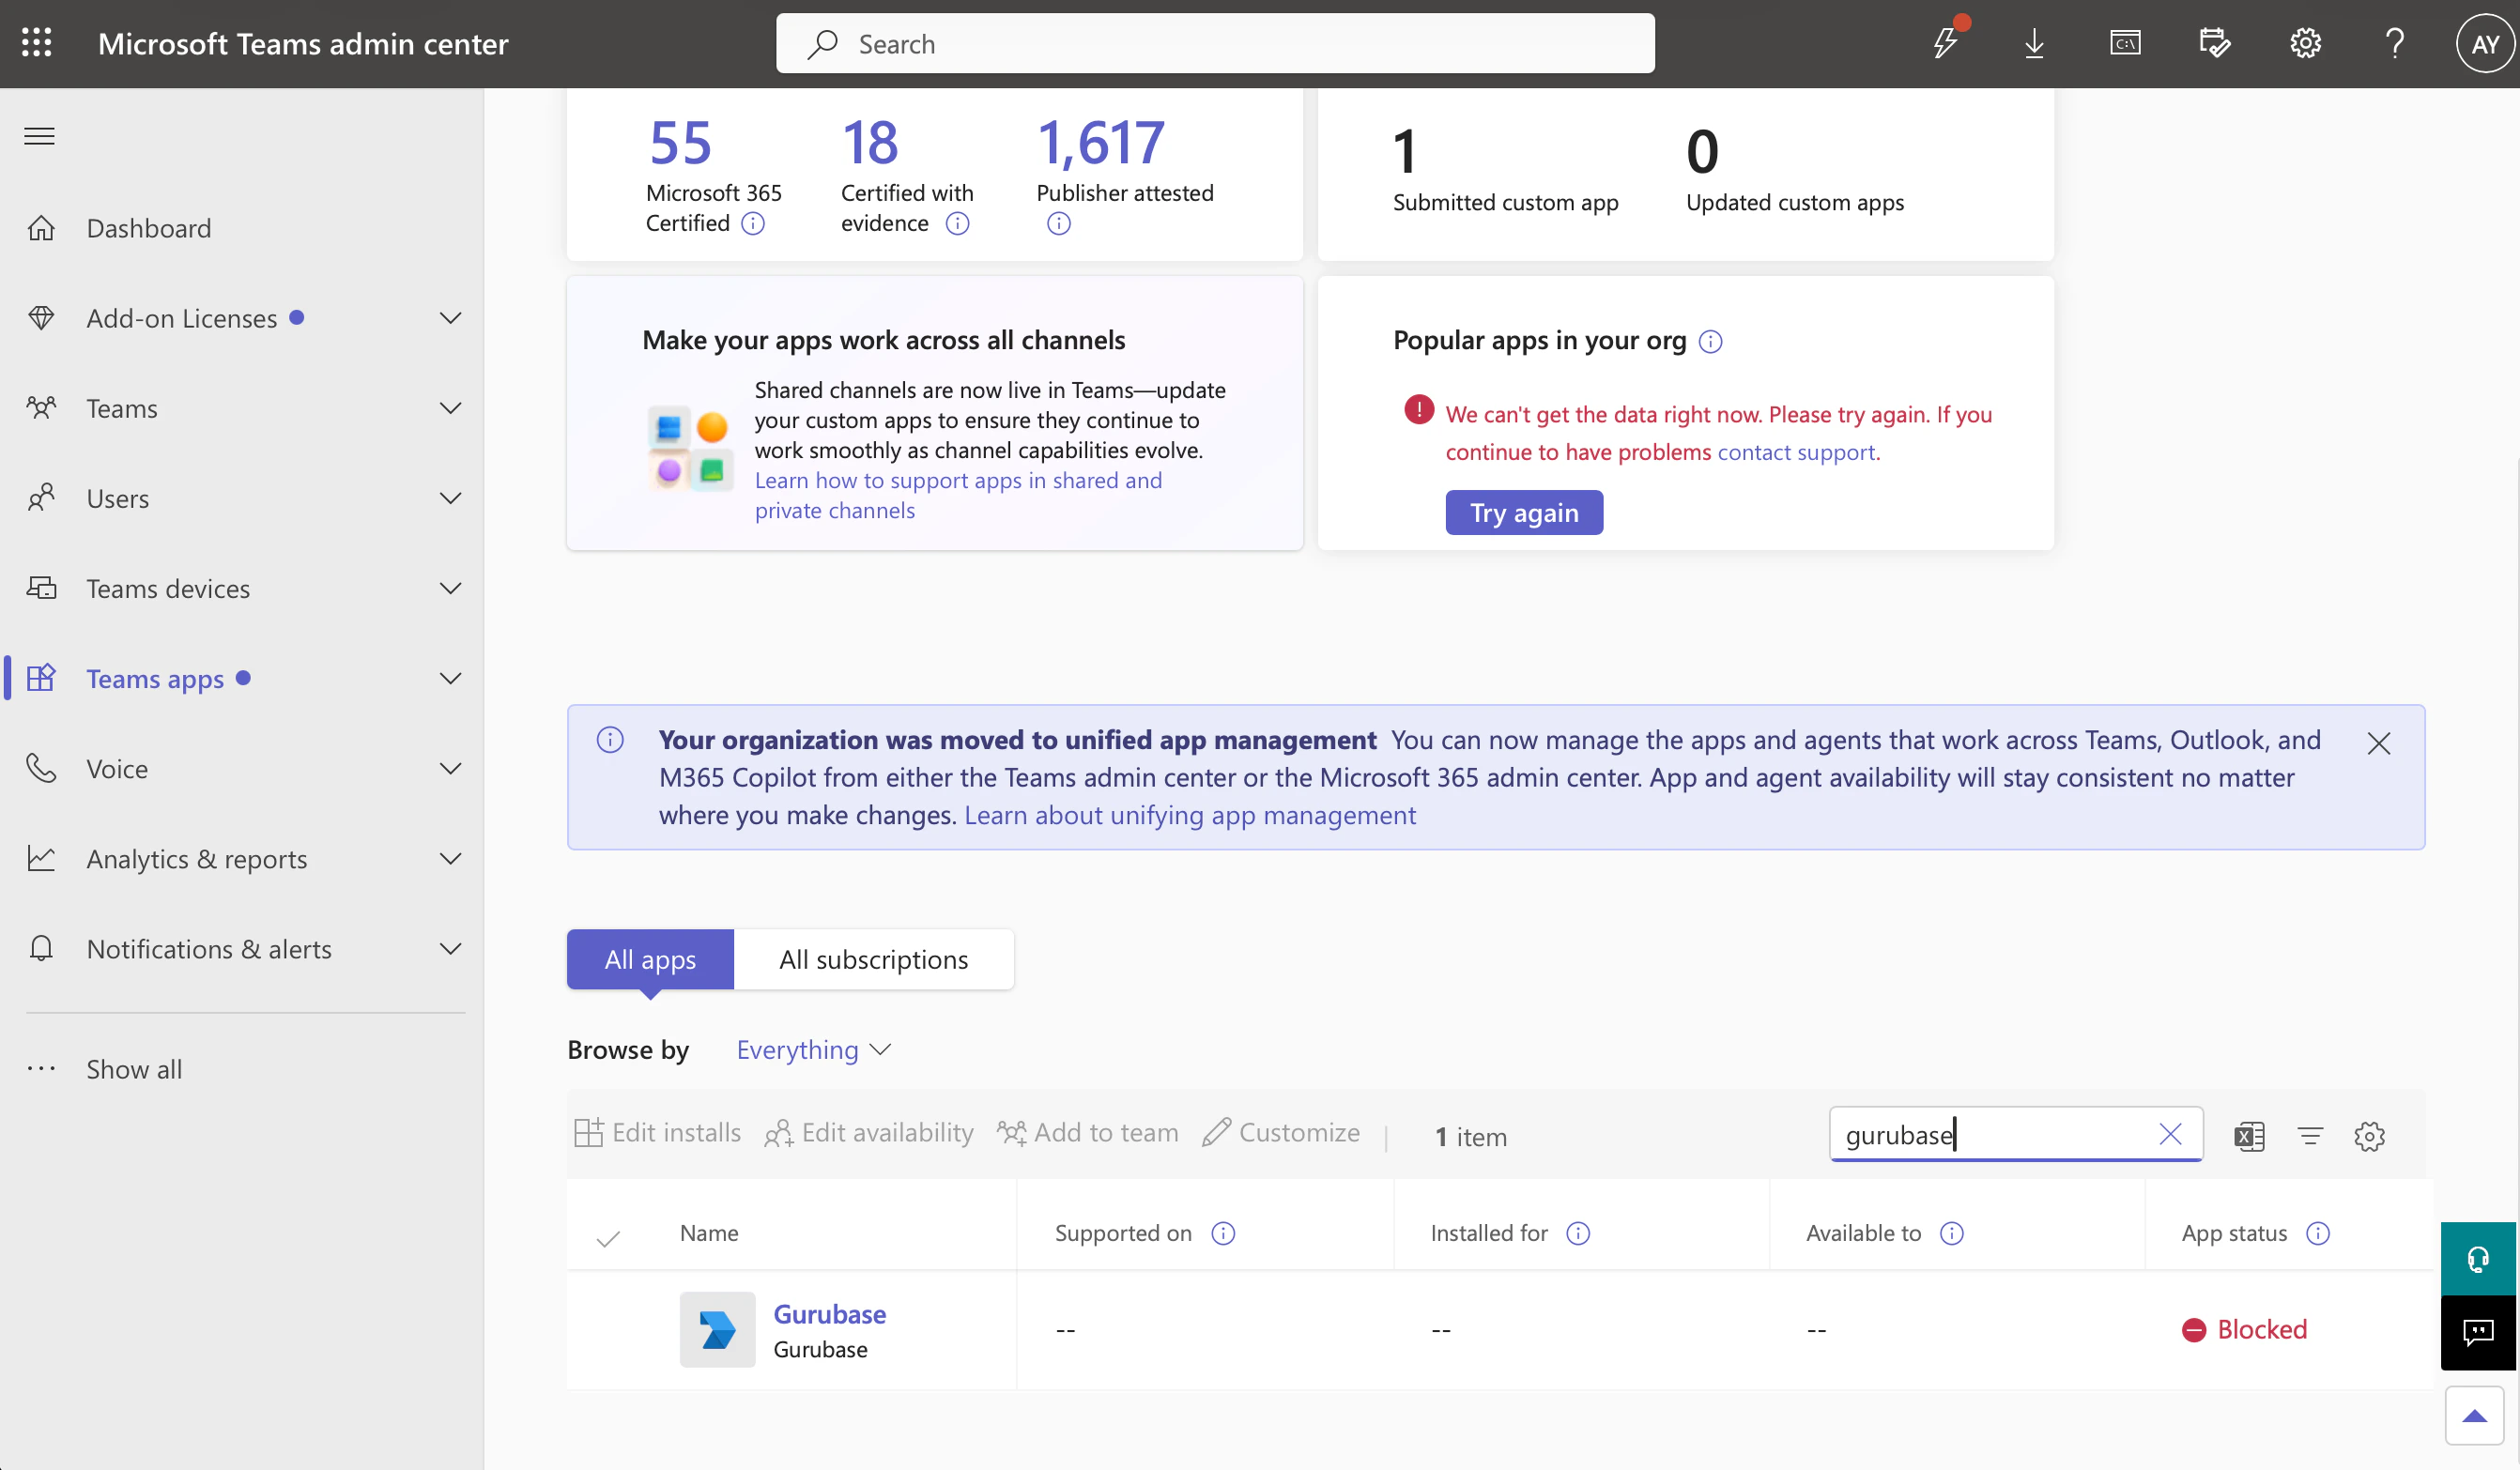 Click **Publish** to approve the pending version.
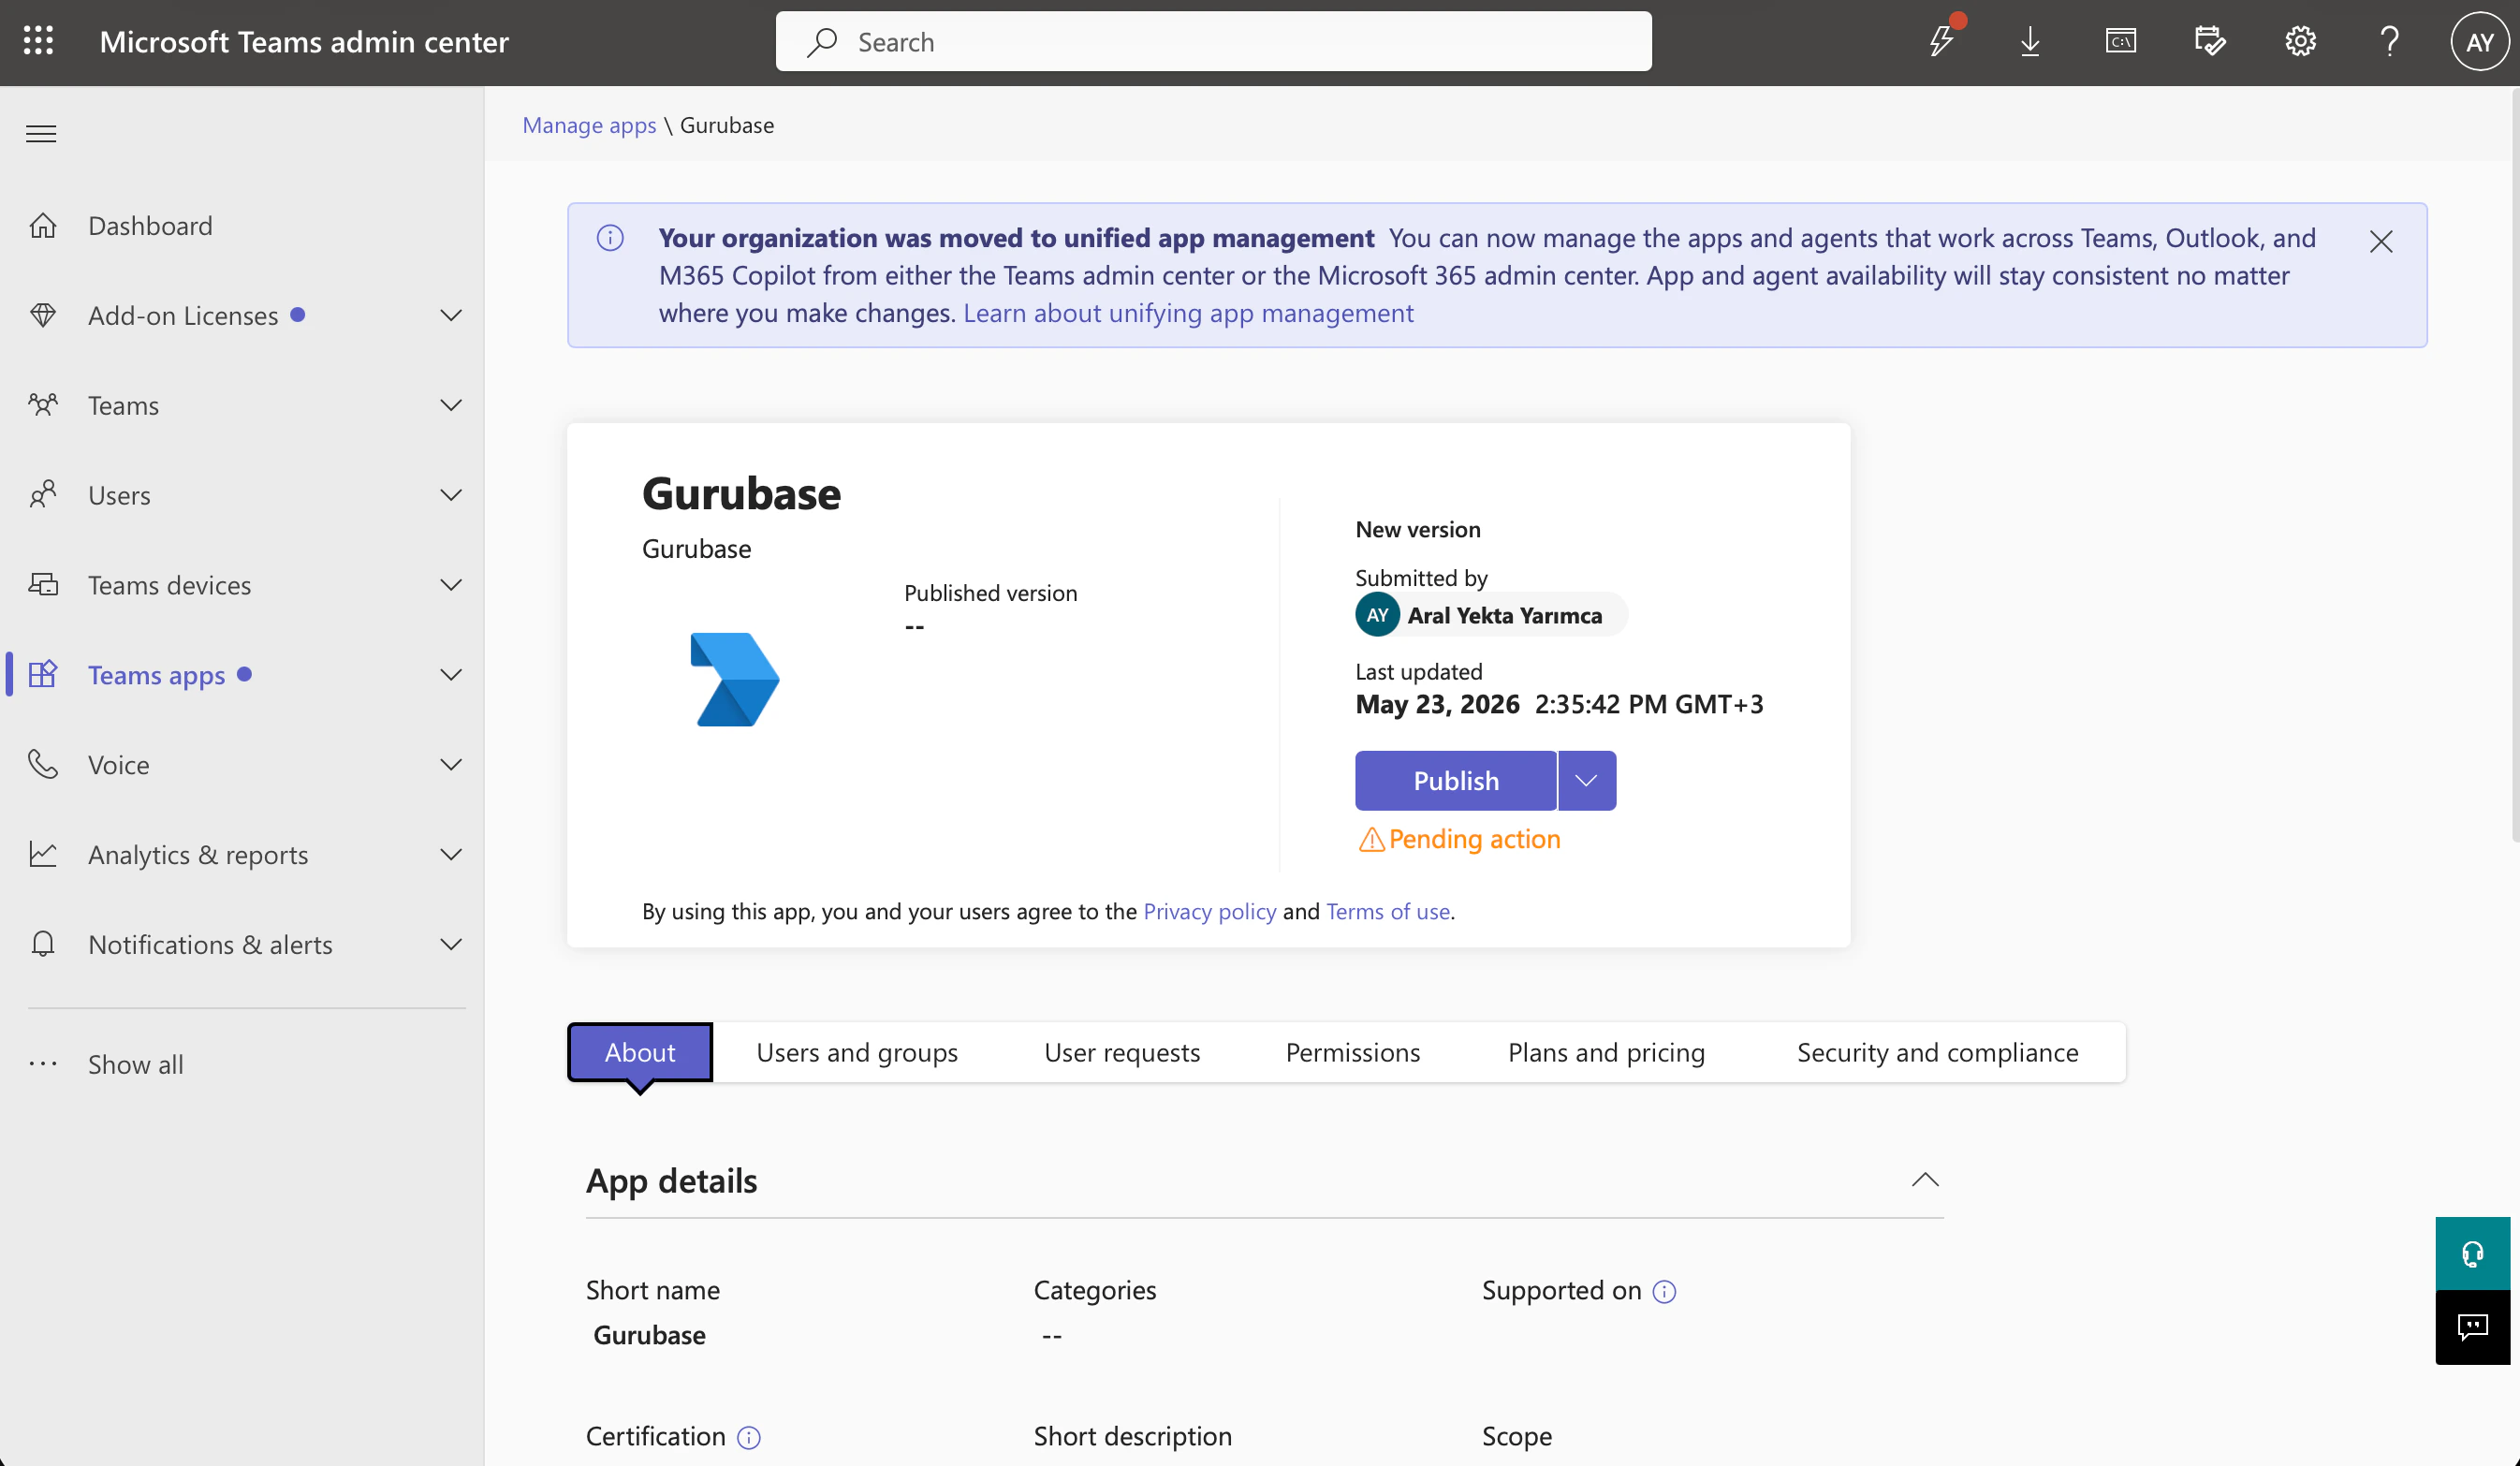 The approval can take a few minutes to propagate. If you don't see your app in the admin center immediately, refresh after a minute.
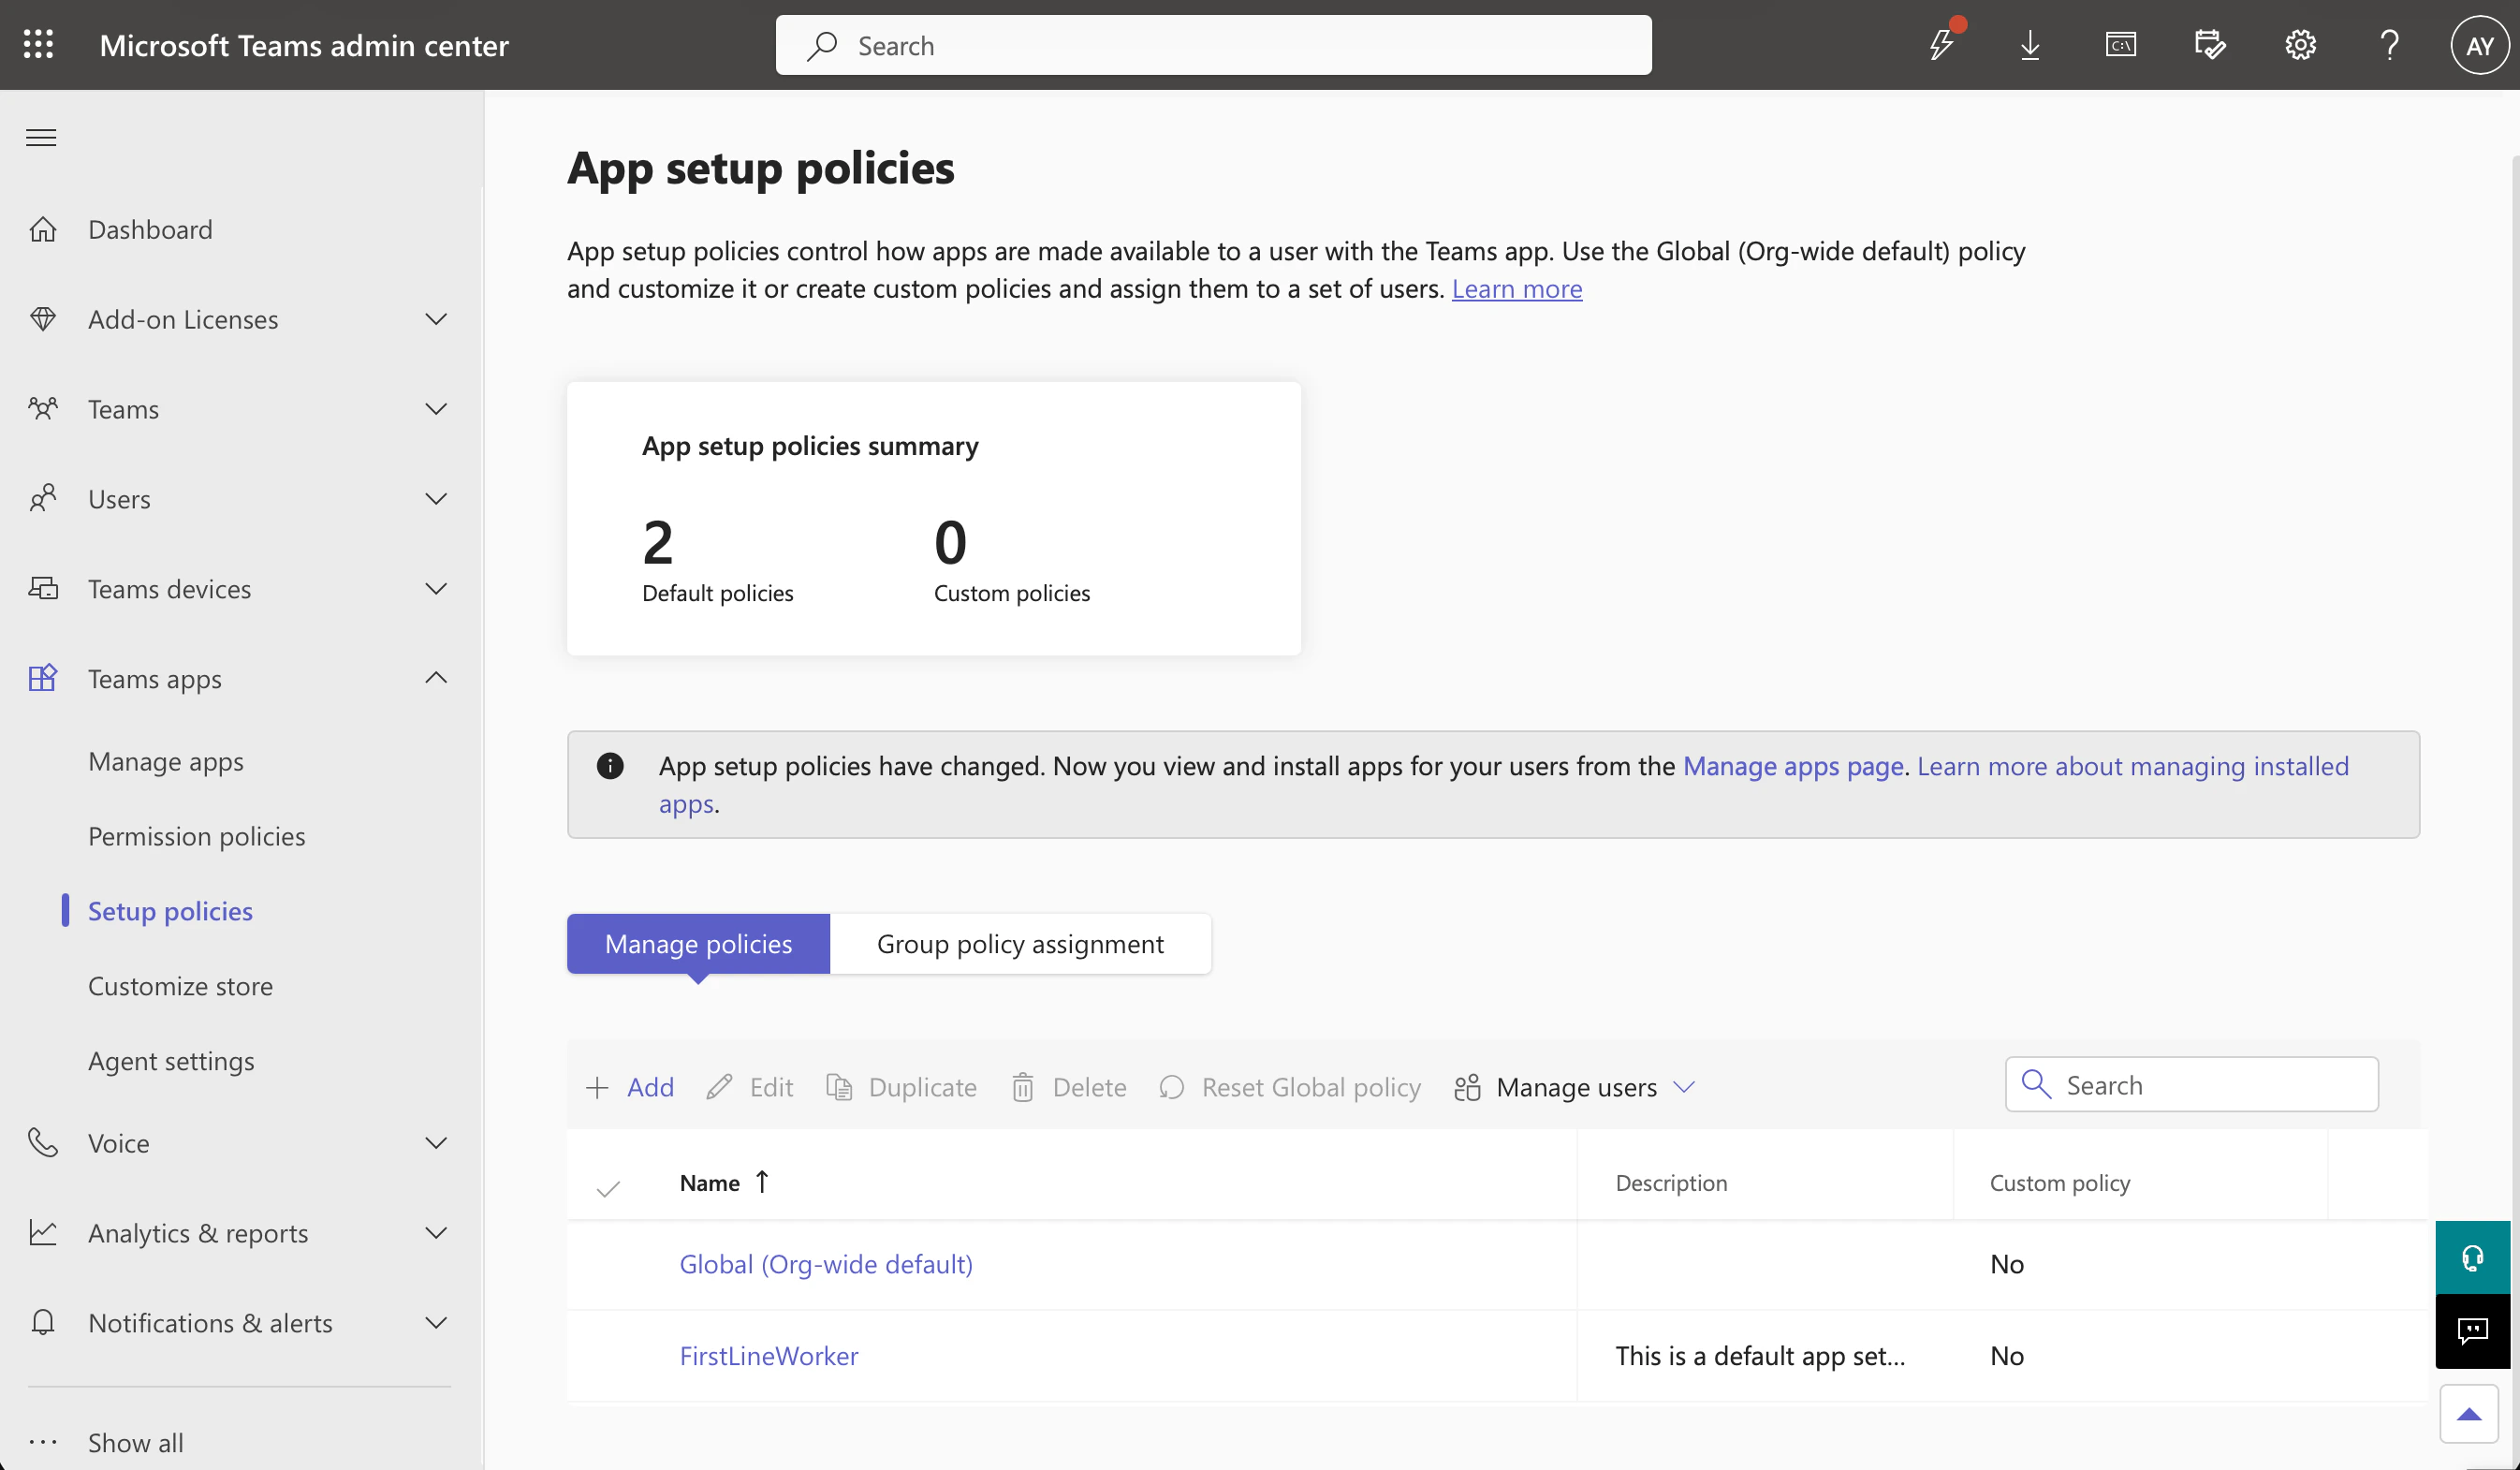
Pinning the app for your org installs it for everyone automatically — without this step users won't see the bot in their Teams sidebar. Go to [Setup policies](https://admin.teams.microsoft.com/policies/app-setup) → click **Global (Org-wide default)**.
The approval can take a few minutes to propagate. If you don't see your app in the admin center immediately, refresh after a minute.
Pinning the app for your org installs it for everyone automatically — without this step users won't see the bot in their Teams sidebar. Go to [Setup policies](https://admin.teams.microsoft.com/policies/app-setup) → click **Global (Org-wide default)**.
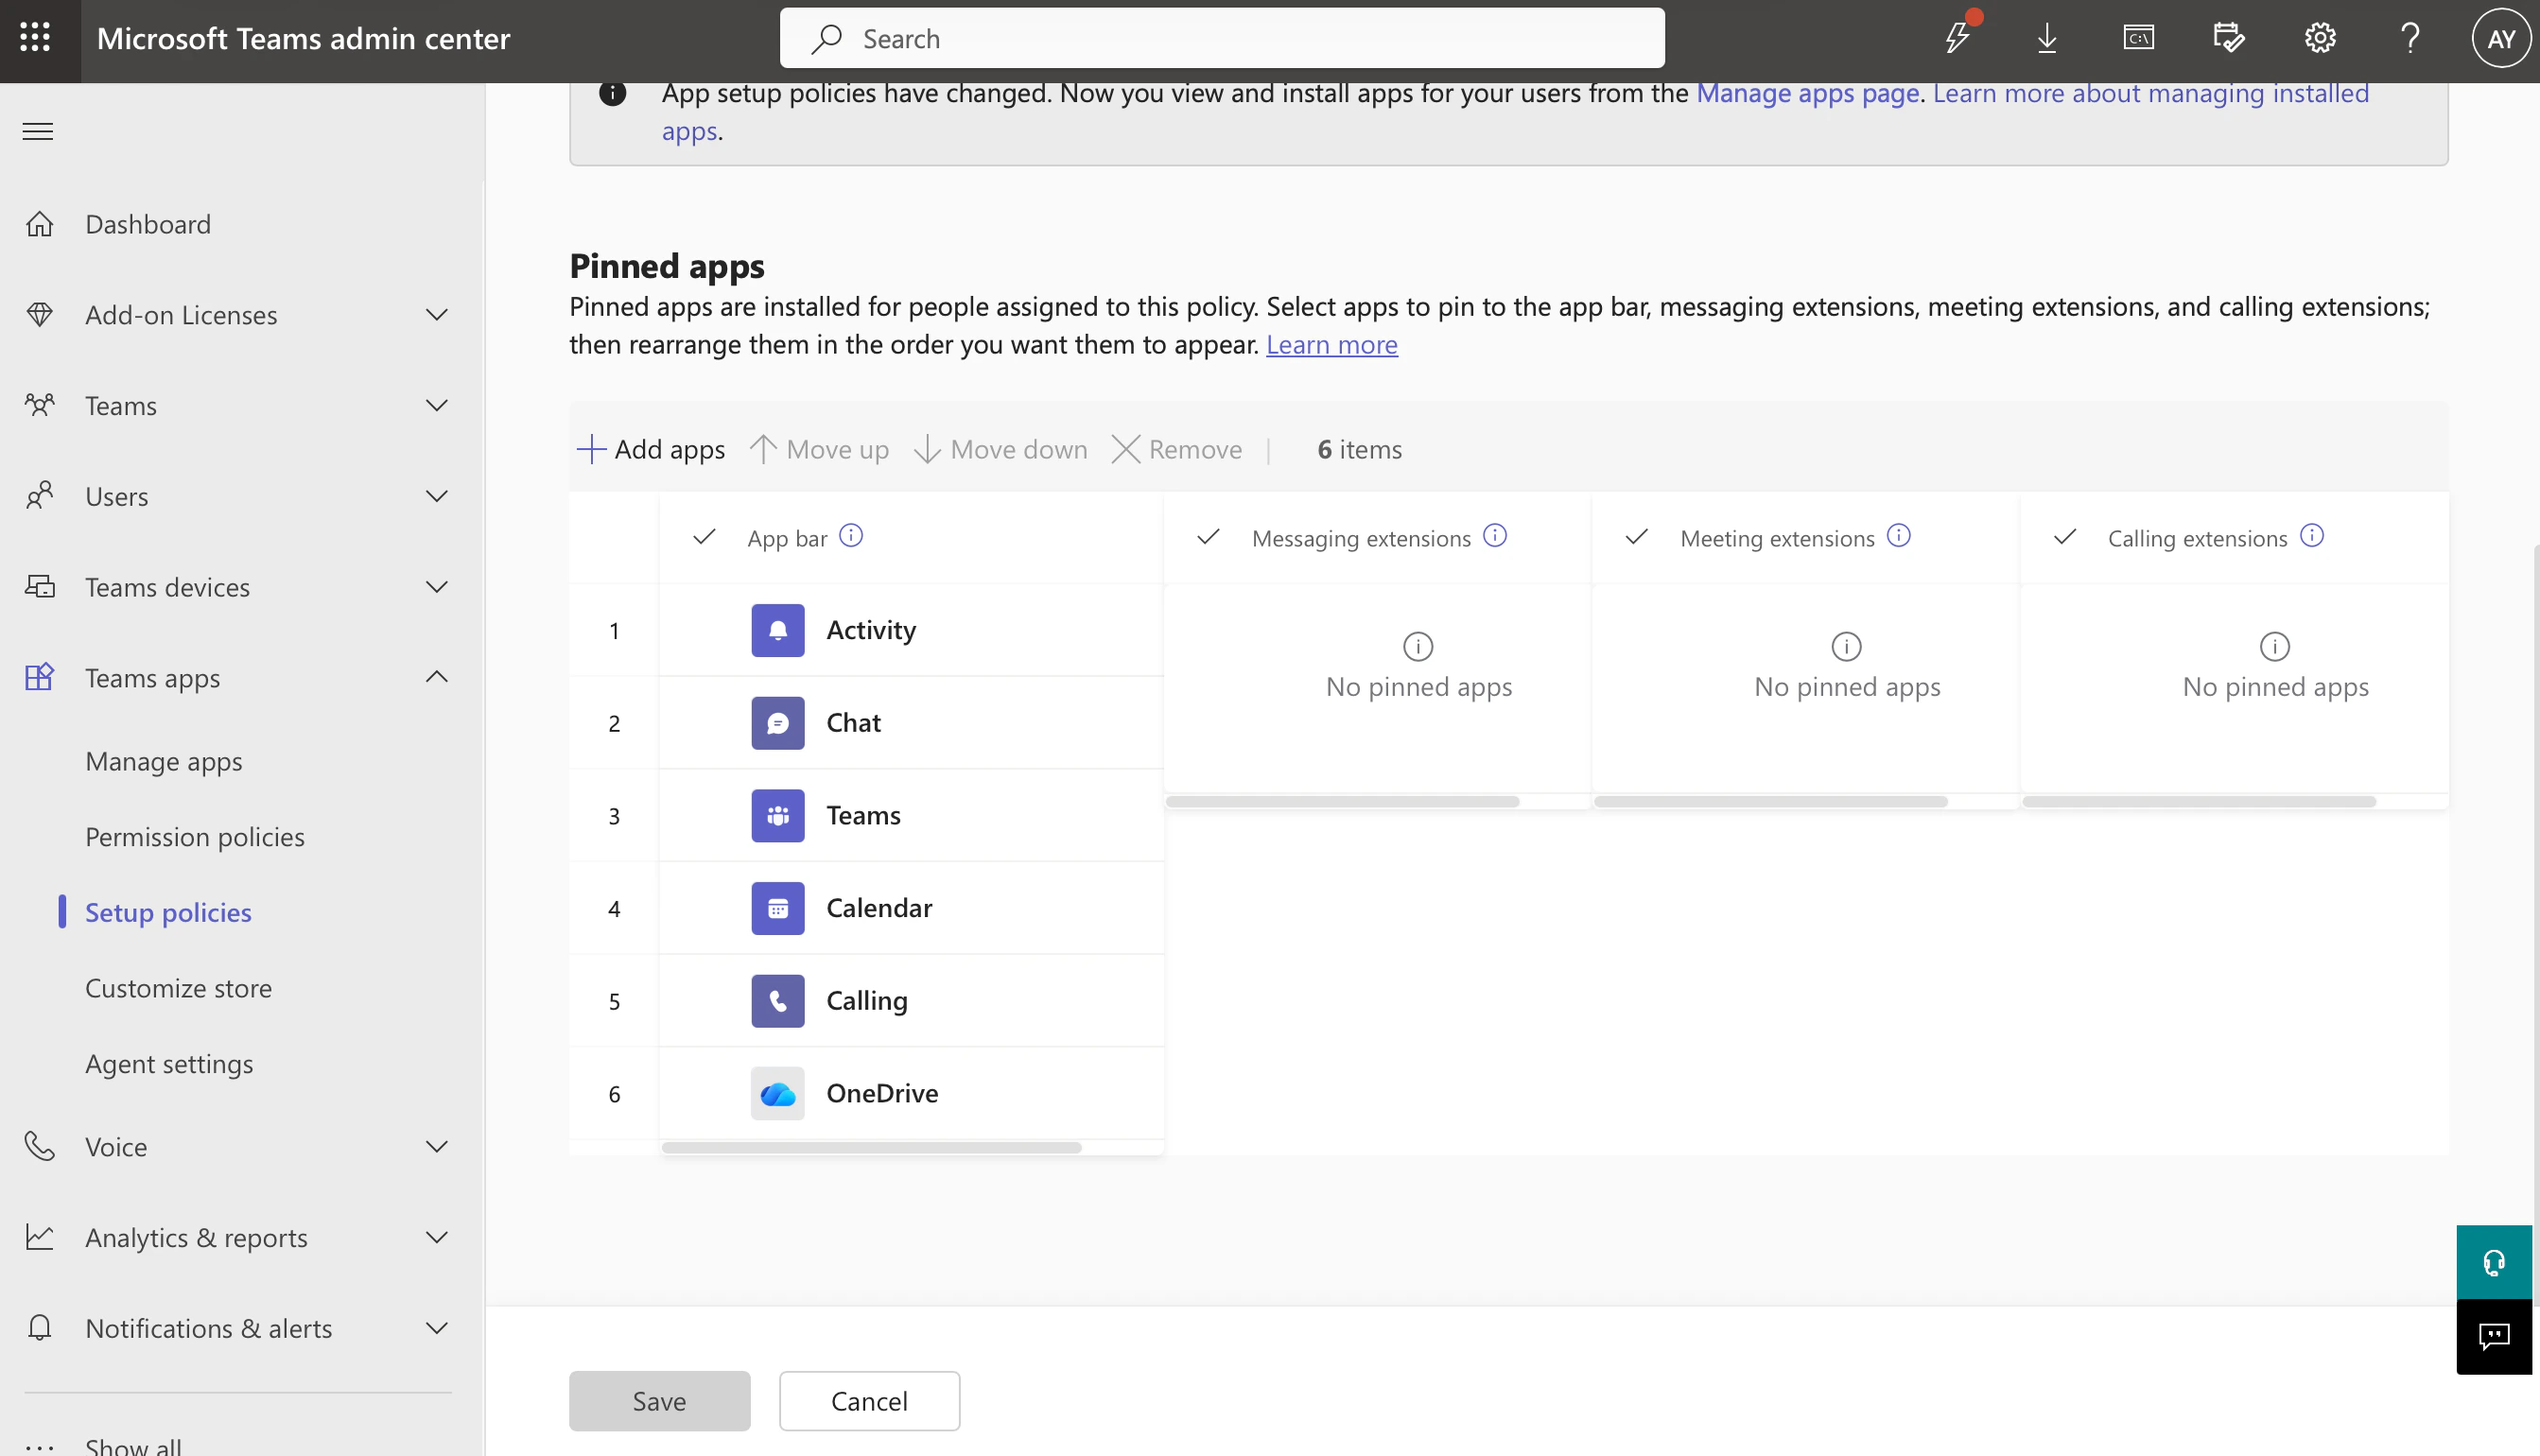 Under **Pinned apps**, click **+ Add apps**, search for your bot, and add it.
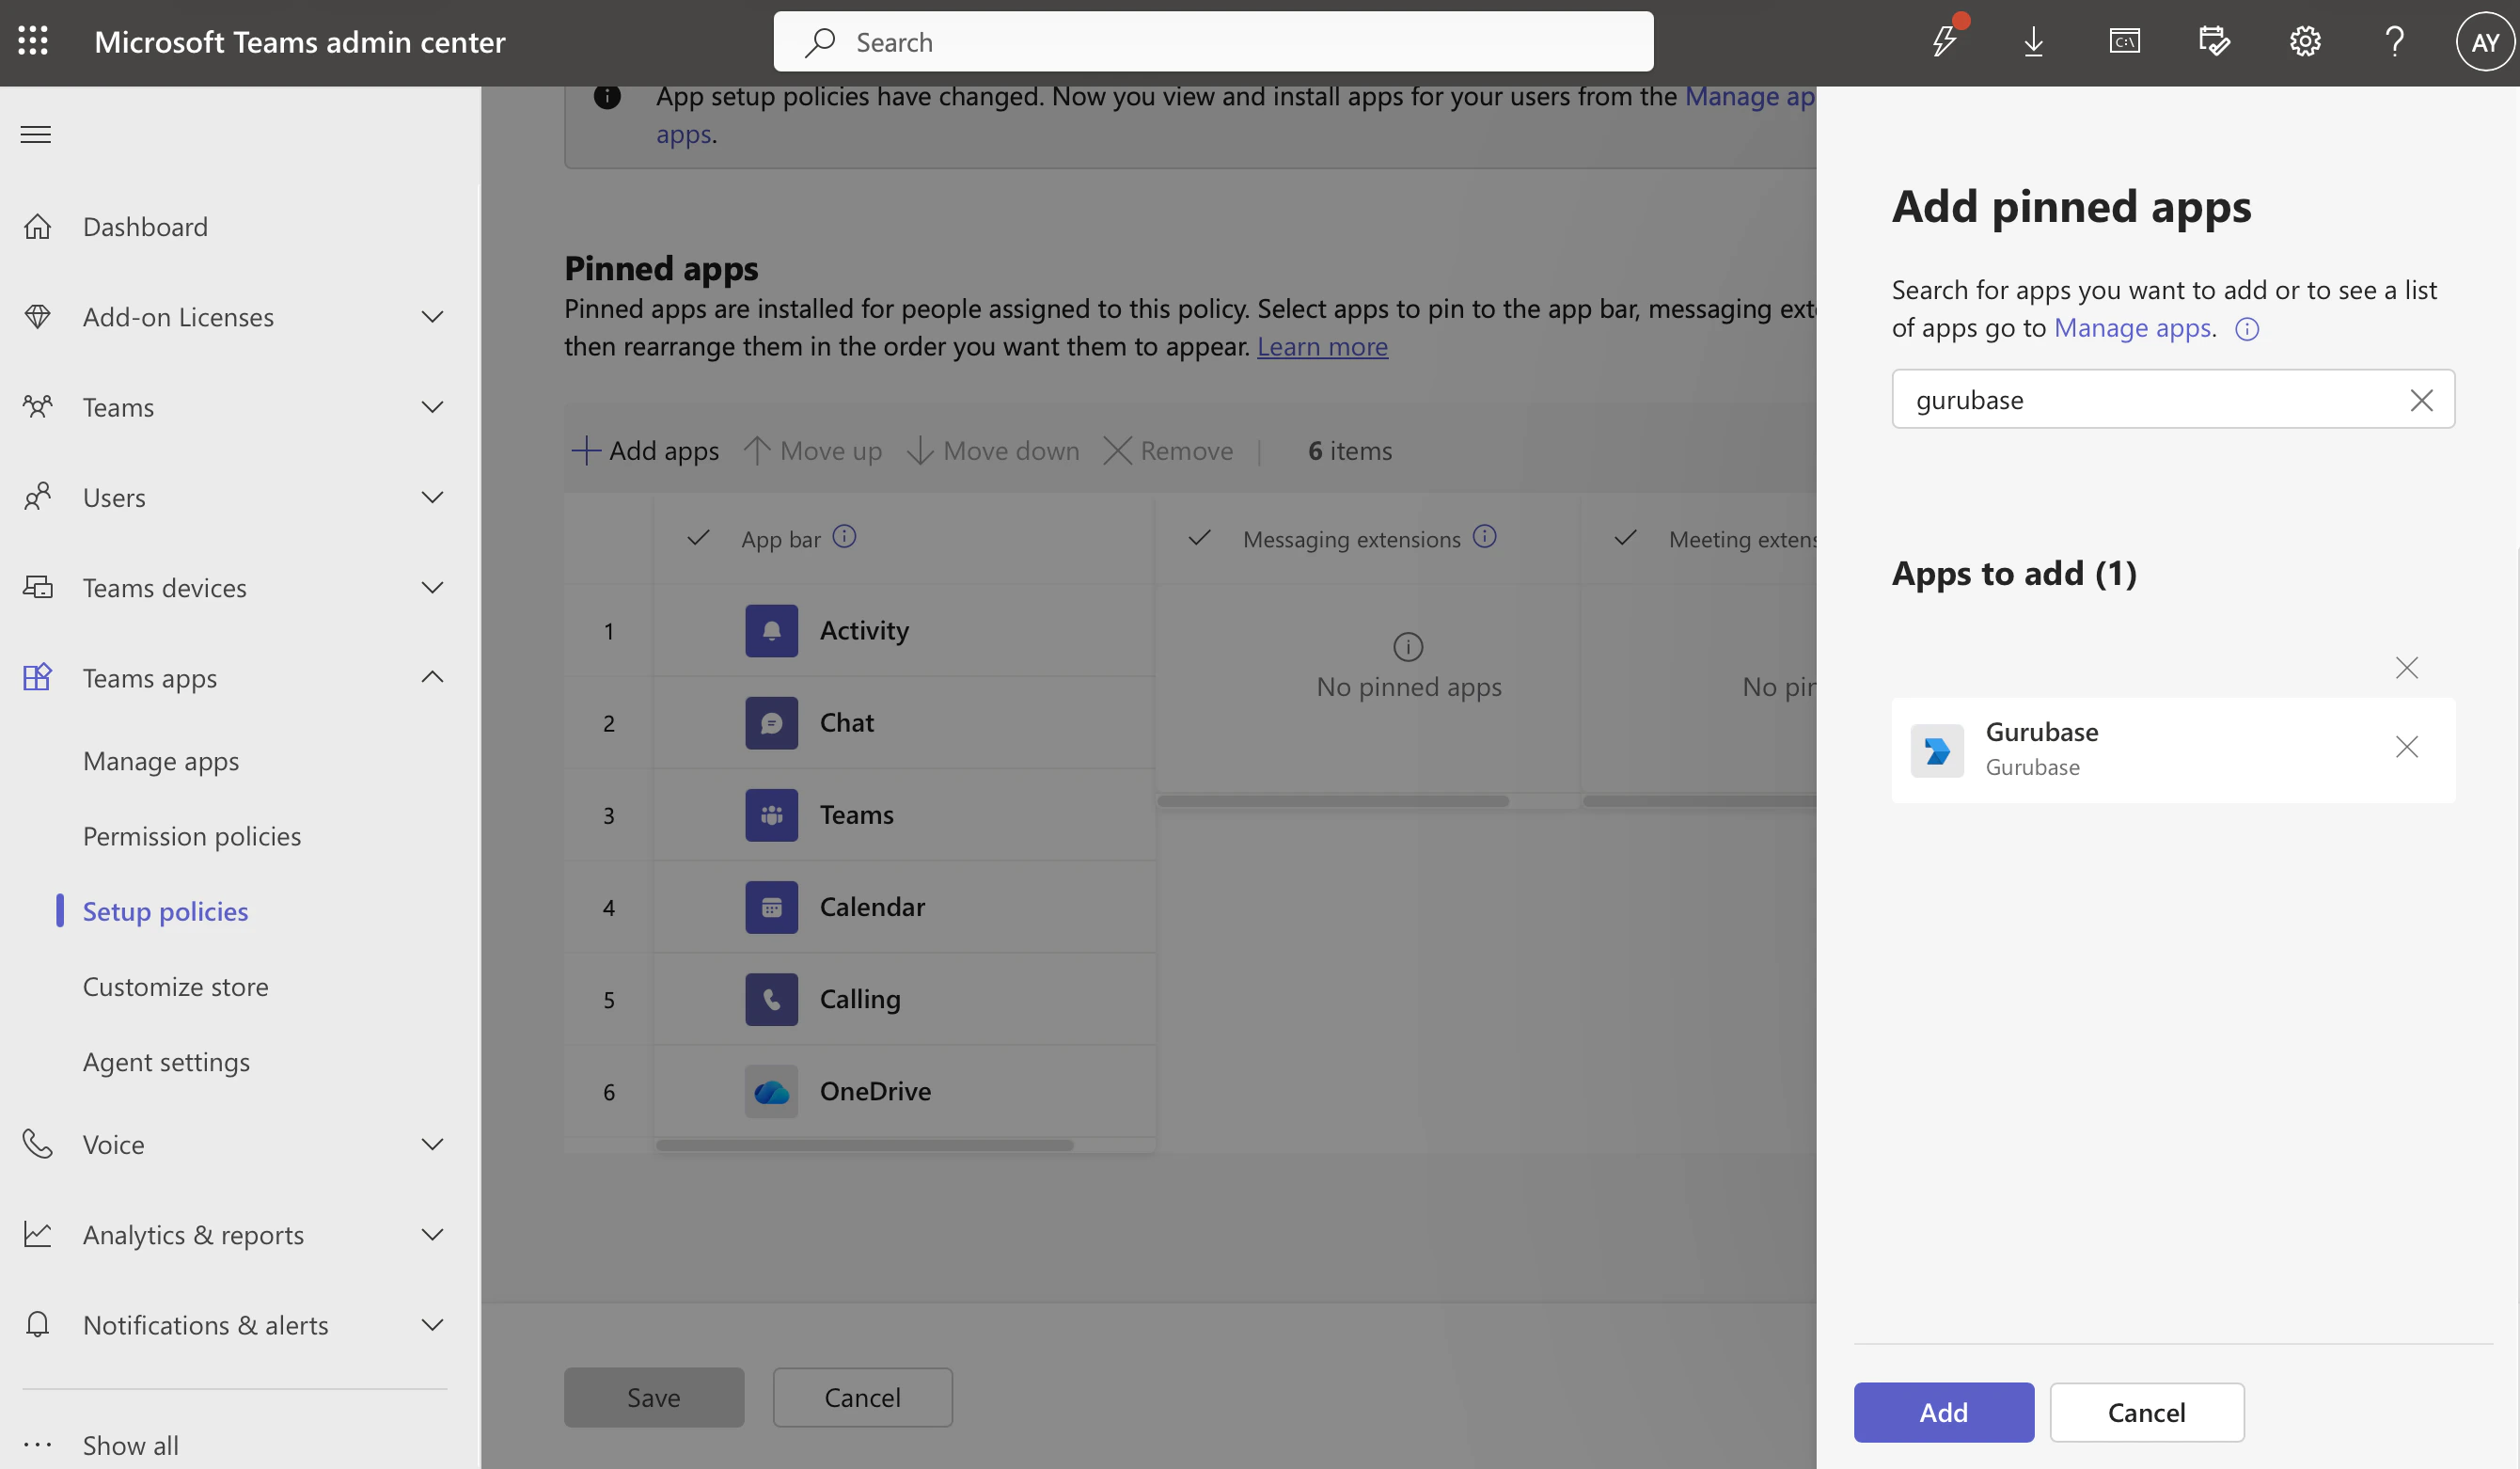 Click **Add** then **Save**.
Open the [Microsoft Entra admin center](https://entra.microsoft.com) → **Overview** and copy the **Tenant ID** (a GUID).
Go to **Gurubase Dashboard** → select your Guru → **Integrations** → **Deployments** → **Microsoft Teams**.
Click **Add** then **Save**.
Open the [Microsoft Entra admin center](https://entra.microsoft.com) → **Overview** and copy the **Tenant ID** (a GUID).
Go to **Gurubase Dashboard** → select your Guru → **Integrations** → **Deployments** → **Microsoft Teams**.
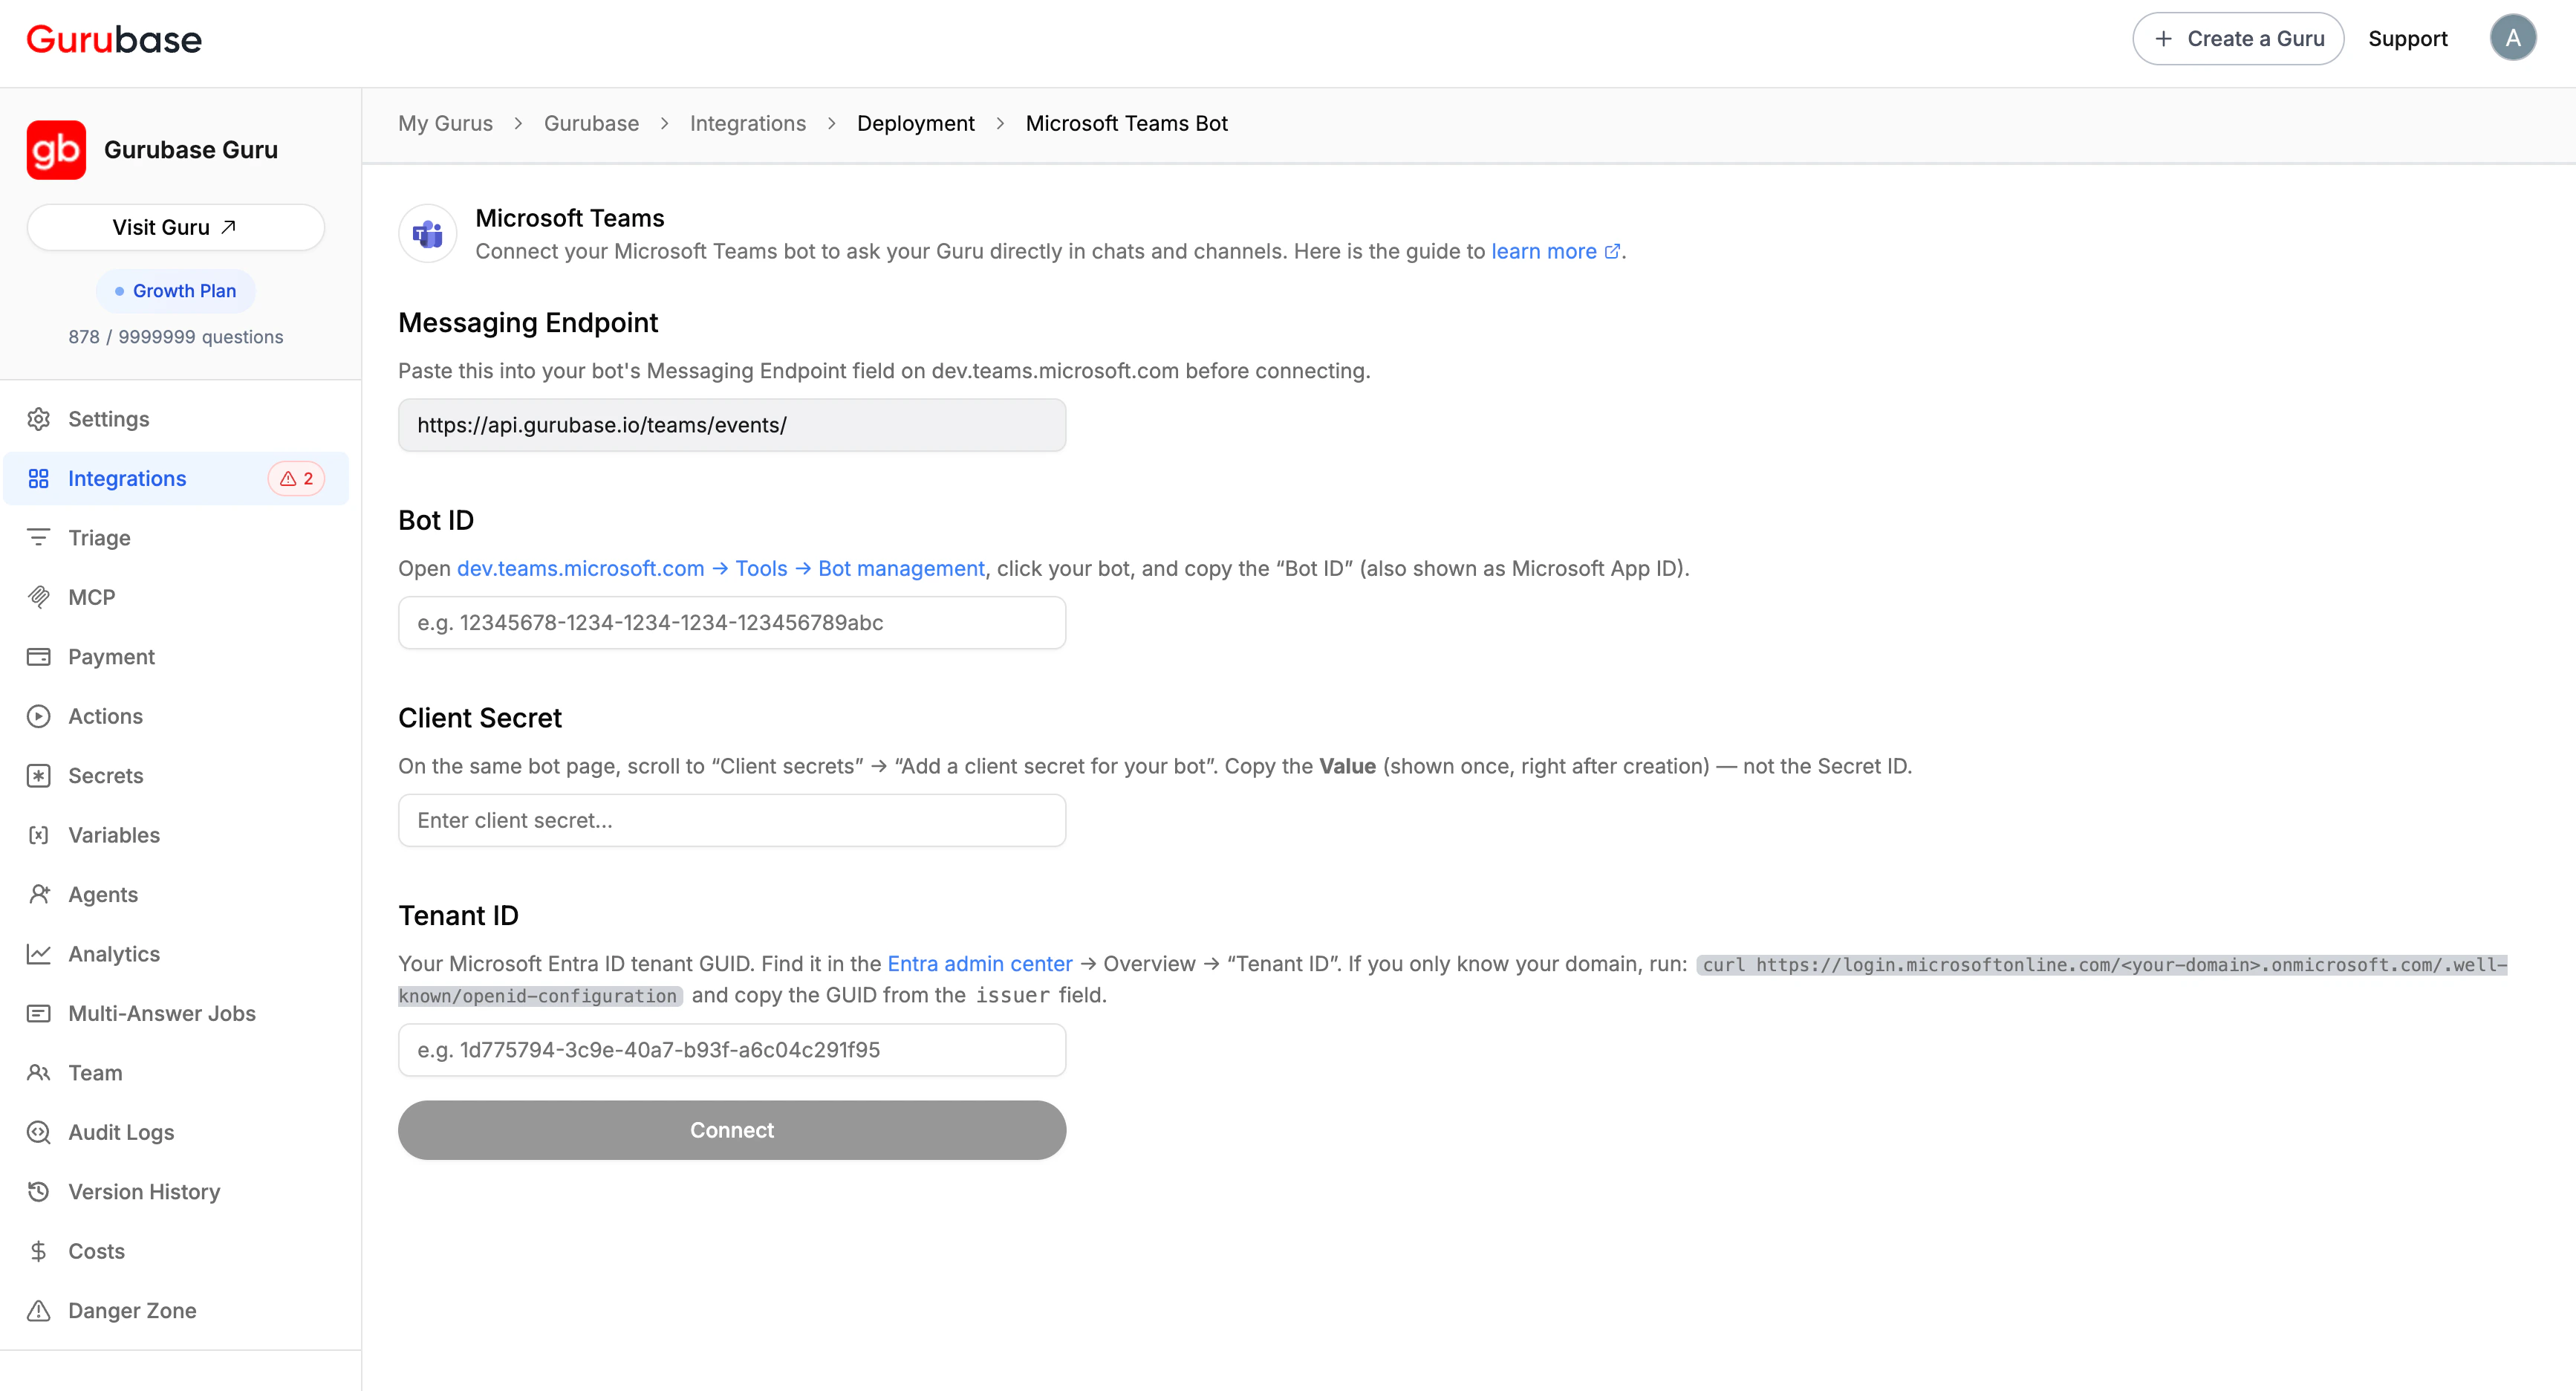 Paste the values you collected:
| Field | Source |
| ----------------- | ------------------------------------------ |
| **Bot ID** | The GUID from Step 3 (the bot you created) |
| **Client Secret** | The secret **Value** from Step 5 |
| **Tenant ID** | Your AAD Tenant GUID from Step 12 |
Click **Connect**. Gurubase will validate the credentials by acquiring a Bot Framework token; if everything is correct you'll see masked values on the page.
Org-wide pinning (Step 11) installs the bot into every user's personal sidebar so 1-1 chats work out of the box. But for the bot to reply in a **team channel**, the bot also needs to be installed in that specific team — pinning alone doesn't do this. Repeat the steps below once per team where you want channel support:
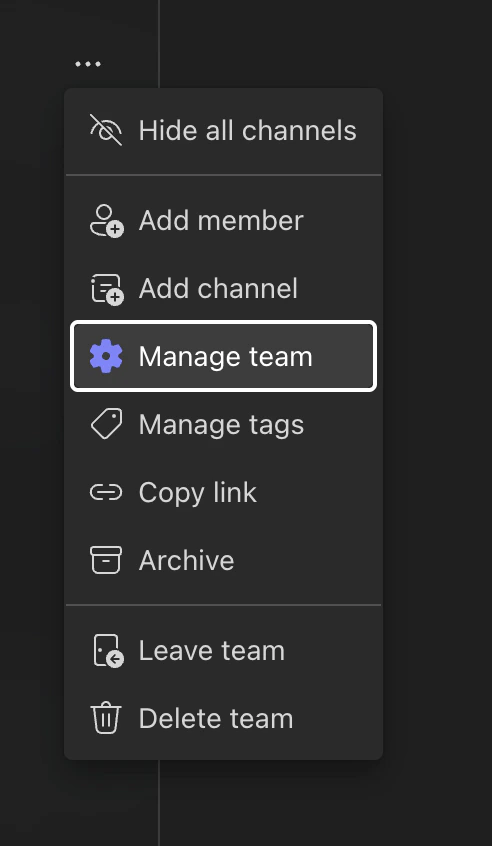
1. In Teams, hover over a team in the sidebar, click the **...** menu next to its name, and select **Manage team**.
Paste the values you collected:
| Field | Source |
| ----------------- | ------------------------------------------ |
| **Bot ID** | The GUID from Step 3 (the bot you created) |
| **Client Secret** | The secret **Value** from Step 5 |
| **Tenant ID** | Your AAD Tenant GUID from Step 12 |
Click **Connect**. Gurubase will validate the credentials by acquiring a Bot Framework token; if everything is correct you'll see masked values on the page.
Org-wide pinning (Step 11) installs the bot into every user's personal sidebar so 1-1 chats work out of the box. But for the bot to reply in a **team channel**, the bot also needs to be installed in that specific team — pinning alone doesn't do this. Repeat the steps below once per team where you want channel support:
1. In Teams, hover over a team in the sidebar, click the **...** menu next to its name, and select **Manage team**.
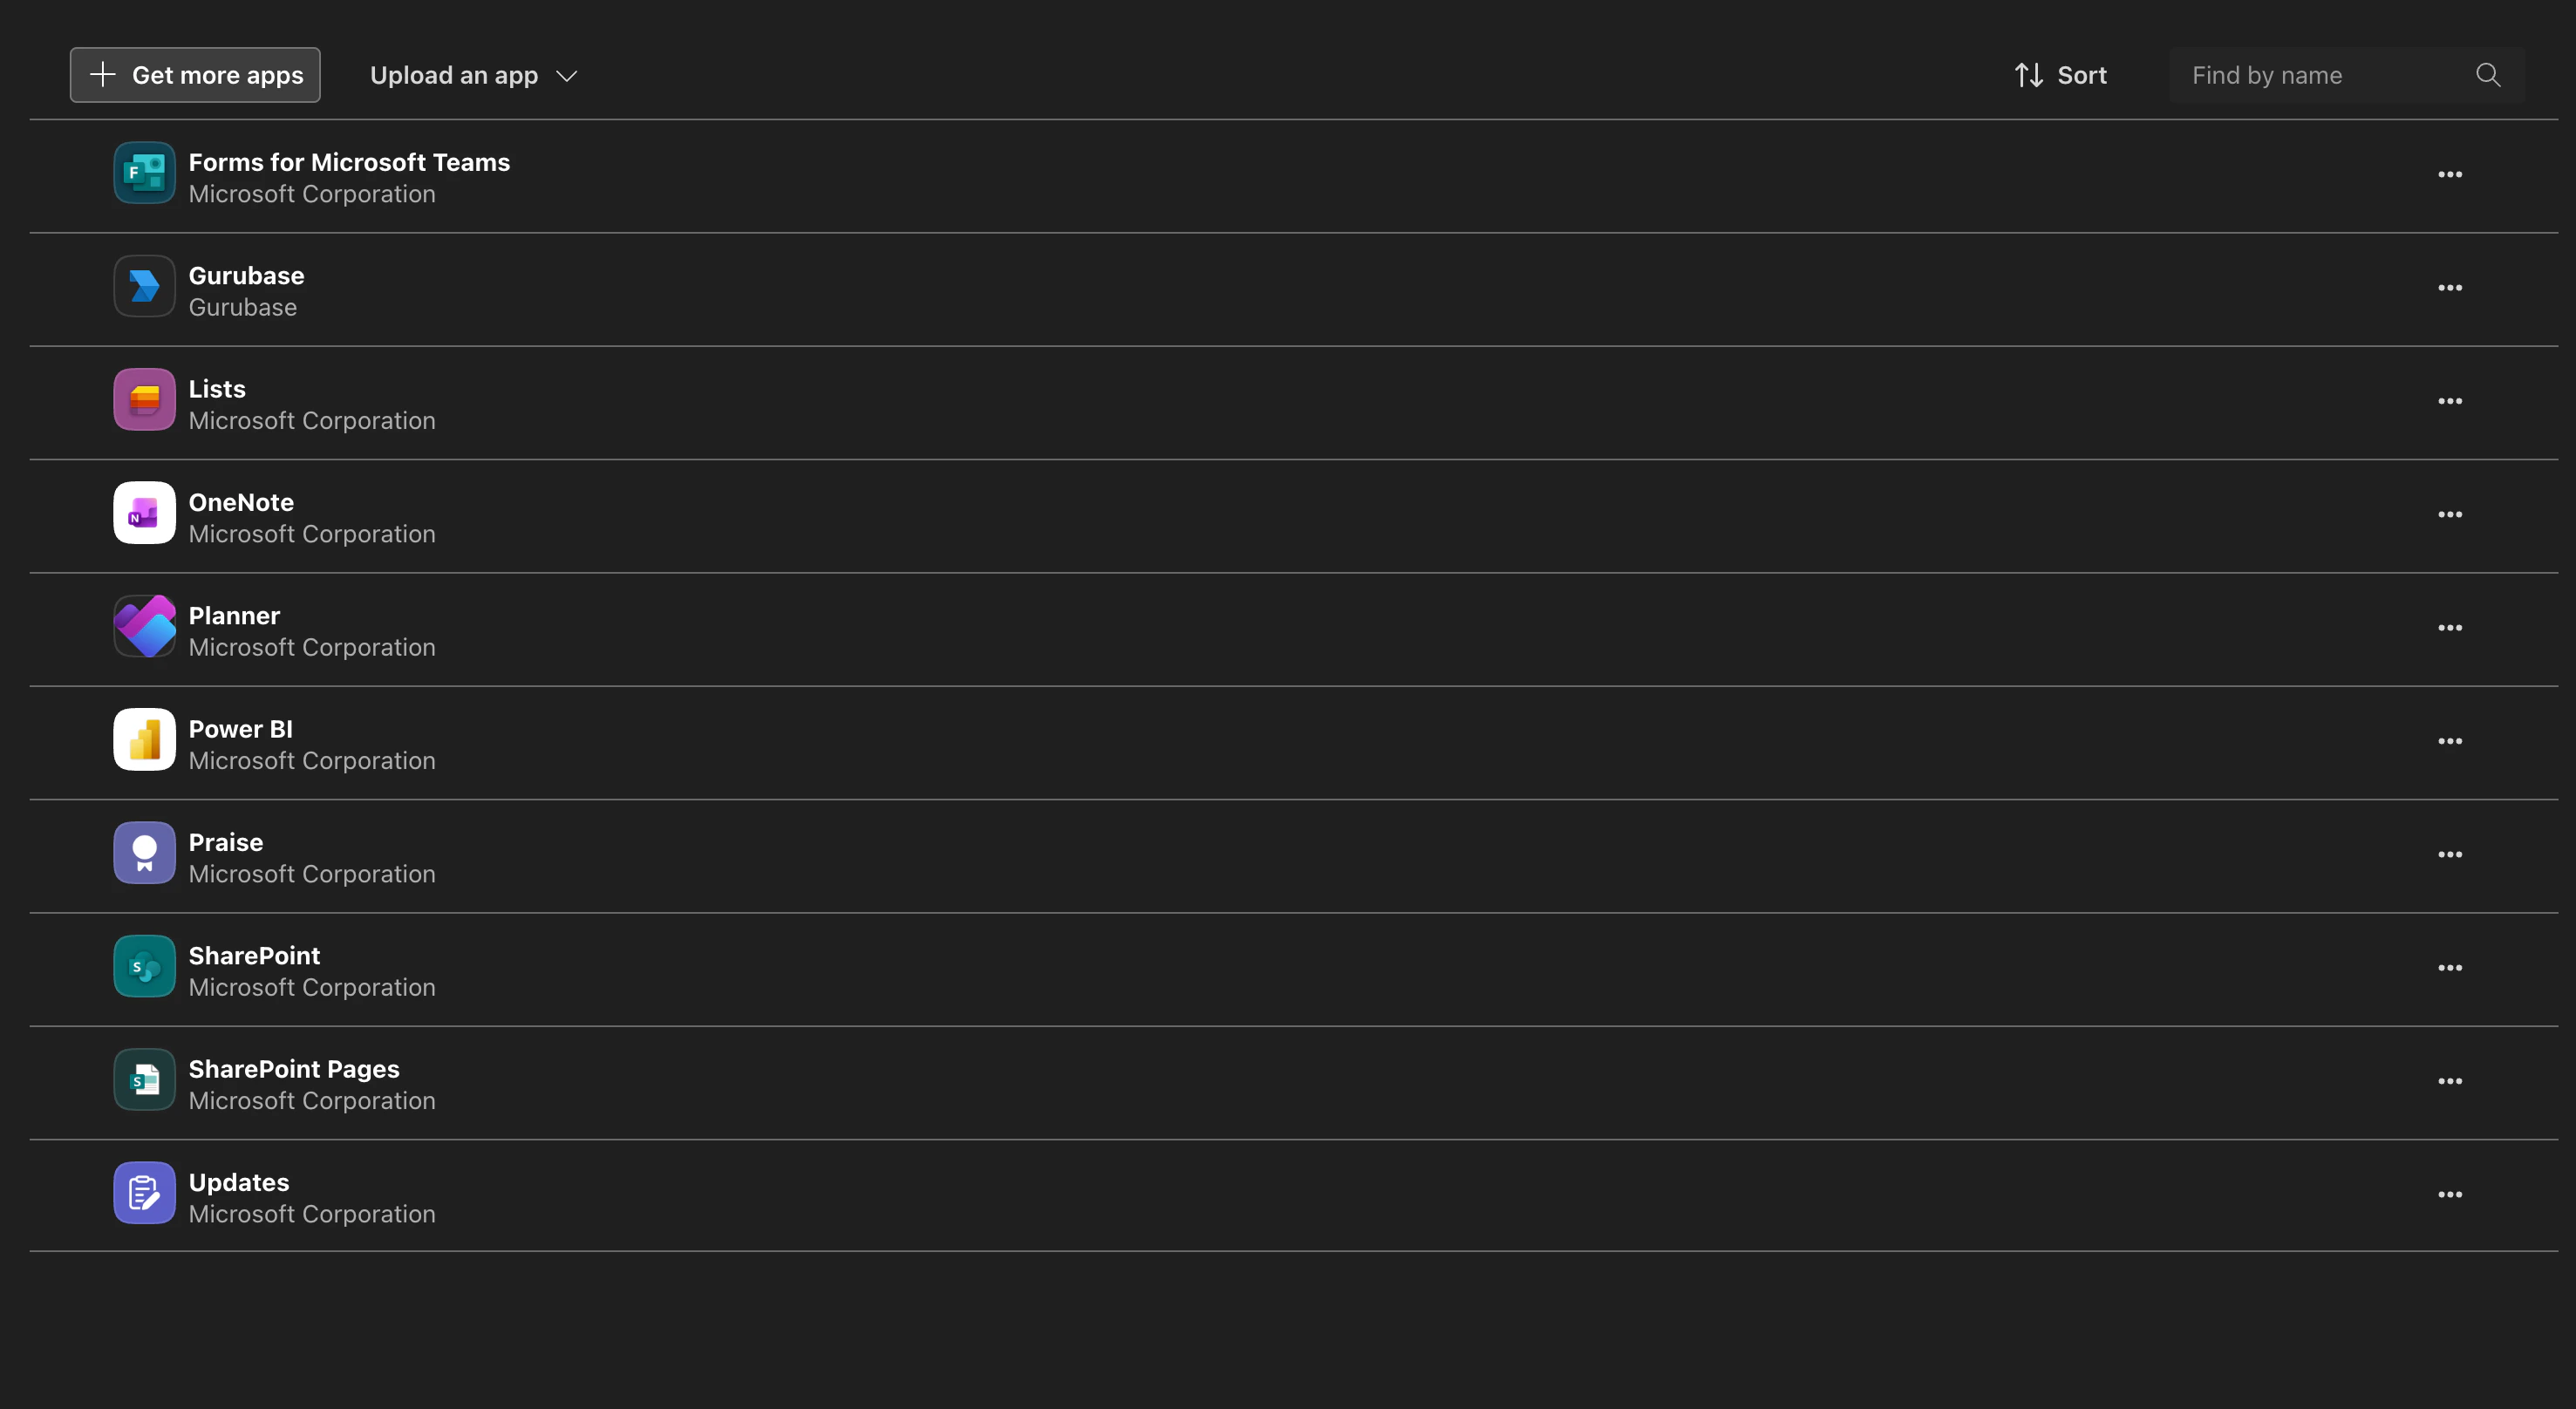
 2. Open the **Apps** tab in the team settings.
3. Click **Get more apps** in the top-right.
2. Open the **Apps** tab in the team settings.
3. Click **Get more apps** in the top-right.
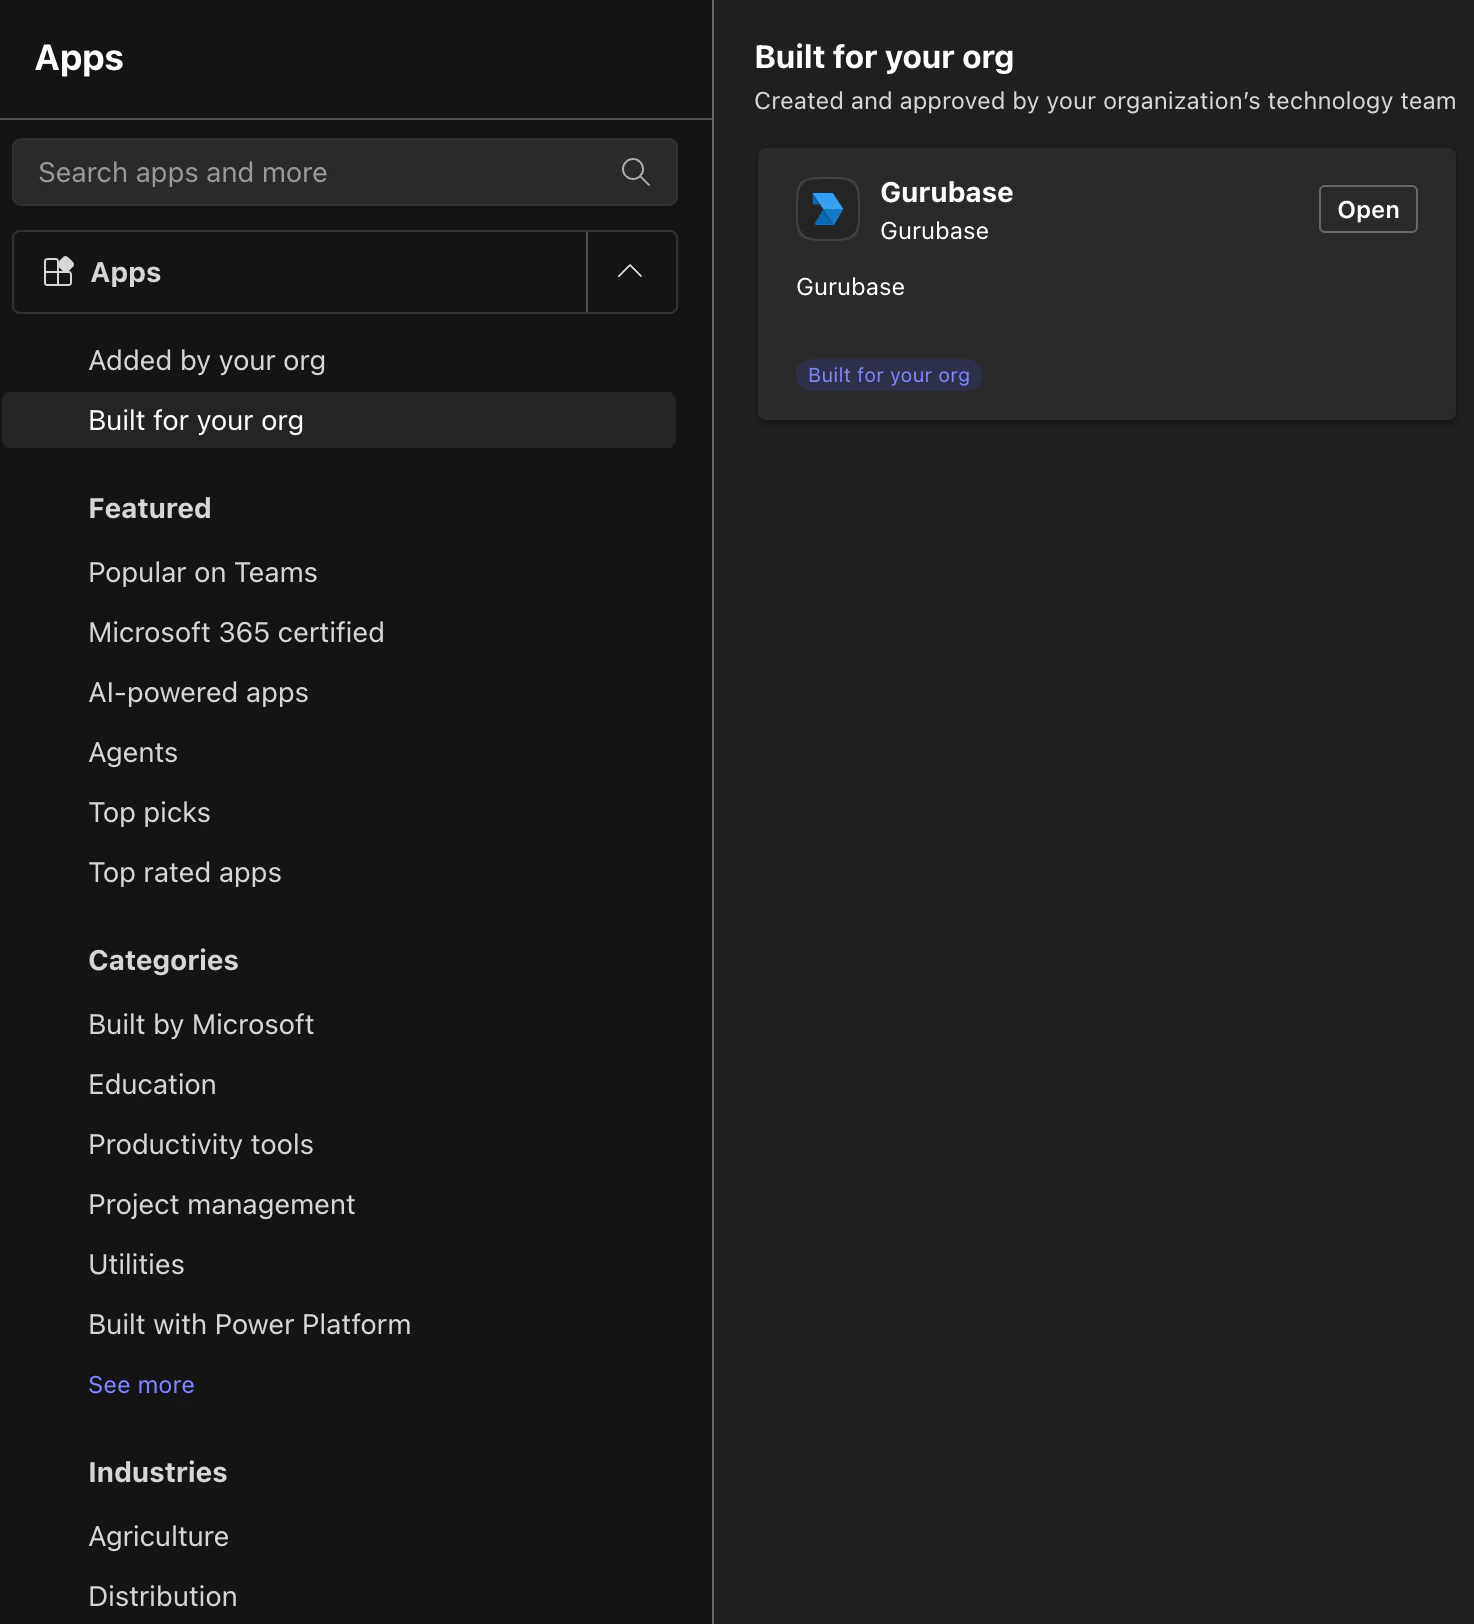
 4. In the apps store sidebar, click **Built for your org**. Your Gurubase bot will appear in the panel on the right.
 5. Click the bot, then **Add** to install it into the team.
Once installed, the bot can be `@mentioned` in any channel of that team without further per-channel configuration.
In Microsoft Teams, find your bot under **Apps** (sidebar, bottom-left) or simply start a new chat with the bot's name.
* **DM**: just type a question — no mention needed.
* **Channel**: mention the bot — Teams only forwards channel messages to bots when explicitly mentioned. To mention, type `@` and pick the bot from the autocomplete dropdown. Pasting `@bot-name` as plain text does **not** count as a mention; it'll look right in the editor but the bot won't receive the message.
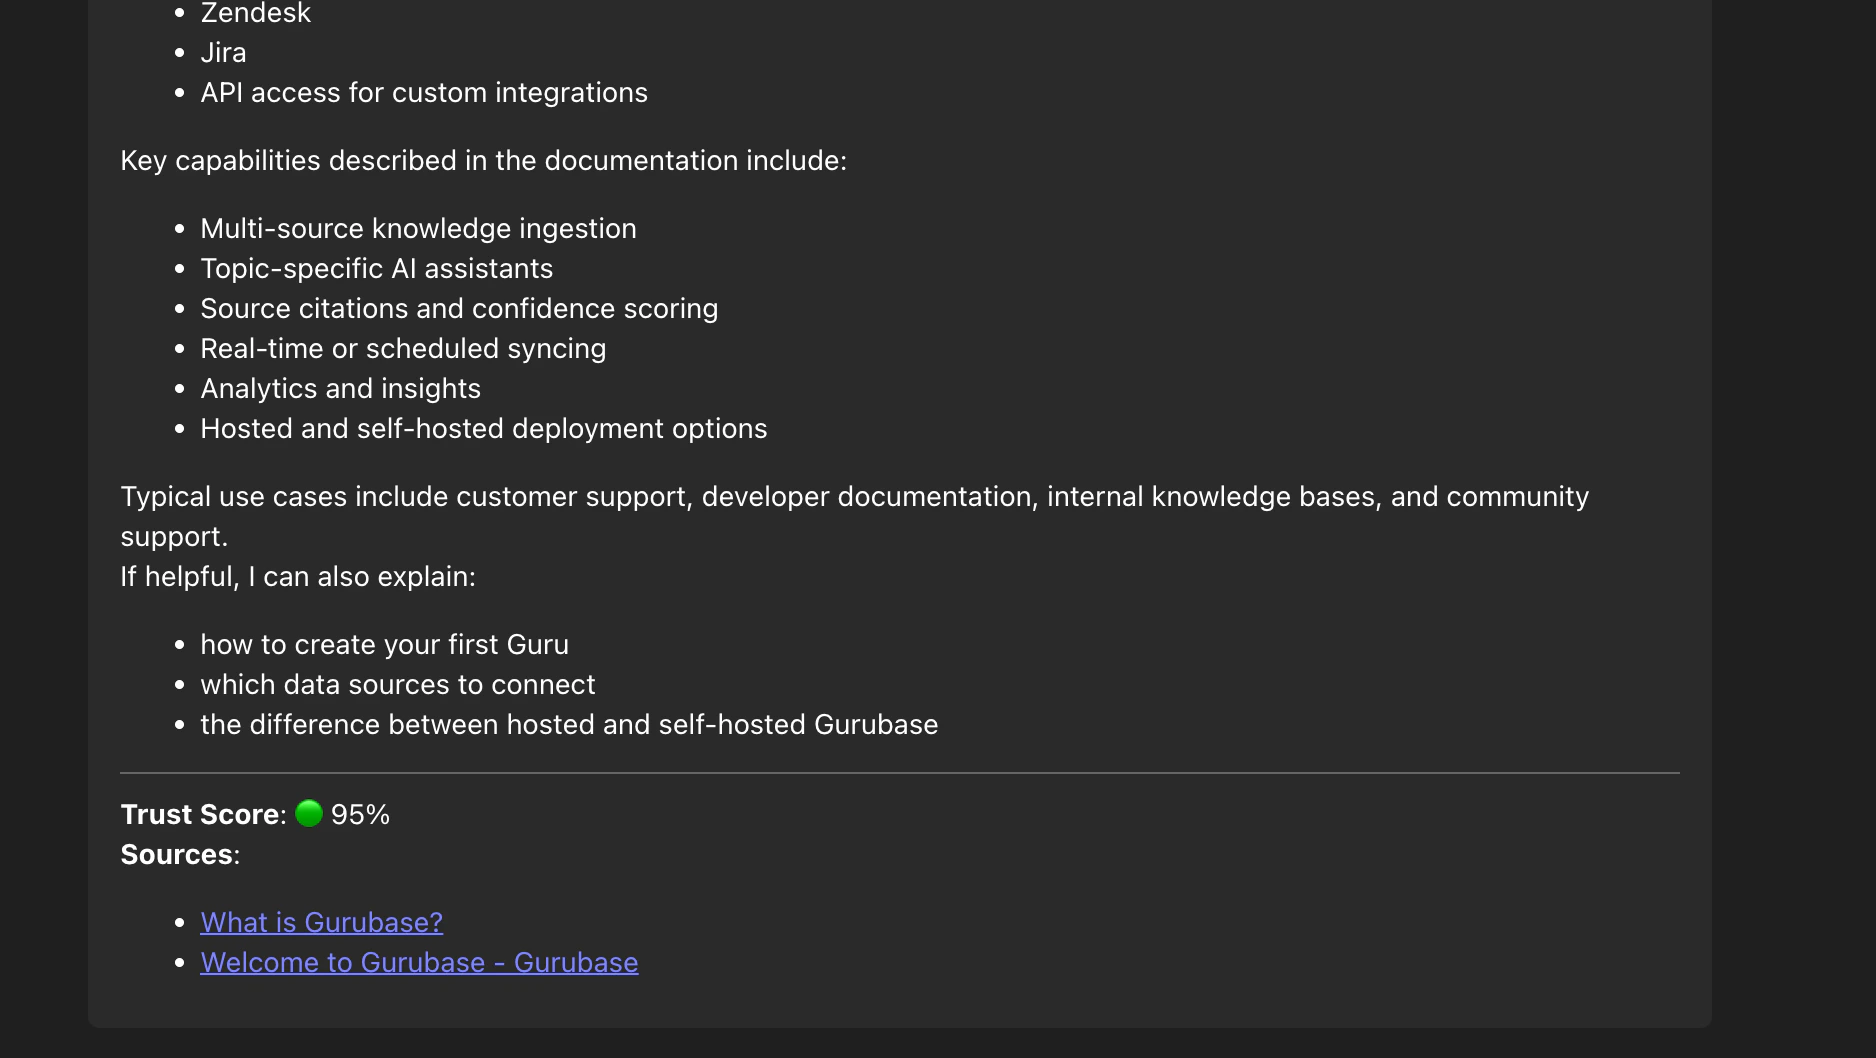
The bot replies with a streaming **Thinking…** placeholder that updates as the answer arrives, then settles into the final formatted reply with trust score and sources.
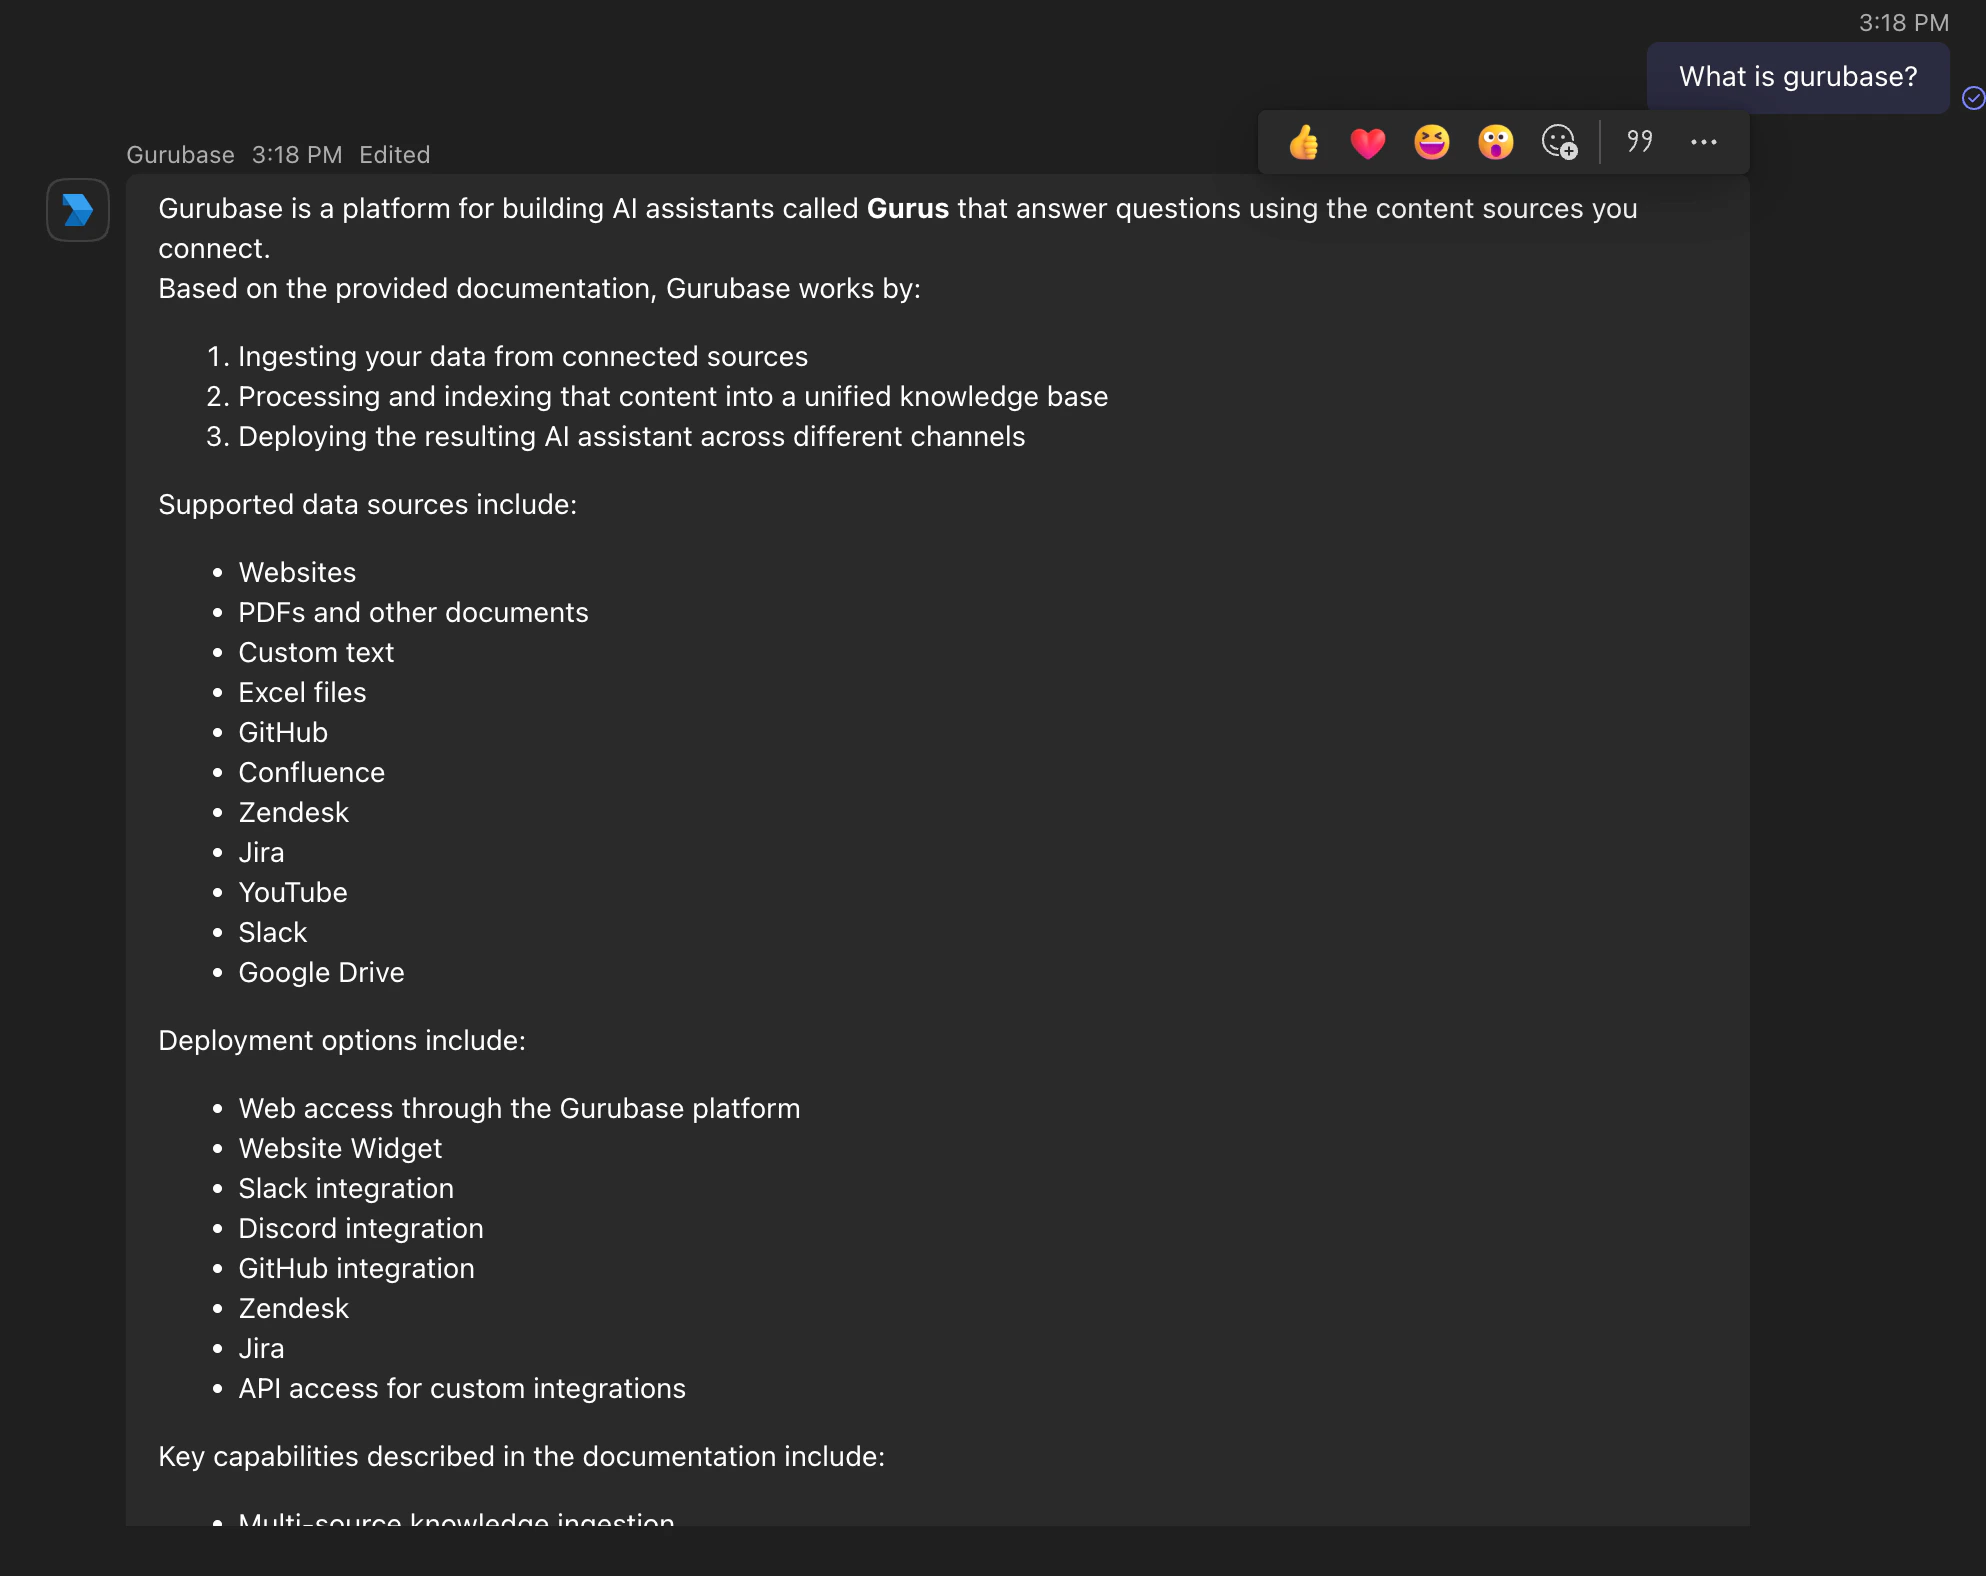
Example of a 1-1 chat exchange:
5. Click the bot, then **Add** to install it into the team.
Once installed, the bot can be `@mentioned` in any channel of that team without further per-channel configuration.
In Microsoft Teams, find your bot under **Apps** (sidebar, bottom-left) or simply start a new chat with the bot's name.
* **DM**: just type a question — no mention needed.
* **Channel**: mention the bot — Teams only forwards channel messages to bots when explicitly mentioned. To mention, type `@` and pick the bot from the autocomplete dropdown. Pasting `@bot-name` as plain text does **not** count as a mention; it'll look right in the editor but the bot won't receive the message.
The bot replies with a streaming **Thinking…** placeholder that updates as the answer arrives, then settles into the final formatted reply with trust score and sources.
Example of a 1-1 chat exchange:
 ***
## Conversation commands
| Command | What it does |
| -------- | ----------------------------------------------------------------------------------------------------------------------------------- |
| `/clear` | Drops the current conversation context. Your next message starts a fresh conversation. Works in both 1-1 chats and channel threads. |
| `/reset` | Alias for `/clear`. |
In 1-1 chats, the conversation context automatically rotates after **30 minutes** of inactivity, so you usually don't need `/clear` unless you want to start fresh sooner.
In channels, each thread is its own conversation — there's no time-based rotation, and `/clear` only resets the thread it was used in.
***
## Attachments
Gurubase processes the following attachment types out of the box:
| Type | 1-1 chat | Channel |
| --------------------------------- | -------- | ------- |
| **Images** (PNG, JPEG, GIF, WEBP) | ✓ | ✗ |
| **PDF** | ✓ | ✗ |
| **Log / text files** (.log, .txt) | ✓ | ✗ |
### Channel attachment limitation
Microsoft Teams does not forward any attachments to bots in channel messages — file uploads go to the channel's SharePoint folder and images are referenced in a way the bot can't fetch. Anything you want the bot to analyze must be shared in a **1-1 chat** with the bot.
This is a Teams platform limitation, not a Gurubase configuration option.
### File reuse within a conversation
Within the same 1-1 conversation context (between rotations), files you've already shared stay available for follow-up questions — you don't need to re-upload a PDF every time you want to ask about it. The bot tags inherited references with a `(from earlier)` badge so it's clear which sources came from previous messages.
***
## Updating an existing bot
If you change anything in the bot's manifest (scopes, name, icon, description, messaging endpoint registered in the manifest, etc.) after publishing, Teams won't pick up the change until you republish:
In your app on `dev.teams.microsoft.com`, open **Basic information** and increment the **Version** field (e.g. `1.0.1` → `1.0.2`). Teams aggressively caches manifests by version; without a bump, the change won't propagate.
Open **Publish → Publish to your org** in the sidebar and click **Publish your app** again.
Go to the [Teams admin center → Manage apps](https://admin.teams.microsoft.com/policies/manage-apps), find your bot, and click **Publish** on the new pending version. It can take a couple of minutes to propagate to Teams clients.
Changing the bot's **credentials** in Gurubase (rotating the client secret, switching tenants) is separate from this flow — that's done from the Gurubase integration page, no Teams republish needed.
***
## Disconnecting
Clicking **Disconnect** on the Gurubase integration page deletes the credentials Gurubase stores and stops the bot from receiving / replying to messages. It does **not** remove the bot app from Teams — users will still see it in their app list until you uninstall it from the [Teams admin center → Manage apps](https://admin.teams.microsoft.com/policies/manage-apps). For a clean uninstall, do both: disconnect in Gurubase, then remove the app in the admin center.
***
## Troubleshooting
| Symptom | Cause / Fix |
| ------------------------------------------------------ | ------------------------------------------------------------------------------------------------------------------------------------------------------------------------------------------ |
| `AADSTS700016` when connecting | Tenant ID doesn't match your bot's AAD tenant. Double-check the Tenant ID from Step 12. |
| `AADSTS7000215` or `AADSTS7000216` | Invalid client secret. Generate a new one in Step 5 and copy the **Value** (not the Secret ID). |
| Bot does not reply in a channel | You must mention the bot (`@`) in channels. Plain channel messages aren't forwarded to the bot. |
| Attachment posted in a channel didn't reach the bot | Teams limitation — no attachments (files or images) are forwarded to bots in channels. Share them in a 1-1 chat instead. |
| App doesn't appear in Teams admin center | The org publish can take a few minutes. Refresh after a minute or two. |
| Manifest update isn't reflected in Teams | See [Updating an existing bot](#updating-an-existing-bot) — every change needs a version bump and a re-publish through the admin center. |
| `@bot-name` in a channel does nothing | You typed it as plain text. Use `@` and pick the bot from the autocomplete dropdown so Teams registers it as a real mention. |
| Bot was removed in Gurubase but still appears in Teams | Disconnecting only severs the credentials; the app stays installed. Remove it from the [Teams admin center](https://admin.teams.microsoft.com/policies/manage-apps) for a clean uninstall. |
***
## Conversation commands
| Command | What it does |
| -------- | ----------------------------------------------------------------------------------------------------------------------------------- |
| `/clear` | Drops the current conversation context. Your next message starts a fresh conversation. Works in both 1-1 chats and channel threads. |
| `/reset` | Alias for `/clear`. |
In 1-1 chats, the conversation context automatically rotates after **30 minutes** of inactivity, so you usually don't need `/clear` unless you want to start fresh sooner.
In channels, each thread is its own conversation — there's no time-based rotation, and `/clear` only resets the thread it was used in.
***
## Attachments
Gurubase processes the following attachment types out of the box:
| Type | 1-1 chat | Channel |
| --------------------------------- | -------- | ------- |
| **Images** (PNG, JPEG, GIF, WEBP) | ✓ | ✗ |
| **PDF** | ✓ | ✗ |
| **Log / text files** (.log, .txt) | ✓ | ✗ |
### Channel attachment limitation
Microsoft Teams does not forward any attachments to bots in channel messages — file uploads go to the channel's SharePoint folder and images are referenced in a way the bot can't fetch. Anything you want the bot to analyze must be shared in a **1-1 chat** with the bot.
This is a Teams platform limitation, not a Gurubase configuration option.
### File reuse within a conversation
Within the same 1-1 conversation context (between rotations), files you've already shared stay available for follow-up questions — you don't need to re-upload a PDF every time you want to ask about it. The bot tags inherited references with a `(from earlier)` badge so it's clear which sources came from previous messages.
***
## Updating an existing bot
If you change anything in the bot's manifest (scopes, name, icon, description, messaging endpoint registered in the manifest, etc.) after publishing, Teams won't pick up the change until you republish:
In your app on `dev.teams.microsoft.com`, open **Basic information** and increment the **Version** field (e.g. `1.0.1` → `1.0.2`). Teams aggressively caches manifests by version; without a bump, the change won't propagate.
Open **Publish → Publish to your org** in the sidebar and click **Publish your app** again.
Go to the [Teams admin center → Manage apps](https://admin.teams.microsoft.com/policies/manage-apps), find your bot, and click **Publish** on the new pending version. It can take a couple of minutes to propagate to Teams clients.
Changing the bot's **credentials** in Gurubase (rotating the client secret, switching tenants) is separate from this flow — that's done from the Gurubase integration page, no Teams republish needed.
***
## Disconnecting
Clicking **Disconnect** on the Gurubase integration page deletes the credentials Gurubase stores and stops the bot from receiving / replying to messages. It does **not** remove the bot app from Teams — users will still see it in their app list until you uninstall it from the [Teams admin center → Manage apps](https://admin.teams.microsoft.com/policies/manage-apps). For a clean uninstall, do both: disconnect in Gurubase, then remove the app in the admin center.
***
## Troubleshooting
| Symptom | Cause / Fix |
| ------------------------------------------------------ | ------------------------------------------------------------------------------------------------------------------------------------------------------------------------------------------ |
| `AADSTS700016` when connecting | Tenant ID doesn't match your bot's AAD tenant. Double-check the Tenant ID from Step 12. |
| `AADSTS7000215` or `AADSTS7000216` | Invalid client secret. Generate a new one in Step 5 and copy the **Value** (not the Secret ID). |
| Bot does not reply in a channel | You must mention the bot (`@`) in channels. Plain channel messages aren't forwarded to the bot. |
| Attachment posted in a channel didn't reach the bot | Teams limitation — no attachments (files or images) are forwarded to bots in channels. Share them in a 1-1 chat instead. |
| App doesn't appear in Teams admin center | The org publish can take a few minutes. Refresh after a minute or two. |
| Manifest update isn't reflected in Teams | See [Updating an existing bot](#updating-an-existing-bot) — every change needs a version bump and a re-publish through the admin center. |
| `@bot-name` in a channel does nothing | You typed it as plain text. Use `@` and pick the bot from the autocomplete dropdown so Teams registers it as a real mention. |
| Bot was removed in Gurubase but still appears in Teams | Disconnecting only severs the credentials; the app stays installed. Remove it from the [Teams admin center](https://admin.teams.microsoft.com/policies/manage-apps) for a clean uninstall. |