> ## Documentation Index
> Fetch the complete documentation index at: https://docs.gurubase.ai/llms.txt
> Use this file to discover all available pages before exploring further.
# Website Widget
> Add Gurubase AI assistant to your website
You're already seeing the widget in action! Click the **"Ask AI"** button on
this page to try it out.
You can add your Guru directly to your website using our widget. The widget adds an "Ask AI" button that opens a chat interface when clicked.
## Prerequisites
Before adding the widget, make sure you have:
* A Guru on Gurubase (either on [Gurubase Cloud](https://app.gurubase.io) or self-hosted with Enterprise plan)
* A Widget ID from your Guru's settings
## Getting Your Widget ID
1. Go to [Gurubase platform](https://app.gurubase.io/my-gurus)
2. Click the Guru you want to add the widget to
3. Click "Integrations" and then "Web Widget"
4. Click "New Widget ID"
5. Enter your website's domain
6. Click the "Show" button to configure and preview your widget
7. Copy the generated widget script
Each Widget ID is restricted to work only on the specific domain it was created for. For example:
* A Widget ID created for `https://www.example.com` will only work on that exact domain.
* It won't work on subdomains like `https://docs.example.com`
* It won't work on different domains like `https://example.org`
* For local development, you need to create a separate Widget ID using your development URL (e.g., `http://localhost:3000`)
* Domain input supports wildcard (`*`) expression:
* `*.example.com` will match any subdomain of `example.com`
* `http://localhost:*` will match any port of `localhost`
* `*` will match any domain, so be careful with this option! Anyone who knows your Widget ID can send requests to your Guru.
Make sure to create Widget IDs for each domain where you want to use the widget.
### Per-Widget Settings
Each Widget ID has an **Attachments** toggle displayed below the domain. When enabled, users can attach files (images, logs, PDFs) in the widget chat via the paperclip button, drag-and-drop onto the input, or paste. When disabled (default), the attachment button is hidden and any file upload requests are rejected by the backend.
**Supported attachment file formats**
| Category | Accepted extensions |
| ----------- | ------------------------------------------------------------------------------------------------------------ |
| Images | `.png`, `.jpg`, `.jpeg`, `.gif`, `.webp` |
| Logs & text | `.txt`, `.log`, `.out`, `.err`, `.json`, `.jsonl`, `.ndjson` (plus rotated variants like `.log.1`, `.log.2`) |
| Documents | `.pdf`, `.docx` |
Default per-question limits (configurable per guru):
| Type | Max files | Max size per file |
| ----------- | --------- | ----------------- |
| Images | 5 | 5 MB |
| Logs & text | 5 | 5 MB |
| PDFs | 3 | 5 MB |
| DOCX | 3 | 5 MB |
Compressed archives (`.gz`, `.zip`, `.bz2`) are not supported; decompress before uploading.
### Text & Display Customization
Inside the widget configuration panel (click "Show"), you can customize the widget's text labels and control what elements are displayed. These settings are saved per-widget and take effect immediately.
**Text overrides** - Leave empty to use defaults. You type the exact text you want displayed:
| Setting | Default | Description |
| ----------------------- | -------------------------------------------------------------------------------------------- | ----------------------------------------- |
| Header Text | `"Ask {guru name} Guru"` | Title shown in the widget header |
| Input Placeholder | `"Ask anything about {guru name}"` | Placeholder text in the input field |
| Empty State Heading | `"Ask anything about {guru name}"` | Heading shown when no conversation exists |
| Empty State Description | `"{guru name} Guru uses the latest data from {guru name} sources to answer your questions."` | Description below the empty state heading |
| Bot Name | `"{guru name} Guru"` | Name shown next to bot responses |
**Display toggles** - Control which elements appear in the widget:
| Setting | Default | Description |
| -------------------------- | ------- | ----------------------------------------------- |
| Show Sources | Enabled | Display source references below responses |
| Show Trust Score | Enabled | Display confidence score for responses |
| Show "Powered by Gurubase" | Enabled | Footer branding (removable on self-hosted only) |
The **Button Text** is configured separately in the appearance section via the `data-text` HTML attribute.
## Widget Configuration & Live Preview
After creating a Widget ID, click "Show" button to open the configuration panel. This allows you to customize your widget's appearance and behavior with a **live preview** that shows exactly how it will look on your website.
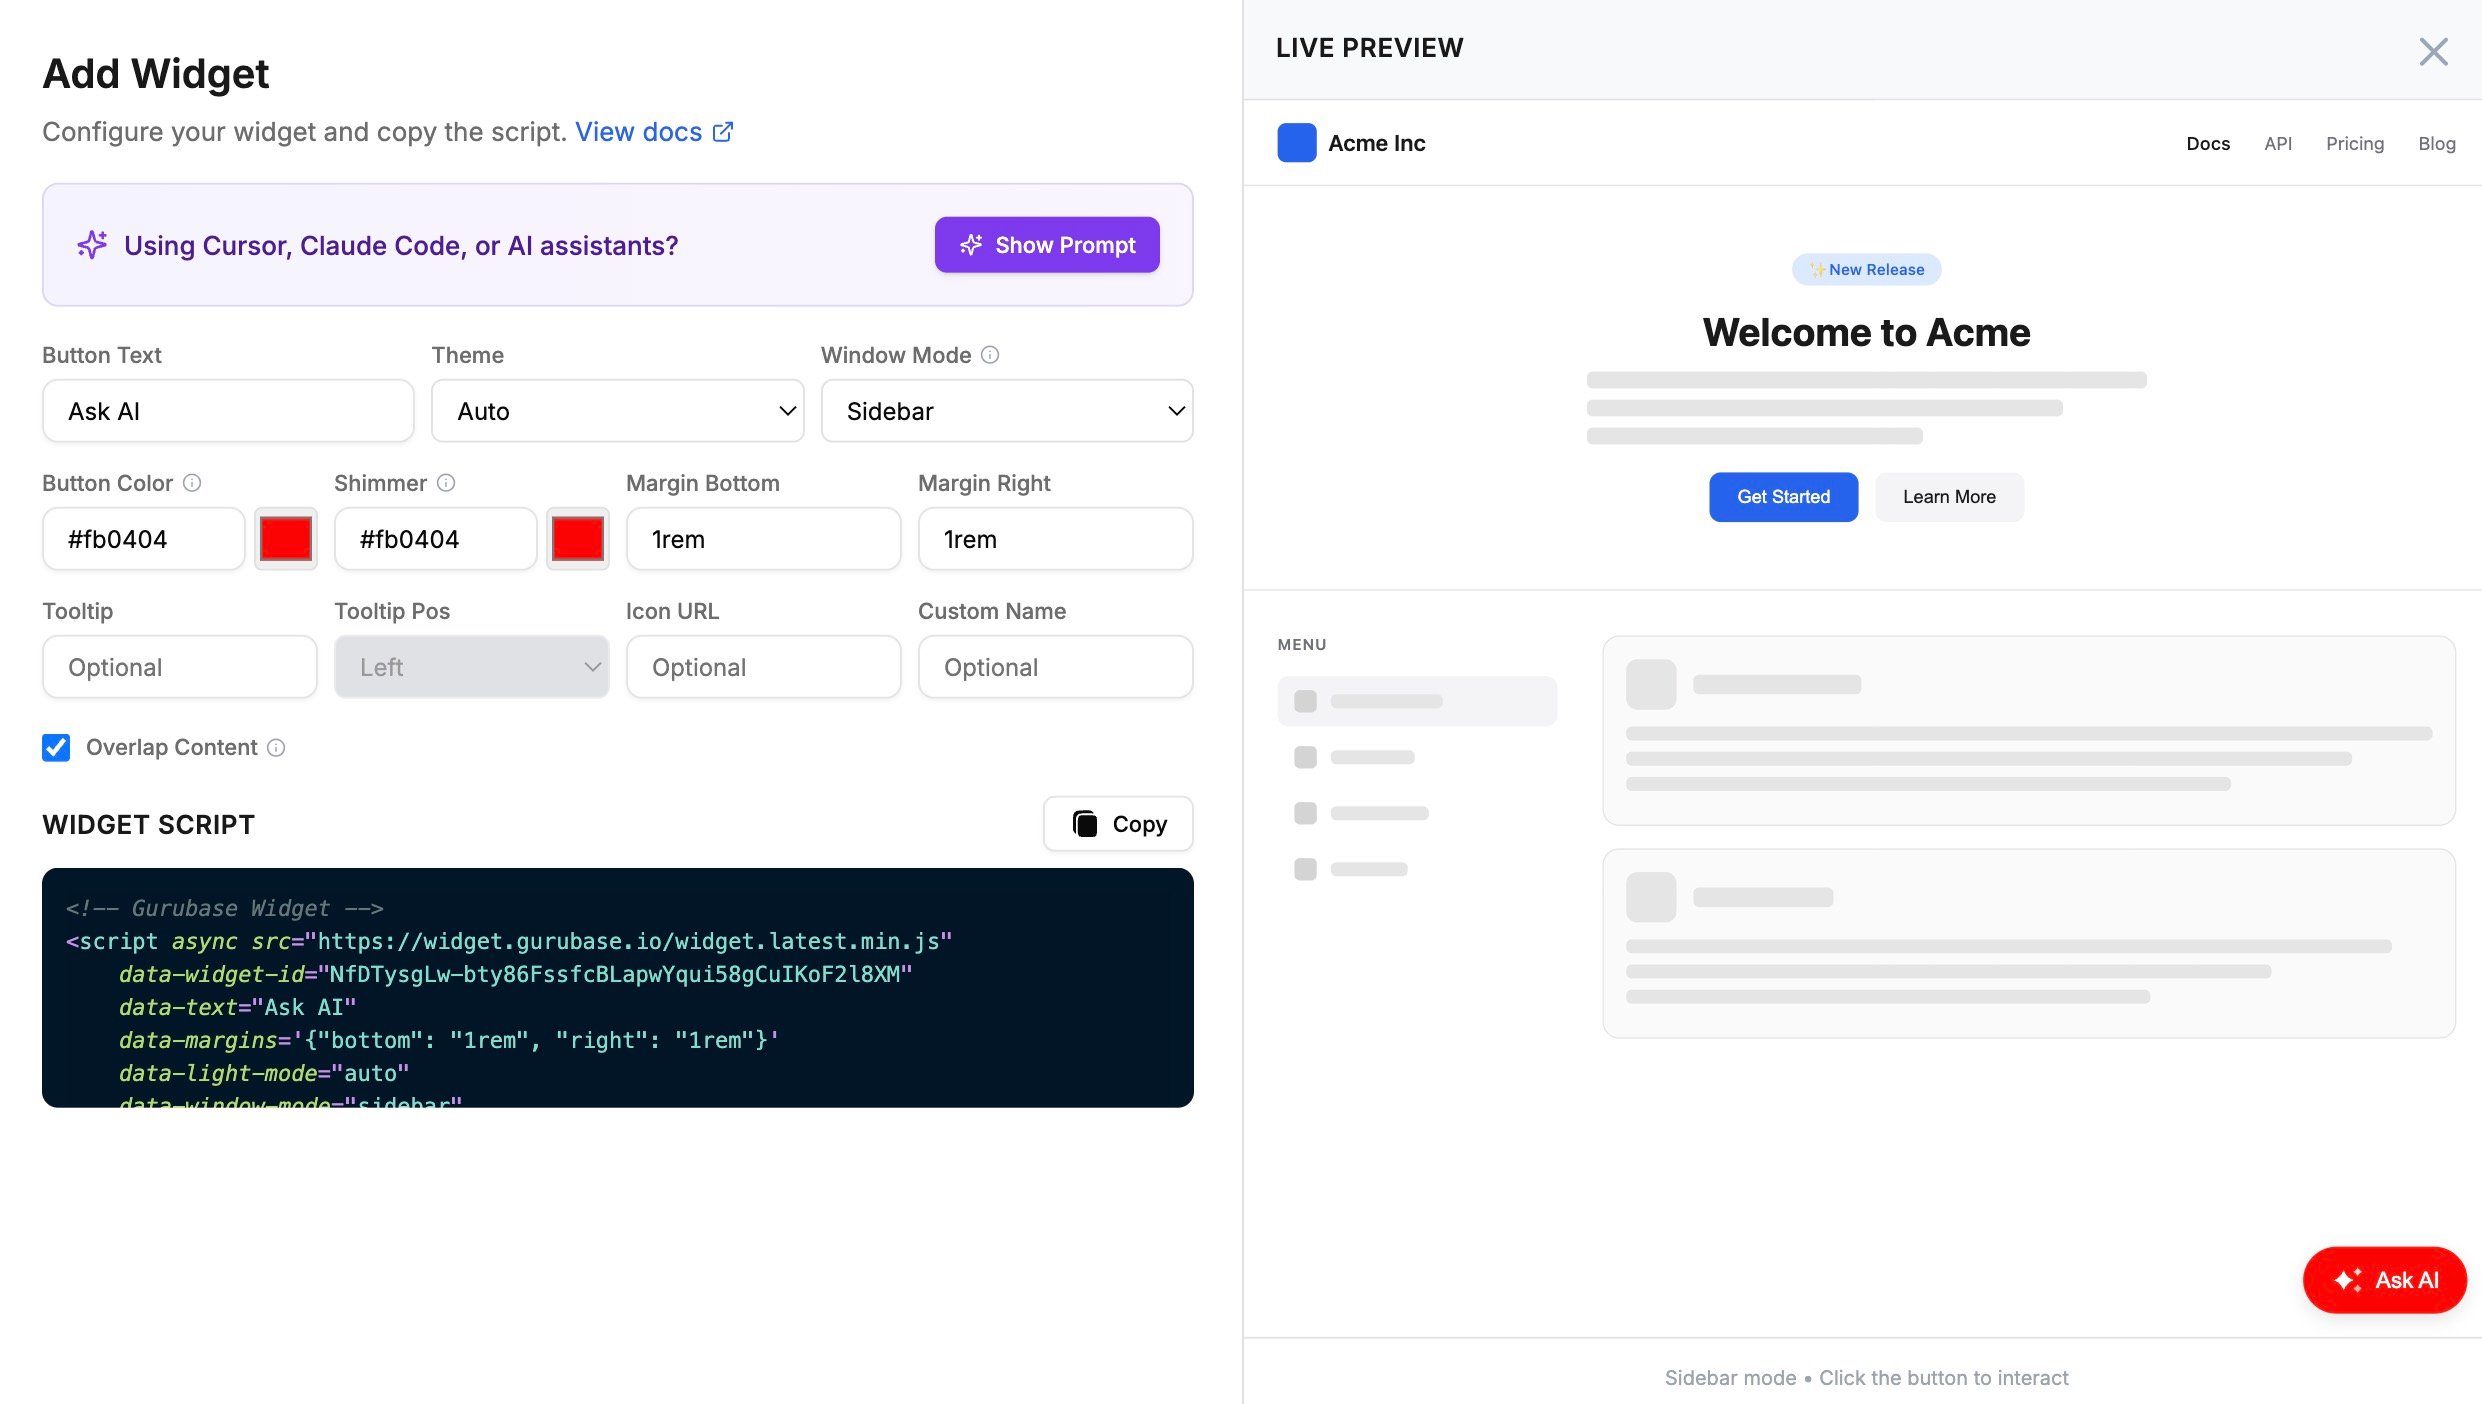 The configuration panel includes:
* **Button Text**: Customize the text displayed on the widget button
* **Theme**: Choose between Light, Dark, or Auto (syncs with your website's theme)
* **Window Mode**: Select Sidebar or Floating display mode
* **Button Color & Shimmer**: Customize the button's primary color and shimmer effect
* **Margins**: Adjust the button's position from the bottom and right edges
* **Tooltip**: Add an optional tooltip with customizable position
* **Icon URL & Custom Name**: Override the default Guru icon and name
* **Text & Display**: Override widget text labels and toggle sources, trust score, and branding visibility (see [Text & Display Customization](#text--display-customization))
The **Live Preview** on the right side shows your widget in real-time as you make changes. You can interact with the preview to test the widget's functionality before deploying it to your website.
Once you're satisfied with the configuration, copy the generated widget script from the "Widget Script" section.
### AI Assistant Integration
If you're using AI coding assistants like **Cursor**, **Claude Code**, or similar tools, click the **"Show Prompt"** button next to "Using Cursor, Claude Code, or AI assistants?" to get a ready-to-use prompt.
The configuration panel includes:
* **Button Text**: Customize the text displayed on the widget button
* **Theme**: Choose between Light, Dark, or Auto (syncs with your website's theme)
* **Window Mode**: Select Sidebar or Floating display mode
* **Button Color & Shimmer**: Customize the button's primary color and shimmer effect
* **Margins**: Adjust the button's position from the bottom and right edges
* **Tooltip**: Add an optional tooltip with customizable position
* **Icon URL & Custom Name**: Override the default Guru icon and name
* **Text & Display**: Override widget text labels and toggle sources, trust score, and branding visibility (see [Text & Display Customization](#text--display-customization))
The **Live Preview** on the right side shows your widget in real-time as you make changes. You can interact with the preview to test the widget's functionality before deploying it to your website.
Once you're satisfied with the configuration, copy the generated widget script from the "Widget Script" section.
### AI Assistant Integration
If you're using AI coding assistants like **Cursor**, **Claude Code**, or similar tools, click the **"Show Prompt"** button next to "Using Cursor, Claude Code, or AI assistants?" to get a ready-to-use prompt.
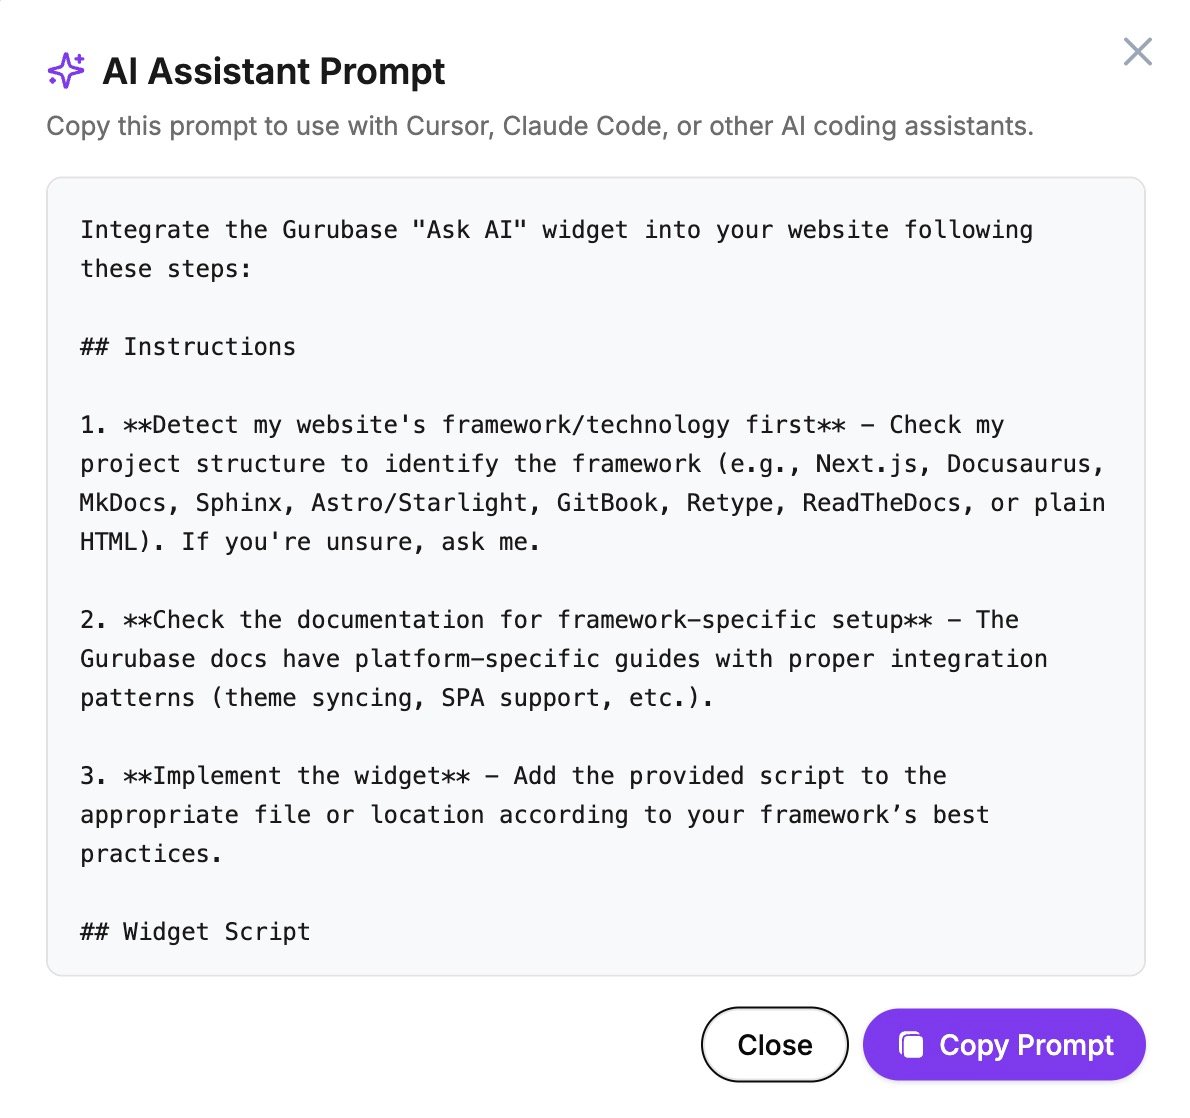 This prompt includes:
* Instructions to detect your website's framework (Next.js, Docusaurus, MkDocs, etc.)
* Guidance to check framework-specific setup from Gurubase docs
* Your widget script with all configured options
Simply copy the prompt and paste it into your AI assistant to get framework-specific integration instructions tailored to your project.
## Basic Installation
Add this script to your website's HTML:
```html theme={null}
```
## Configuration Options
| Option | Description | Default |
| ----------------------- | -------------------------------------------------------------------------------------------------------------------------------------------------------------------------------------------------------------------------------------------------------------------------------- | ------------------------------------- |
| `data-widget-id` | Your Widget ID (required) | - |
| `data-text` | Button text | "Ask AI" |
| `data-margins` | Button positioning | `{"bottom": "1rem", "right": "1rem"}` |
| `data-light-mode` | Light mode toggle. Possible values are `"light"`, `"dark"`, `"auto"`. Auto mode syncs the widget theme with the website's theme | `"dark"` |
| `data-window-mode` | Display mode for the chat window. Options: `"sidebar"`, `"floating"` | `"sidebar"` |
| `data-bg-color` | Primary color | Fetched from Gurubase |
| `data-shimmer-color` | Color for the animated shimmer effect on example questions. Accepts hex color values (e.g., "#0000FF"). If not set, uses `data-bg-color`. Falls back to red if neither is available. | Uses `data-bg-color` or red fallback |
| `data-icon-url` | Custom logo URL | Fetched from Gurubase |
| `data-name` | Custom name | Fetched from Gurubase |
| `data-base-url` | URL to your Gurubase backend. **Only for self-hosted Gurubase (Enterprise plan).** | Gurubase Cloud |
| `data-tooltip` | Tooltip text | null |
| `data-tooltip-side` | `"top"`, `"bottom"`, `"left"`, `"right"`, `"top left"`, `"top right"`, `"bottom left"`, `"bottom right"` | `"left"` |
| `data-overlap-content` | Whether to overlap the main content or shrink its width with the sidebar | `"false"` |
| `data-pass-user-info` | Enable passing user identifier to the server and displaying the user's name in chat. On Zendesk Help Center pages, automatically uses `HelpCenter.user.email` for identification and `HelpCenter.user.name` for display. Falls back to localStorage via `data-user-info-source`. | false |
| `data-user-info-source` | localStorage path to user info (supports dot notation, e.g., "ajs\_user\_traits.email"). Only needed for non-Zendesk sites. | null |
## Window Modes
The widget supports two display modes for the chat window:
The traditional sidebar experience where the chat window slides in from the
right edge of the screen.
This prompt includes:
* Instructions to detect your website's framework (Next.js, Docusaurus, MkDocs, etc.)
* Guidance to check framework-specific setup from Gurubase docs
* Your widget script with all configured options
Simply copy the prompt and paste it into your AI assistant to get framework-specific integration instructions tailored to your project.
## Basic Installation
Add this script to your website's HTML:
```html theme={null}
```
## Configuration Options
| Option | Description | Default |
| ----------------------- | -------------------------------------------------------------------------------------------------------------------------------------------------------------------------------------------------------------------------------------------------------------------------------- | ------------------------------------- |
| `data-widget-id` | Your Widget ID (required) | - |
| `data-text` | Button text | "Ask AI" |
| `data-margins` | Button positioning | `{"bottom": "1rem", "right": "1rem"}` |
| `data-light-mode` | Light mode toggle. Possible values are `"light"`, `"dark"`, `"auto"`. Auto mode syncs the widget theme with the website's theme | `"dark"` |
| `data-window-mode` | Display mode for the chat window. Options: `"sidebar"`, `"floating"` | `"sidebar"` |
| `data-bg-color` | Primary color | Fetched from Gurubase |
| `data-shimmer-color` | Color for the animated shimmer effect on example questions. Accepts hex color values (e.g., "#0000FF"). If not set, uses `data-bg-color`. Falls back to red if neither is available. | Uses `data-bg-color` or red fallback |
| `data-icon-url` | Custom logo URL | Fetched from Gurubase |
| `data-name` | Custom name | Fetched from Gurubase |
| `data-base-url` | URL to your Gurubase backend. **Only for self-hosted Gurubase (Enterprise plan).** | Gurubase Cloud |
| `data-tooltip` | Tooltip text | null |
| `data-tooltip-side` | `"top"`, `"bottom"`, `"left"`, `"right"`, `"top left"`, `"top right"`, `"bottom left"`, `"bottom right"` | `"left"` |
| `data-overlap-content` | Whether to overlap the main content or shrink its width with the sidebar | `"false"` |
| `data-pass-user-info` | Enable passing user identifier to the server and displaying the user's name in chat. On Zendesk Help Center pages, automatically uses `HelpCenter.user.email` for identification and `HelpCenter.user.name` for display. Falls back to localStorage via `data-user-info-source`. | false |
| `data-user-info-source` | localStorage path to user info (supports dot notation, e.g., "ajs\_user\_traits.email"). Only needed for non-Zendesk sites. | null |
## Window Modes
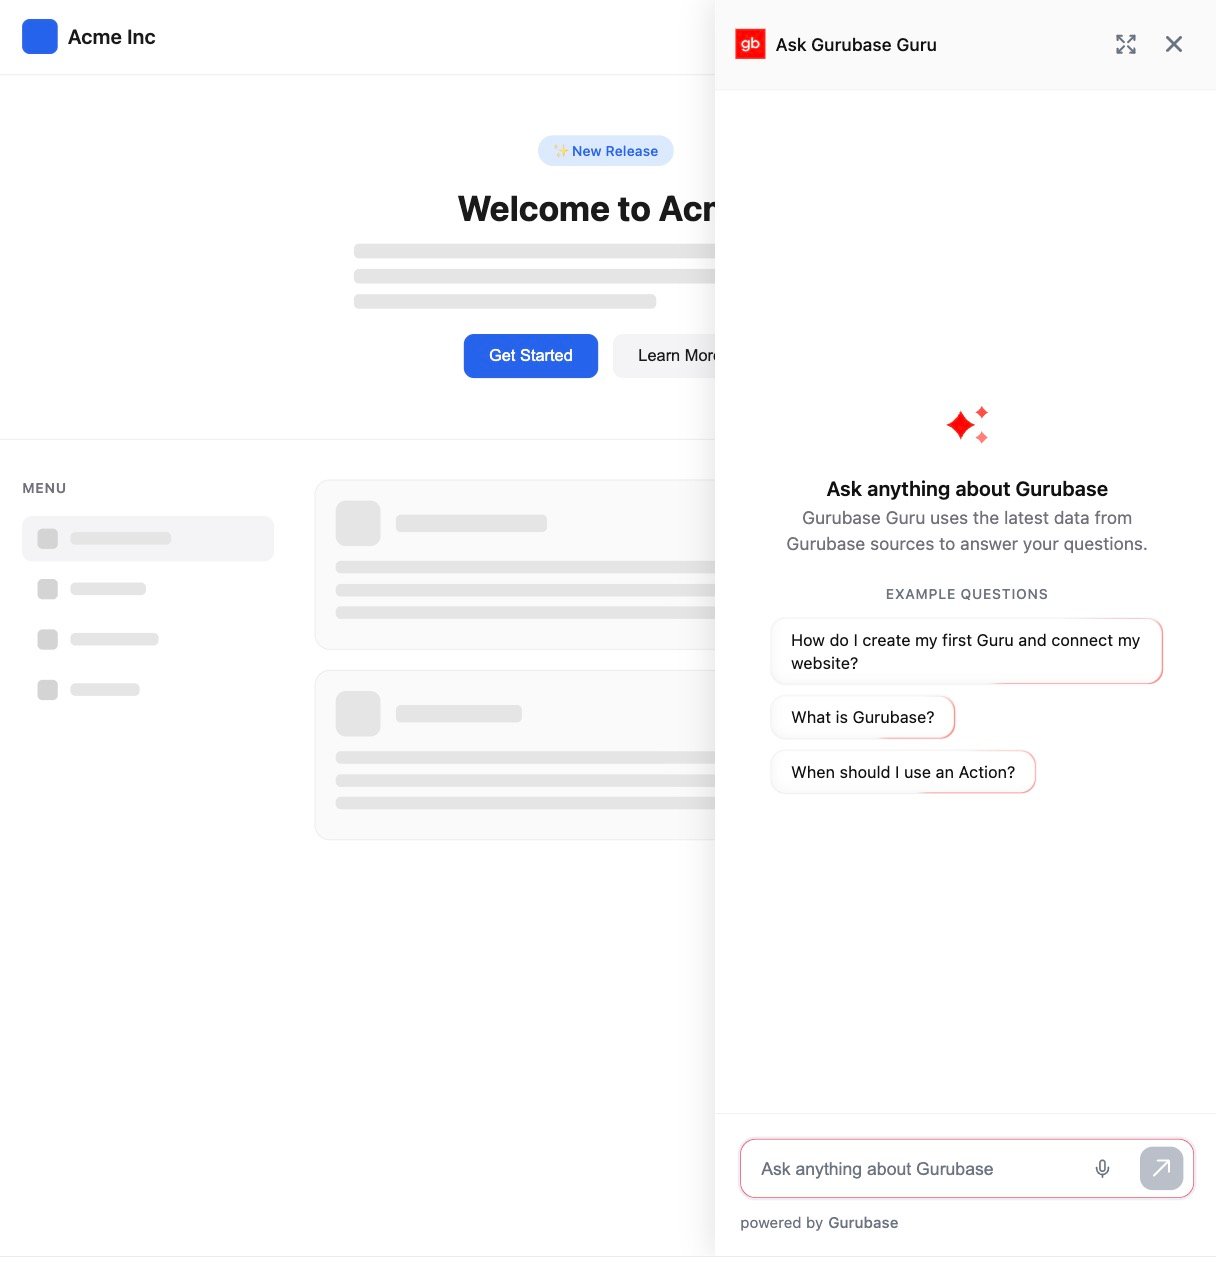
The widget supports two display modes for the chat window:
The traditional sidebar experience where the chat window slides in from the
right edge of the screen.
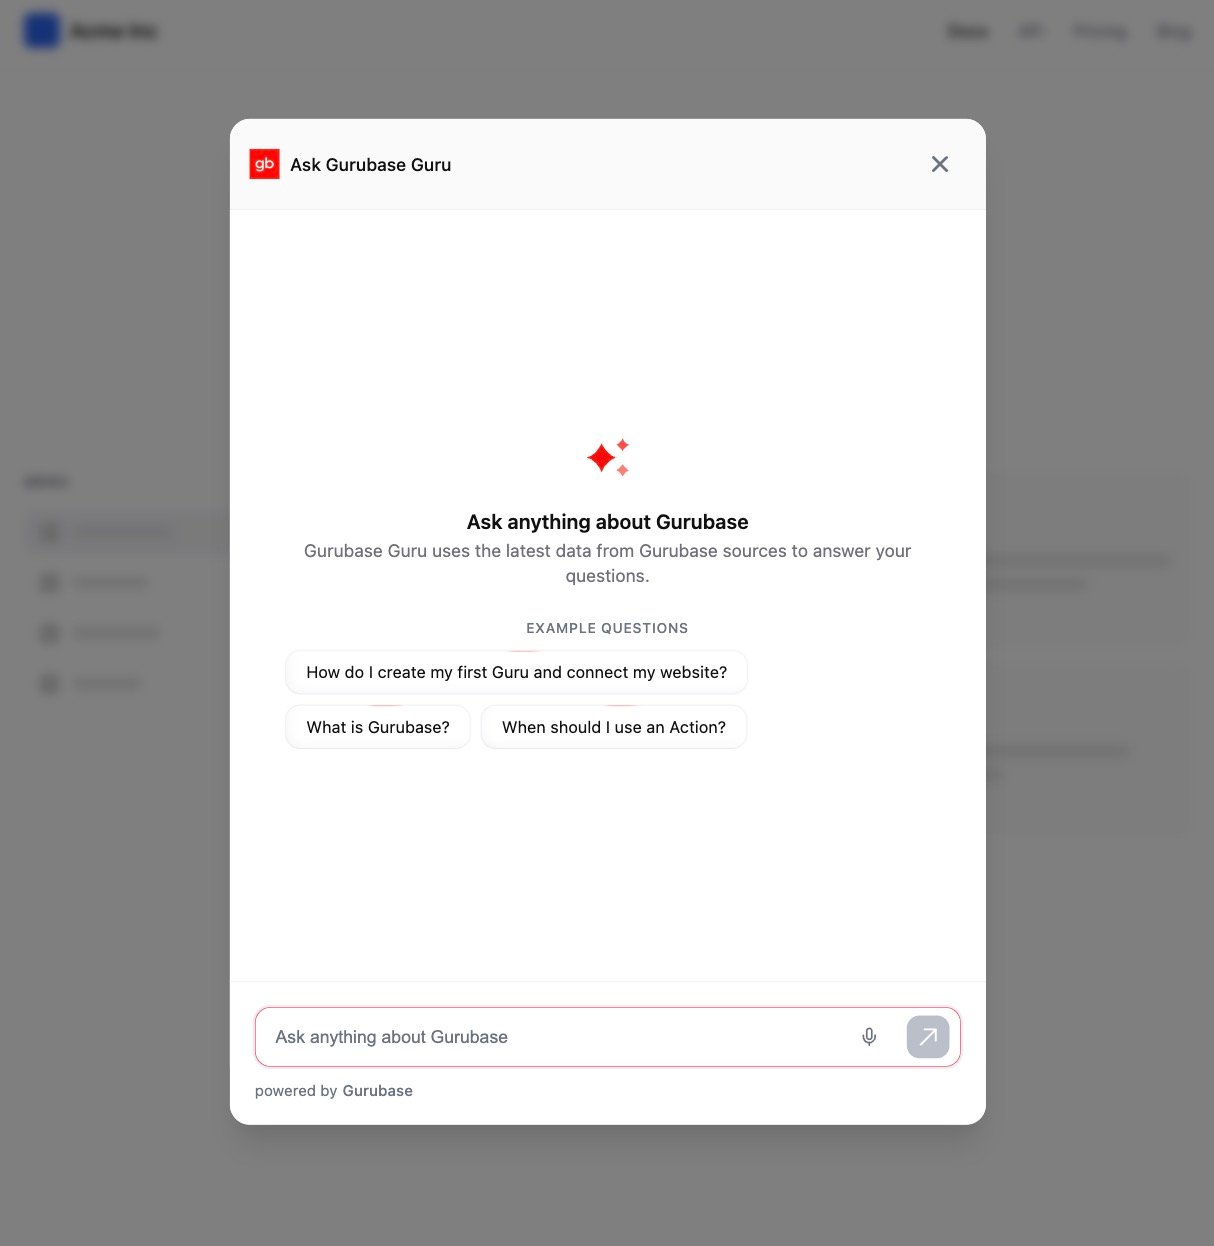
 A modern modal-style experience where the chat opens as a centered floating
window.
A modern modal-style experience where the chat opens as a centered floating
window.
 ### Floating Mode Example
```html theme={null}
```
## Self-hosted Installation (Enterprise Only)
Self-hosted installations are exclusively available under the Enterprise plan. To request access, contact us at **[contact@gurubase.io](mailto:contact@gurubase.io)**.
If you're using self-hosted Gurubase, you must set the Gurubase instance URL using the `data-base-url` attribute. The default URL of Self-hosted Gurubase instance is `http://localhost:8029/api/`.
```html theme={null}
```
## Customization Examples
### Custom Button Text and Position
```html theme={null}
```
### Light Mode with Custom Colors
```html theme={null}
```
## Exposed Functions
The widget exposes the following functions via `window.chatWidget`:
* `switchTheme(lightMode = null)`
Sync the theme of the widget with your website's theme. Accepts an optional `lightMode` parameter:
* `switchTheme()`: Toggle the theme
* `switchTheme(true)`: Force light mode
* `switchTheme(false)`: Force dark mode
Example: `window.chatWidget.switchTheme(true);`
See the [MkDocs](https://github.com/Gurubase/gurubase-widget/tree/master/examples/mkdocs/docs/js/theme-switch.js) example for theme syncing implementation.
* `destroy()`
Remove the widget from the DOM and clean up all event listeners. Useful for SPAs where you want to conditionally show/hide the widget based on the current route.
Example: `window.chatWidget.destroy();`
See [Path-Based Widget Loading](#path-based-widget-loading) for a complete example.
## Example Questions
You can display custom example questions in your widget to help guide users on what they can ask. These questions appear when users open the widget, providing helpful prompts to get started.
### Floating Mode Example
```html theme={null}
```
## Self-hosted Installation (Enterprise Only)
Self-hosted installations are exclusively available under the Enterprise plan. To request access, contact us at **[contact@gurubase.io](mailto:contact@gurubase.io)**.
If you're using self-hosted Gurubase, you must set the Gurubase instance URL using the `data-base-url` attribute. The default URL of Self-hosted Gurubase instance is `http://localhost:8029/api/`.
```html theme={null}
```
## Customization Examples
### Custom Button Text and Position
```html theme={null}
```
### Light Mode with Custom Colors
```html theme={null}
```
## Exposed Functions
The widget exposes the following functions via `window.chatWidget`:
* `switchTheme(lightMode = null)`
Sync the theme of the widget with your website's theme. Accepts an optional `lightMode` parameter:
* `switchTheme()`: Toggle the theme
* `switchTheme(true)`: Force light mode
* `switchTheme(false)`: Force dark mode
Example: `window.chatWidget.switchTheme(true);`
See the [MkDocs](https://github.com/Gurubase/gurubase-widget/tree/master/examples/mkdocs/docs/js/theme-switch.js) example for theme syncing implementation.
* `destroy()`
Remove the widget from the DOM and clean up all event listeners. Useful for SPAs where you want to conditionally show/hide the widget based on the current route.
Example: `window.chatWidget.destroy();`
See [Path-Based Widget Loading](#path-based-widget-loading) for a complete example.
## Example Questions
You can display custom example questions in your widget to help guide users on what they can ask. These questions appear when users open the widget, providing helpful prompts to get started.
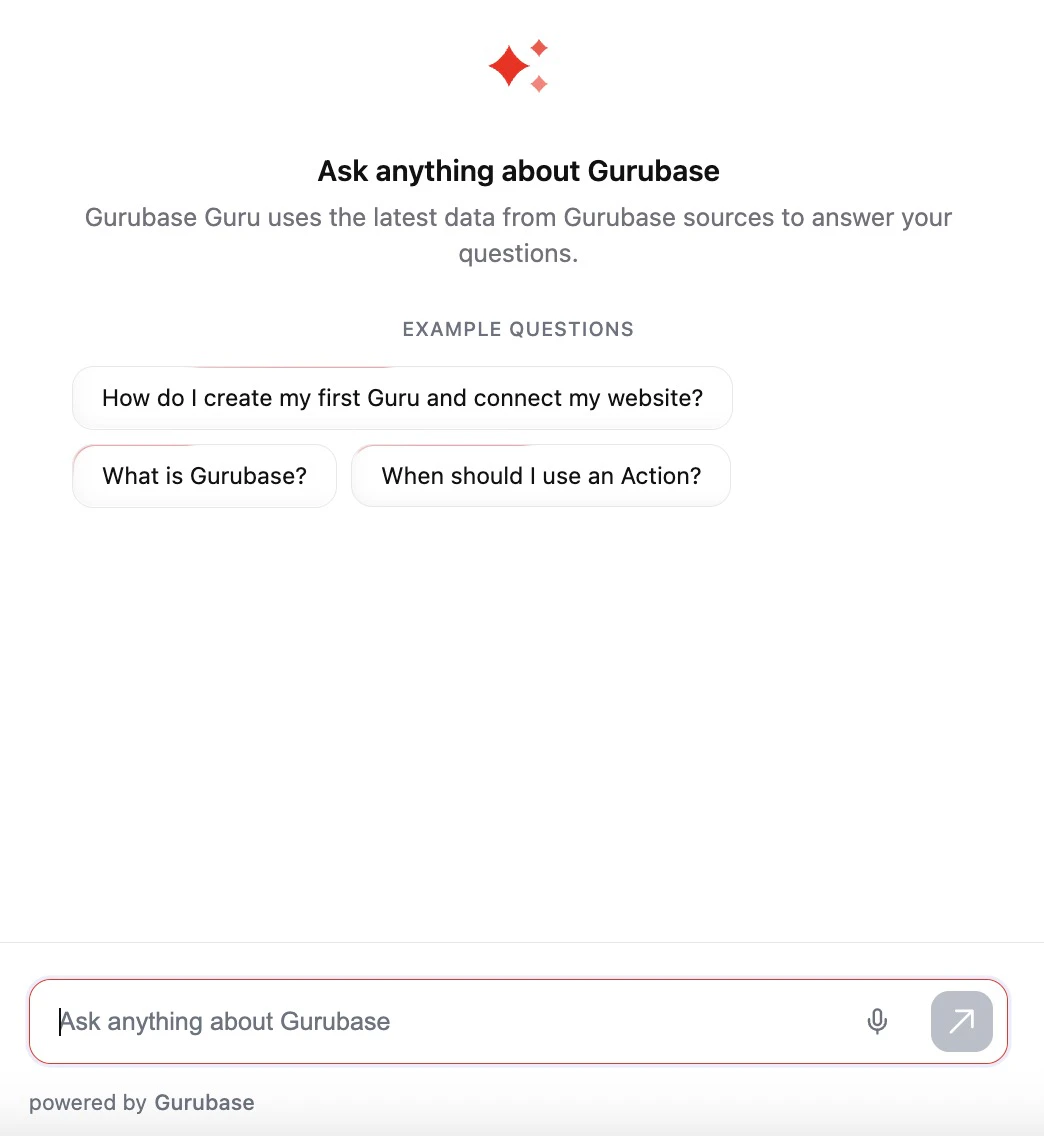 To configure example questions:
1. Go to your Guru's settings page
2. Scroll to **Advanced Settings**
3. Add up to 3 example questions (100 characters max each)
4. Save your changes
When users click an example question in the widget, it populates the input field so they can submit it directly or modify it first.
See the full Example Questions guide for best practices and tips
## User Identification
The widget can automatically identify users and include their information in API requests as `external_user_id`. It also displays the user's name in chat messages instead of the default "You" label. This supports two methods: automatic detection on Zendesk Help Center pages and manual configuration via localStorage.
### How It Works
When `data-pass-user-info="true"` is set, the widget:
1. Checks for Zendesk's `HelpCenter.user.email` for user identification (automatic, no extra config needed)
2. Falls back to reading from localStorage via `data-user-info-source` if HelpCenter is not available
3. Sends the extracted value as `external_user_id` to the backend
4. Displays the user's name in chat messages using this fallback order:
* `HelpCenter.user.name` (Zendesk only)
* `HelpCenter.user.email` (Zendesk only)
* `data-user-info-source` value from localStorage
* "You" (default if none of the above are available)
5. Fails silently if data is unavailable (won't break widget functionality)
### Zendesk Help Center (Automatic)
On Zendesk Help Center pages, the widget automatically detects the logged-in user's email for identification and their name for display. No `data-user-info-source` is needed:
```html theme={null}
```
### localStorage (Other Sites)
For non-Zendesk sites, configure `data-user-info-source` to read from localStorage. Supports dot notation for nested JSON objects.
```html theme={null}
```
### Common Use Cases
**Segment Analytics:**
```html theme={null}
data-pass-user-info="true" data-user-info-source="ajs_user_traits.email"
```
Extracts email from Segment's user traits object stored as:
```json theme={null}
localStorage['ajs_user_traits'] = '{"email": "user@example.com", "name": "John Doe"}'
```
**Mixpanel:**
```html theme={null}
data-pass-user-info="true" data-user-info-source="mp_user_properties.email"
```
**Custom User Data:**
```html theme={null}
data-pass-user-info="true" data-user-info-source="userData.userId"
```
**Top-level localStorage key (no nesting):**
```html theme={null}
data-pass-user-info="true" data-user-info-source="user_id"
```
## Path-Based Widget Loading
If you want to load the widget only on specific paths (e.g., only on `/docs/` pages), you can use a conditional loading approach. This is especially useful for Single Page Applications (SPAs) where you need to handle client-side navigation.
The following script can be adapted to any SPA framework (Docusaurus, Next.js, Remix, etc.):
```javascript theme={null}
(function () {
var widgetInitialized = false;
function isDocsPath(pathname) {
return pathname === "/docs" || pathname.startsWith("/docs/");
}
function initWidget() {
if (widgetInitialized) return;
// Only show on /docs pages - modify this path as needed
if (!isDocsPath(window.location.pathname)) return;
var existingScript = document.getElementById("guru-widget-id");
if (existingScript) return;
var script = document.createElement("script");
script.src = "https://widget.gurubase.io/widget.latest.min.js";
script.setAttribute("data-widget-id", "YOUR_WIDGET_ID");
script.setAttribute("data-text", "Ask AI");
script.setAttribute("data-margins", '{"bottom": "20px", "right": "20px"}');
script.setAttribute("data-light-mode", "auto");
script.setAttribute("data-overlap-content", "true");
script.defer = true;
script.id = "guru-widget-id";
document.body.appendChild(script);
widgetInitialized = true;
}
function destroyWidget() {
if (!widgetInitialized) return;
// Use widget's destroy method if available
if (window.chatWidget && typeof window.chatWidget.destroy === "function") {
window.chatWidget.destroy();
}
// Remove the script tag
var script = document.getElementById("guru-widget-id");
if (script) script.remove();
// Remove widget instance
if (window.chatWidget) delete window.chatWidget;
if (window.ChatWidget) delete window.ChatWidget;
// Remove all widget-related DOM elements
["#guru-widget-id", "#gurubase-chat-widget-container"].forEach(
function (selector) {
try {
document.querySelectorAll(selector).forEach(function (el) {
el.remove();
});
} catch (e) {}
},
);
widgetInitialized = false;
}
function handleRouteChange() {
if (isDocsPath(window.location.pathname)) {
initWidget();
} else {
destroyWidget();
}
}
function setup() {
// Check on initial page load
handleRouteChange();
// Hook into History API for SPA client-side navigation
var originalPushState = history.pushState;
history.pushState = function () {
originalPushState.apply(this, arguments);
setTimeout(handleRouteChange, 0);
};
var originalReplaceState = history.replaceState;
history.replaceState = function () {
originalReplaceState.apply(this, arguments);
setTimeout(handleRouteChange, 0);
};
// Handle browser back/forward buttons
window.addEventListener("popstate", function () {
setTimeout(handleRouteChange, 0);
});
}
// Wait for DOM to be ready before accessing document.body
if (document.readyState === "loading") {
document.addEventListener("DOMContentLoaded", setup);
} else {
setup();
}
})();
```
**Key points:**
* The `isDocsPath()` helper matches both `/docs` and `/docs/*` paths (modify this function to match your desired paths)
* The `initWidget()` function checks the current path before loading the widget
* The `destroyWidget()` function cleans up all widget-related DOM elements when navigating away
* History API hooks (`pushState`, `replaceState`, `popstate`) handle SPA navigation
For Docusaurus, you can wrap this in a plugin. Create `plugins/gurubase-widget.js`:
```javascript theme={null}
module.exports = (_context) => ({
name: "docusaurus-plugin-gurubase-widget",
injectHtmlTags() {
return {
postBodyTags: [
{
tagName: "script",
innerHTML: `
(function() {
var widgetInitialized = false;
function isDocsPath(pathname) {
return pathname === '/docs' || pathname.startsWith('/docs/');
}
function initWidget() {
if (widgetInitialized) return;
if (!isDocsPath(window.location.pathname)) return;
var existingScript = document.getElementById('guru-widget-id');
if (existingScript) return;
var script = document.createElement('script');
script.src = "https://widget.gurubase.io/widget.latest.min.js";
script.setAttribute("data-widget-id", "YOUR_WIDGET_ID");
script.setAttribute("data-light-mode", "auto");
script.setAttribute("data-overlap-content", "true");
script.defer = true;
script.id = "guru-widget-id";
document.body.appendChild(script);
widgetInitialized = true;
}
function destroyWidget() {
if (!widgetInitialized) return;
if (window.chatWidget && typeof window.chatWidget.destroy === 'function') {
window.chatWidget.destroy();
}
var script = document.getElementById('guru-widget-id');
if (script) script.remove();
if (window.chatWidget) delete window.chatWidget;
if (window.ChatWidget) delete window.ChatWidget;
['#guru-widget-id', '#gurubase-chat-widget-container'].forEach(function(selector) {
try { document.querySelectorAll(selector).forEach(function(el) { el.remove(); }); } catch (e) {}
});
widgetInitialized = false;
}
function handleRouteChange() {
if (isDocsPath(window.location.pathname)) {
initWidget();
} else {
destroyWidget();
}
}
handleRouteChange();
var originalPushState = history.pushState;
history.pushState = function() {
originalPushState.apply(this, arguments);
setTimeout(handleRouteChange, 0);
};
var originalReplaceState = history.replaceState;
history.replaceState = function() {
originalReplaceState.apply(this, arguments);
setTimeout(handleRouteChange, 0);
};
window.addEventListener('popstate', function() {
setTimeout(handleRouteChange, 0);
});
})();
`,
},
],
};
},
});
```
Then register in `docusaurus.config.js`:
```javascript theme={null}
module.exports = {
plugins: ["./plugins/gurubase-widget.js"],
};
```
## Platform-Specific Integrations
### Archbee
To add the Gurubase widget to your Archbee documentation:
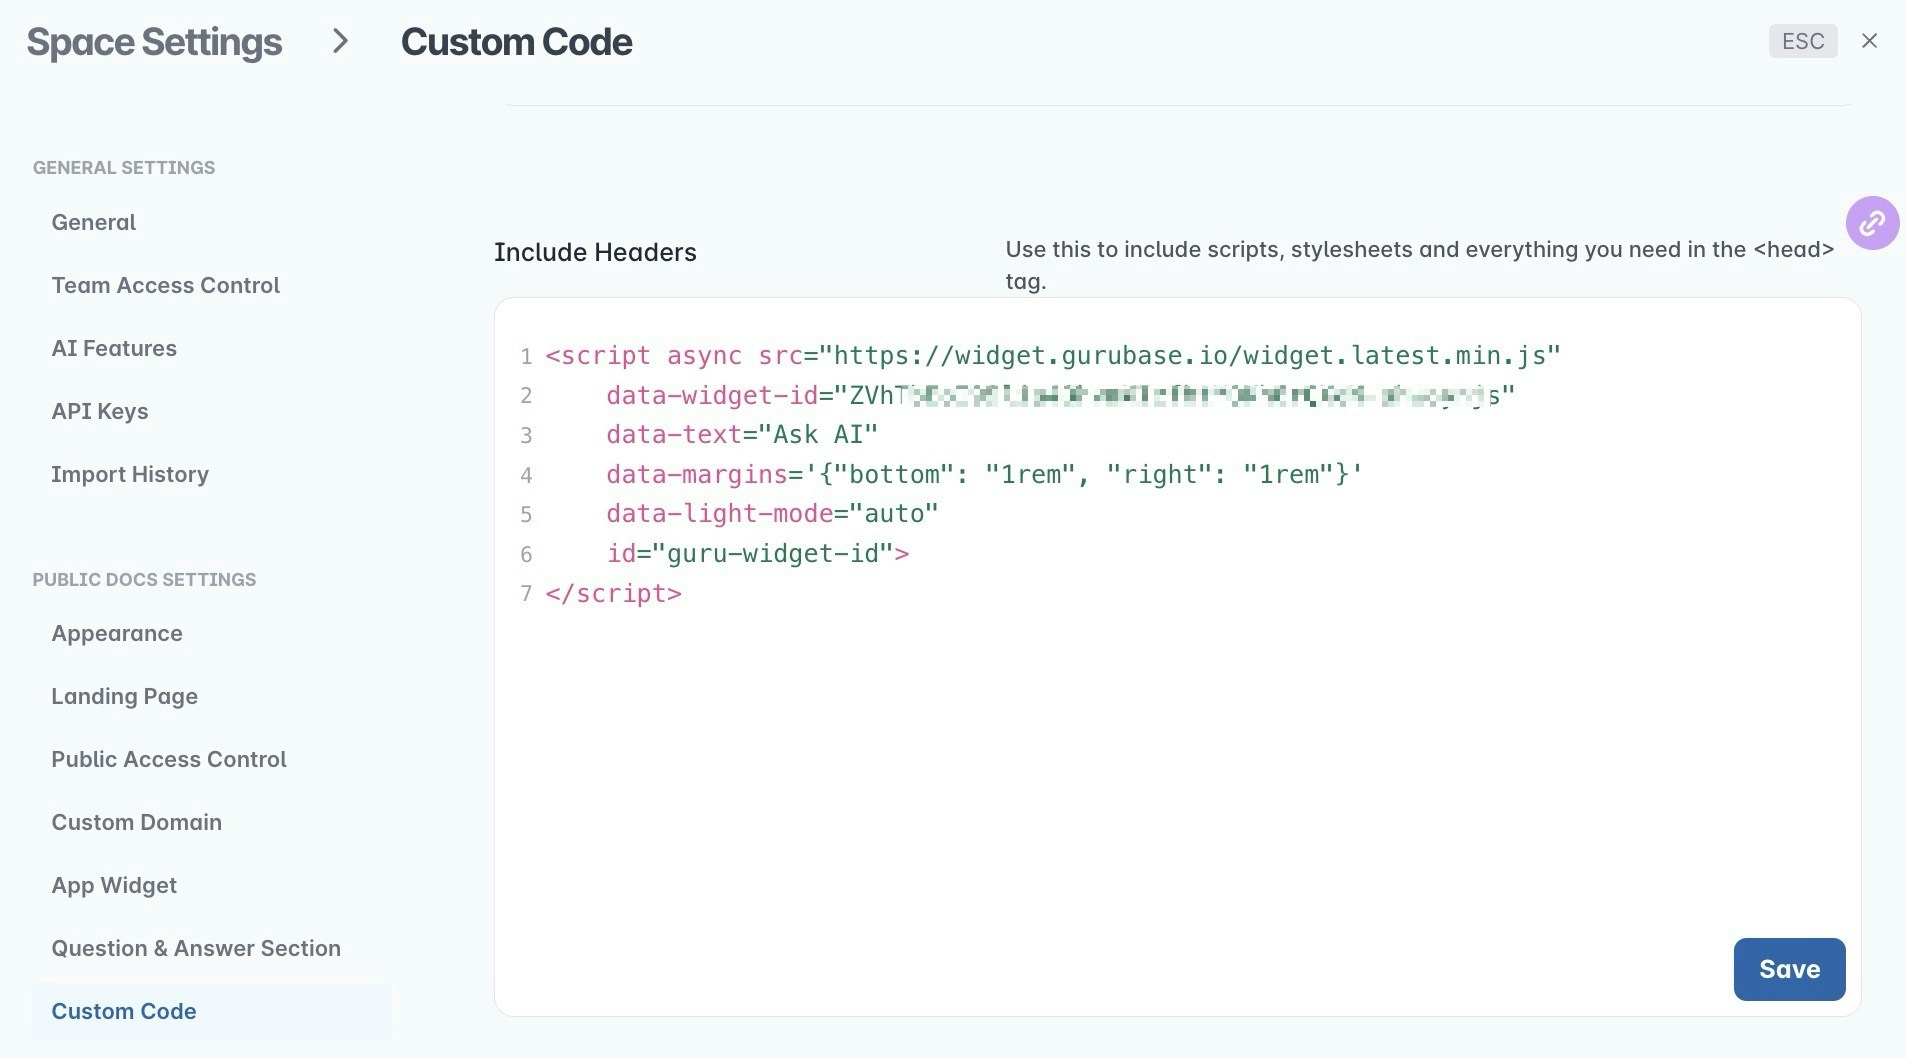
1. Go to **Space Settings** > **Custom Code**
2. Under the "Include Headers" text area, paste the Gurubase widget script that you received from the [Gurubase platform](#getting-your-widget-id):
For security reasons, scripts are only included on a custom domain in Archbee.
Make sure you have set up a custom domain for your documentation to use the
widget.
To configure example questions:
1. Go to your Guru's settings page
2. Scroll to **Advanced Settings**
3. Add up to 3 example questions (100 characters max each)
4. Save your changes
When users click an example question in the widget, it populates the input field so they can submit it directly or modify it first.
See the full Example Questions guide for best practices and tips
## User Identification
The widget can automatically identify users and include their information in API requests as `external_user_id`. It also displays the user's name in chat messages instead of the default "You" label. This supports two methods: automatic detection on Zendesk Help Center pages and manual configuration via localStorage.
### How It Works
When `data-pass-user-info="true"` is set, the widget:
1. Checks for Zendesk's `HelpCenter.user.email` for user identification (automatic, no extra config needed)
2. Falls back to reading from localStorage via `data-user-info-source` if HelpCenter is not available
3. Sends the extracted value as `external_user_id` to the backend
4. Displays the user's name in chat messages using this fallback order:
* `HelpCenter.user.name` (Zendesk only)
* `HelpCenter.user.email` (Zendesk only)
* `data-user-info-source` value from localStorage
* "You" (default if none of the above are available)
5. Fails silently if data is unavailable (won't break widget functionality)
### Zendesk Help Center (Automatic)
On Zendesk Help Center pages, the widget automatically detects the logged-in user's email for identification and their name for display. No `data-user-info-source` is needed:
```html theme={null}
```
### localStorage (Other Sites)
For non-Zendesk sites, configure `data-user-info-source` to read from localStorage. Supports dot notation for nested JSON objects.
```html theme={null}
```
### Common Use Cases
**Segment Analytics:**
```html theme={null}
data-pass-user-info="true" data-user-info-source="ajs_user_traits.email"
```
Extracts email from Segment's user traits object stored as:
```json theme={null}
localStorage['ajs_user_traits'] = '{"email": "user@example.com", "name": "John Doe"}'
```
**Mixpanel:**
```html theme={null}
data-pass-user-info="true" data-user-info-source="mp_user_properties.email"
```
**Custom User Data:**
```html theme={null}
data-pass-user-info="true" data-user-info-source="userData.userId"
```
**Top-level localStorage key (no nesting):**
```html theme={null}
data-pass-user-info="true" data-user-info-source="user_id"
```
## Path-Based Widget Loading
If you want to load the widget only on specific paths (e.g., only on `/docs/` pages), you can use a conditional loading approach. This is especially useful for Single Page Applications (SPAs) where you need to handle client-side navigation.
The following script can be adapted to any SPA framework (Docusaurus, Next.js, Remix, etc.):
```javascript theme={null}
(function () {
var widgetInitialized = false;
function isDocsPath(pathname) {
return pathname === "/docs" || pathname.startsWith("/docs/");
}
function initWidget() {
if (widgetInitialized) return;
// Only show on /docs pages - modify this path as needed
if (!isDocsPath(window.location.pathname)) return;
var existingScript = document.getElementById("guru-widget-id");
if (existingScript) return;
var script = document.createElement("script");
script.src = "https://widget.gurubase.io/widget.latest.min.js";
script.setAttribute("data-widget-id", "YOUR_WIDGET_ID");
script.setAttribute("data-text", "Ask AI");
script.setAttribute("data-margins", '{"bottom": "20px", "right": "20px"}');
script.setAttribute("data-light-mode", "auto");
script.setAttribute("data-overlap-content", "true");
script.defer = true;
script.id = "guru-widget-id";
document.body.appendChild(script);
widgetInitialized = true;
}
function destroyWidget() {
if (!widgetInitialized) return;
// Use widget's destroy method if available
if (window.chatWidget && typeof window.chatWidget.destroy === "function") {
window.chatWidget.destroy();
}
// Remove the script tag
var script = document.getElementById("guru-widget-id");
if (script) script.remove();
// Remove widget instance
if (window.chatWidget) delete window.chatWidget;
if (window.ChatWidget) delete window.ChatWidget;
// Remove all widget-related DOM elements
["#guru-widget-id", "#gurubase-chat-widget-container"].forEach(
function (selector) {
try {
document.querySelectorAll(selector).forEach(function (el) {
el.remove();
});
} catch (e) {}
},
);
widgetInitialized = false;
}
function handleRouteChange() {
if (isDocsPath(window.location.pathname)) {
initWidget();
} else {
destroyWidget();
}
}
function setup() {
// Check on initial page load
handleRouteChange();
// Hook into History API for SPA client-side navigation
var originalPushState = history.pushState;
history.pushState = function () {
originalPushState.apply(this, arguments);
setTimeout(handleRouteChange, 0);
};
var originalReplaceState = history.replaceState;
history.replaceState = function () {
originalReplaceState.apply(this, arguments);
setTimeout(handleRouteChange, 0);
};
// Handle browser back/forward buttons
window.addEventListener("popstate", function () {
setTimeout(handleRouteChange, 0);
});
}
// Wait for DOM to be ready before accessing document.body
if (document.readyState === "loading") {
document.addEventListener("DOMContentLoaded", setup);
} else {
setup();
}
})();
```
**Key points:**
* The `isDocsPath()` helper matches both `/docs` and `/docs/*` paths (modify this function to match your desired paths)
* The `initWidget()` function checks the current path before loading the widget
* The `destroyWidget()` function cleans up all widget-related DOM elements when navigating away
* History API hooks (`pushState`, `replaceState`, `popstate`) handle SPA navigation
For Docusaurus, you can wrap this in a plugin. Create `plugins/gurubase-widget.js`:
```javascript theme={null}
module.exports = (_context) => ({
name: "docusaurus-plugin-gurubase-widget",
injectHtmlTags() {
return {
postBodyTags: [
{
tagName: "script",
innerHTML: `
(function() {
var widgetInitialized = false;
function isDocsPath(pathname) {
return pathname === '/docs' || pathname.startsWith('/docs/');
}
function initWidget() {
if (widgetInitialized) return;
if (!isDocsPath(window.location.pathname)) return;
var existingScript = document.getElementById('guru-widget-id');
if (existingScript) return;
var script = document.createElement('script');
script.src = "https://widget.gurubase.io/widget.latest.min.js";
script.setAttribute("data-widget-id", "YOUR_WIDGET_ID");
script.setAttribute("data-light-mode", "auto");
script.setAttribute("data-overlap-content", "true");
script.defer = true;
script.id = "guru-widget-id";
document.body.appendChild(script);
widgetInitialized = true;
}
function destroyWidget() {
if (!widgetInitialized) return;
if (window.chatWidget && typeof window.chatWidget.destroy === 'function') {
window.chatWidget.destroy();
}
var script = document.getElementById('guru-widget-id');
if (script) script.remove();
if (window.chatWidget) delete window.chatWidget;
if (window.ChatWidget) delete window.ChatWidget;
['#guru-widget-id', '#gurubase-chat-widget-container'].forEach(function(selector) {
try { document.querySelectorAll(selector).forEach(function(el) { el.remove(); }); } catch (e) {}
});
widgetInitialized = false;
}
function handleRouteChange() {
if (isDocsPath(window.location.pathname)) {
initWidget();
} else {
destroyWidget();
}
}
handleRouteChange();
var originalPushState = history.pushState;
history.pushState = function() {
originalPushState.apply(this, arguments);
setTimeout(handleRouteChange, 0);
};
var originalReplaceState = history.replaceState;
history.replaceState = function() {
originalReplaceState.apply(this, arguments);
setTimeout(handleRouteChange, 0);
};
window.addEventListener('popstate', function() {
setTimeout(handleRouteChange, 0);
});
})();
`,
},
],
};
},
});
```
Then register in `docusaurus.config.js`:
```javascript theme={null}
module.exports = {
plugins: ["./plugins/gurubase-widget.js"],
};
```
## Platform-Specific Integrations
### Archbee
To add the Gurubase widget to your Archbee documentation:
1. Go to **Space Settings** > **Custom Code**
2. Under the "Include Headers" text area, paste the Gurubase widget script that you received from the [Gurubase platform](#getting-your-widget-id):
For security reasons, scripts are only included on a custom domain in Archbee.
Make sure you have set up a custom domain for your documentation to use the
widget.
 ### GitBook
GitBook offers an [official integration](https://www.gitbook.com/integrations/gurubase) that makes it easy to add Gurubase to your documentation:
1. In your GitBook space, go to **Integrations** and search for **Gurubase**
2. Click **Install** to add the integration
3. Click **Install on a docs site** and select a site to install
4. Enter your **Widget ID** from [Gurubase platform](#getting-your-widget-id)
5. Configure additional options (optional)
### GitBook
GitBook offers an [official integration](https://www.gitbook.com/integrations/gurubase) that makes it easy to add Gurubase to your documentation:
1. In your GitBook space, go to **Integrations** and search for **Gurubase**
2. Click **Install** to add the integration
3. Click **Install on a docs site** and select a site to install
4. Enter your **Widget ID** from [Gurubase platform](#getting-your-widget-id)
5. Configure additional options (optional)
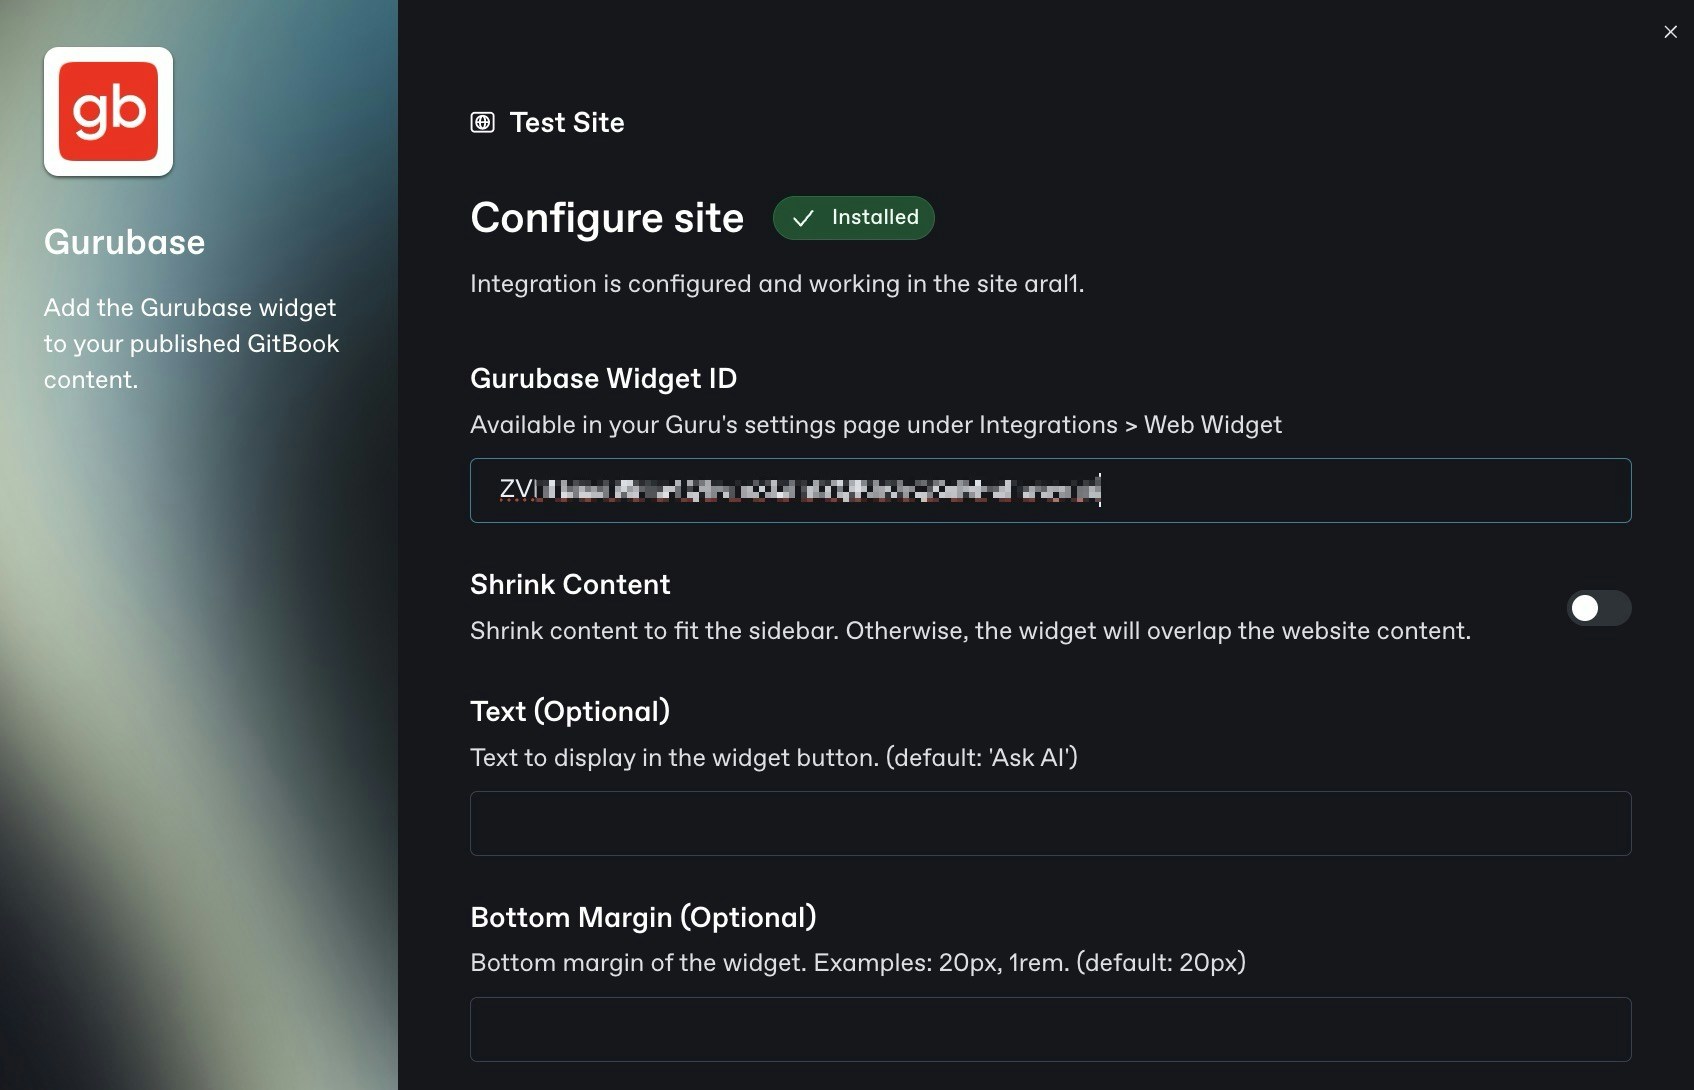 After a few minutes, you will see the "Ask AI" button in your GitBook documentation.
### Mintlify
To add the Gurubase widget to your Mintlify documentation with automatic theme syncing, create a JavaScript file (e.g., `gurubase.js`) in your docs content folder with the following content:
```javascript theme={null}
// Customize widget settings
const widgetSettings = {
widgetId: "YOUR_WIDGET_ID", // Replace with your Widget ID from https://app.gurubase.io/my-gurus
overlapContent: true,
// Optional configurations:
// text: "Ask AI",
// margins: { bottom: "20px", right: "20px" },
// lightMode: "auto",
// bgColor: "#000000",
};
function initGurubaseWidget() {
// Guard against double initialization
if (document.getElementById("guru-widget-id")) return;
// Load the Gurubase widget
const guruScript = document.createElement("script");
guruScript.src = "https://widget.gurubase.io/widget.latest.min.js";
guruScript.defer = true;
guruScript.id = "guru-widget-id";
// Add widget settings as data attributes
Object.entries(widgetSettings).forEach(([key, value]) => {
const dataKey = `data-${key.replace(/([A-Z])/g, "-$1").toLowerCase()}`;
const dataValue = typeof value === "object" ? JSON.stringify(value) : value;
guruScript.setAttribute(dataKey, dataValue);
});
// Initialize theme handling
guruScript.addEventListener("load", () => {
const initWidget = setInterval(() => {
if (window.chatWidget?.switchTheme) {
clearInterval(initWidget);
// Handle theme changes
const syncTheme = () => {
const isDark = document.documentElement.classList.contains("dark");
window.chatWidget.switchTheme(!isDark);
};
// Watch for theme changes
new MutationObserver(syncTheme).observe(document.documentElement, {
attributes: true,
attributeFilter: ["class"],
});
// Set initial theme
syncTheme();
}
}, 1000);
// Stop checking after 20 seconds
setTimeout(() => clearInterval(initWidget), 20000);
});
document.body.appendChild(guruScript);
}
// Wait for DOM to be ready before accessing document.body
if (document.readyState === "loading") {
document.addEventListener("DOMContentLoaded", initGurubaseWidget);
} else {
initGurubaseWidget();
}
```
Any `.js` file in your Mintlify content directory is [automatically included](https://www.mintlify.com/docs/customize/custom-scripts#adding-custom-javascript) on every page - no additional configuration needed. The widget will automatically sync its theme (light/dark) with your Mintlify documentation.
### Docusaurus
Add the widget to your `docusaurus.config.js`:
```javascript theme={null}
module.exports = {
scripts: [
{
src: "https://widget.gurubase.io/widget.latest.min.js",
"data-widget-id": "YOUR_WIDGET_ID",
"data-light-mode": "auto",
id: "guru-widget-id",
async: true,
},
],
};
```
For path-based loading (showing the widget only on specific pages like `/docs/`), see [Path-Based Widget Loading](#path-based-widget-loading).
### MkDocs (Material)
For MkDocs with the [Material theme](https://squidfunk.github.io/mkdocs-material/), you can add theme syncing so the widget matches your documentation's light/dark mode.
1. Add the widget script to your `mkdocs.yml`:
```yaml theme={null}
extra_javascript:
- js/gurubase-widget.js
```
2. Create `docs/js/gurubase-widget.js`:
```javascript theme={null}
(function () {
function initWidget() {
// Guard against double initialization
if (document.getElementById("guru-widget-id")) return;
// Load the widget
var script = document.createElement("script");
script.src = "https://widget.gurubase.io/widget.latest.min.js";
script.setAttribute("data-widget-id", "YOUR_WIDGET_ID");
script.setAttribute("data-light-mode", "auto");
script.defer = true;
script.id = "guru-widget-id";
document.body.appendChild(script);
// Theme sync for Material theme
script.onload = function () {
var checkWidget = setInterval(function () {
if (window.chatWidget && window.chatWidget.switchTheme) {
clearInterval(checkWidget);
function syncTheme() {
// Material theme uses data-md-color-scheme on body
var scheme = document.body.getAttribute("data-md-color-scheme");
var isLight = scheme === "default" || scheme === "light";
window.chatWidget.switchTheme(isLight);
}
// Watch for theme changes
new MutationObserver(syncTheme).observe(document.body, {
attributes: true,
attributeFilter: ["data-md-color-scheme"],
});
syncTheme();
}
}, 500);
setTimeout(function () {
clearInterval(checkWidget);
}, 20000);
};
}
// Wait for DOM to be ready before accessing document.body
if (document.readyState === "loading") {
document.addEventListener("DOMContentLoaded", initWidget);
} else {
initWidget();
}
})();
```
### Sphinx / Read the Docs
For Sphinx documentation (including Read the Docs), you can add the widget using either a static JavaScript file or a template override.
**Important:** Choose only ONE of the following approaches. Using both will
cause the widget to load twice.
#### Option A: Static JavaScript File (Recommended)
Use this approach for a cleaner setup with all widget configuration in a single JavaScript file.
1. Create `_static/gurubase-widget.js`:
```javascript theme={null}
document.addEventListener("DOMContentLoaded", function () {
// Customize widget settings
const widgetSettings = {
widgetId: "YOUR_WIDGET_ID", // Replace with your Widget ID from https://app.gurubase.io/my-gurus
text: "Ask AI", // Optional - Button text
margins: { bottom: "20px", right: "20px" }, // Optional
lightMode: "auto", // Optional - "light", "dark", or "auto"
bgColor: "#0D9373", // Optional - Widget background color
iconUrl: "YOUR_ICON_URL", // Optional - Widget icon URL
name: "YOUR_NAME", // Optional - Widget name
// baseUrl: "http://localhost:8029/api/", // Optional - For self-hosted Gurubase (Enterprise only)
};
// Load the Gurubase widget
const guruScript = document.createElement("script");
guruScript.src = "https://widget.gurubase.io/widget.latest.min.js";
guruScript.defer = true;
guruScript.id = "guru-widget-id";
// Add widget settings as data attributes
Object.entries({
"data-widget-id": widgetSettings.widgetId,
"data-text": widgetSettings.text,
"data-margins": JSON.stringify(widgetSettings.margins),
"data-light-mode": widgetSettings.lightMode,
"data-bg-color": widgetSettings.bgColor,
"data-icon-url": widgetSettings.iconUrl,
"data-name": widgetSettings.name,
"data-base-url": widgetSettings.baseUrl,
}).forEach(([key, value]) => {
if (value) {
// Only set if value is defined
guruScript.setAttribute(key, value);
}
});
// Append the script to the document
document.body.appendChild(guruScript);
});
```
2. Add the script to your `conf.py`:
```python theme={null}
# Static files directory
html_static_path = ['_static']
# Add the widget script to all pages
html_js_files = [
'gurubase-widget.js',
]
```
#### Option B: Template Override
Use this approach if you prefer to add the widget directly in HTML templates.
1. Create or edit `_templates/layout.html`:
```html theme={null}
{% extends "!layout.html" %} {% block extrahead %} {{ super() }}
{% endblock %}
```
2. Make sure your `conf.py` includes the templates path:
```python theme={null}
templates_path = ['_templates']
```
#### Theme Sync for Dark Mode
For themes with dark mode support (like Furo or PyData), add theme syncing to automatically match the widget theme with your documentation.
**Using static JS file (`_static/gurubase-widget.js`):**
```javascript theme={null}
document.addEventListener("DOMContentLoaded", function () {
const widgetSettings = {
widgetId: "YOUR_WIDGET_ID",
};
const guruScript = document.createElement("script");
guruScript.src = "https://widget.gurubase.io/widget.latest.min.js";
guruScript.defer = true;
guruScript.id = "guru-widget-id";
guruScript.setAttribute("data-widget-id", widgetSettings.widgetId);
document.body.appendChild(guruScript);
// Theme sync for Sphinx themes with dark mode
guruScript.onload = function () {
var checkWidget = setInterval(function () {
if (window.chatWidget && window.chatWidget.switchTheme) {
clearInterval(checkWidget);
function syncTheme() {
var isDark =
document.body.dataset.theme === "dark" ||
document.documentElement.dataset.theme === "dark";
window.chatWidget.switchTheme(!isDark);
}
new MutationObserver(syncTheme).observe(document.documentElement, {
attributes: true,
attributeFilter: ["data-theme"],
});
new MutationObserver(syncTheme).observe(document.body, {
attributes: true,
attributeFilter: ["data-theme"],
});
syncTheme();
}
}, 500);
setTimeout(function () {
clearInterval(checkWidget);
}, 20000);
};
});
```
**Using template override (`_templates/layout.html`):**
```html theme={null}
{% block extrahead %} {{ super() }}
{% endblock %}
```
### Zendesk Knowledge Base
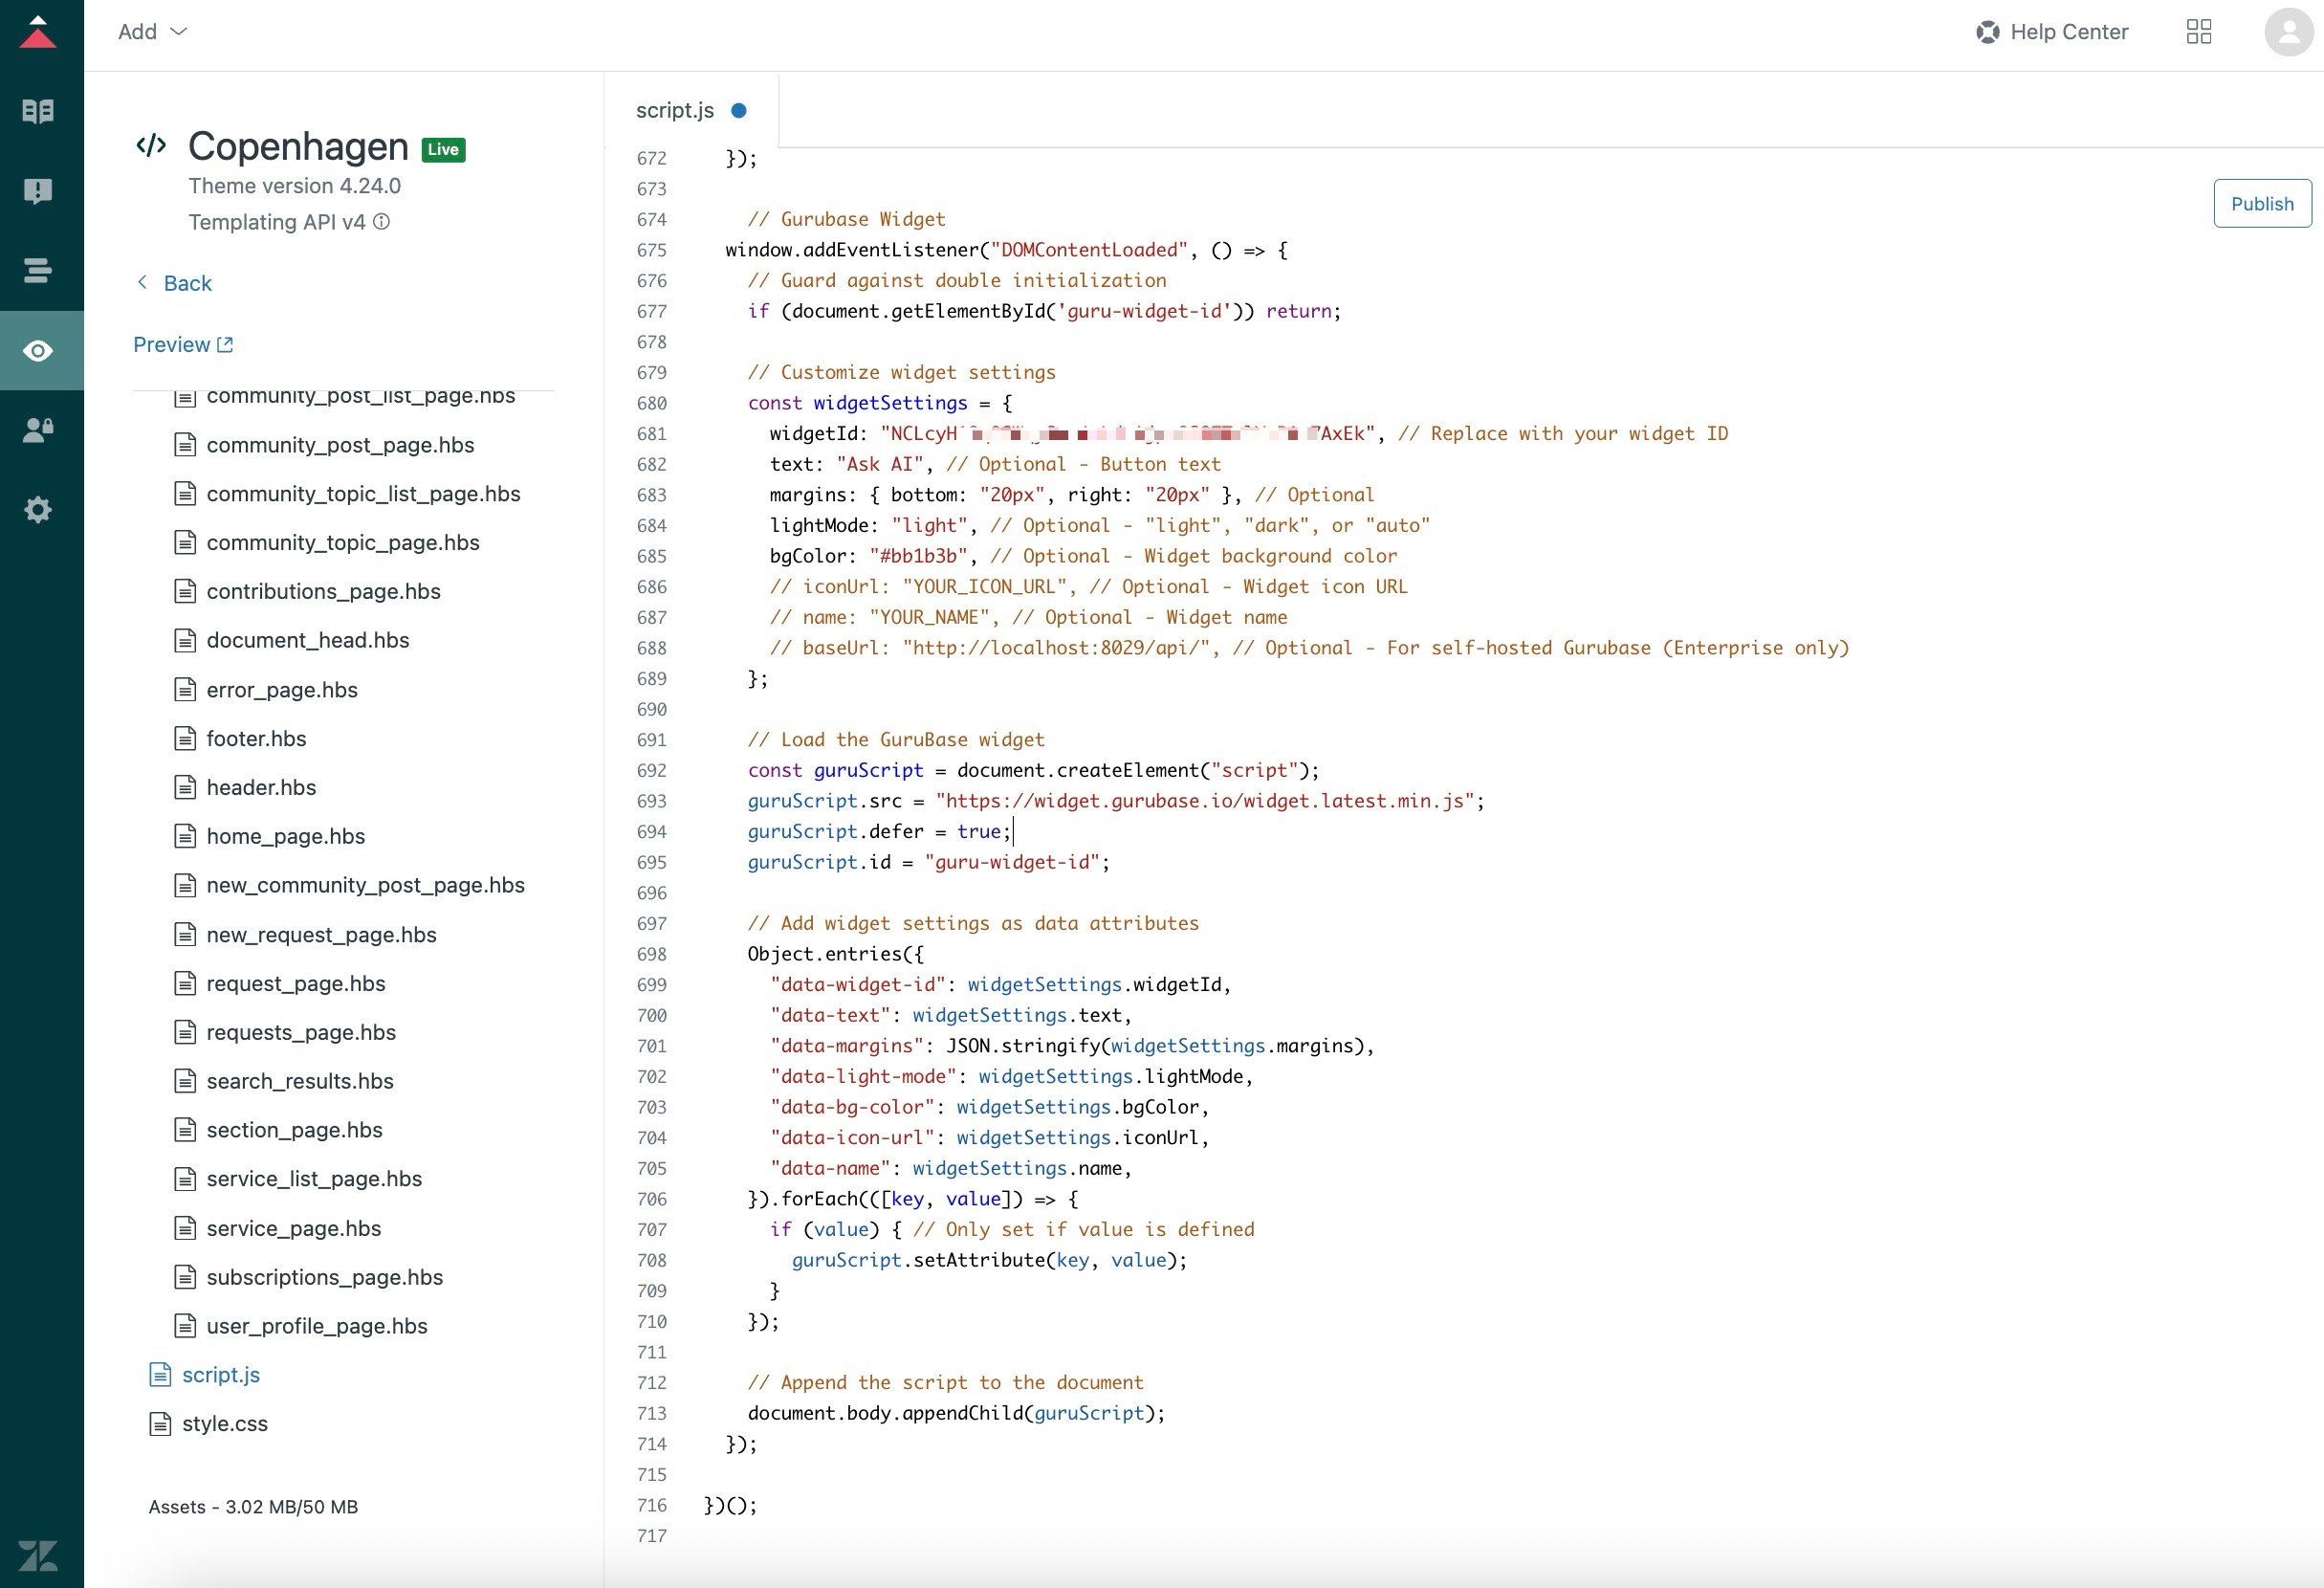
For Zendesk Help Center themes (like Copenhagen), add the widget to your theme's `script.js` file.
1. Navigate to your Zendesk Help Center (e.g., `https://.zendesk.com/hc/en-us`)
2. Open **Knowledge Admin**
3. Select **Customize design** from the left sidebar (Eye icon)
4. Click **Customize** on the Live theme
5. Click **Edit code** to open the theme editor
6. Open the `script.js` file
7. Add the following code just before the closing `})();` at the end of the file:
After a few minutes, you will see the "Ask AI" button in your GitBook documentation.
### Mintlify
To add the Gurubase widget to your Mintlify documentation with automatic theme syncing, create a JavaScript file (e.g., `gurubase.js`) in your docs content folder with the following content:
```javascript theme={null}
// Customize widget settings
const widgetSettings = {
widgetId: "YOUR_WIDGET_ID", // Replace with your Widget ID from https://app.gurubase.io/my-gurus
overlapContent: true,
// Optional configurations:
// text: "Ask AI",
// margins: { bottom: "20px", right: "20px" },
// lightMode: "auto",
// bgColor: "#000000",
};
function initGurubaseWidget() {
// Guard against double initialization
if (document.getElementById("guru-widget-id")) return;
// Load the Gurubase widget
const guruScript = document.createElement("script");
guruScript.src = "https://widget.gurubase.io/widget.latest.min.js";
guruScript.defer = true;
guruScript.id = "guru-widget-id";
// Add widget settings as data attributes
Object.entries(widgetSettings).forEach(([key, value]) => {
const dataKey = `data-${key.replace(/([A-Z])/g, "-$1").toLowerCase()}`;
const dataValue = typeof value === "object" ? JSON.stringify(value) : value;
guruScript.setAttribute(dataKey, dataValue);
});
// Initialize theme handling
guruScript.addEventListener("load", () => {
const initWidget = setInterval(() => {
if (window.chatWidget?.switchTheme) {
clearInterval(initWidget);
// Handle theme changes
const syncTheme = () => {
const isDark = document.documentElement.classList.contains("dark");
window.chatWidget.switchTheme(!isDark);
};
// Watch for theme changes
new MutationObserver(syncTheme).observe(document.documentElement, {
attributes: true,
attributeFilter: ["class"],
});
// Set initial theme
syncTheme();
}
}, 1000);
// Stop checking after 20 seconds
setTimeout(() => clearInterval(initWidget), 20000);
});
document.body.appendChild(guruScript);
}
// Wait for DOM to be ready before accessing document.body
if (document.readyState === "loading") {
document.addEventListener("DOMContentLoaded", initGurubaseWidget);
} else {
initGurubaseWidget();
}
```
Any `.js` file in your Mintlify content directory is [automatically included](https://www.mintlify.com/docs/customize/custom-scripts#adding-custom-javascript) on every page - no additional configuration needed. The widget will automatically sync its theme (light/dark) with your Mintlify documentation.
### Docusaurus
Add the widget to your `docusaurus.config.js`:
```javascript theme={null}
module.exports = {
scripts: [
{
src: "https://widget.gurubase.io/widget.latest.min.js",
"data-widget-id": "YOUR_WIDGET_ID",
"data-light-mode": "auto",
id: "guru-widget-id",
async: true,
},
],
};
```
For path-based loading (showing the widget only on specific pages like `/docs/`), see [Path-Based Widget Loading](#path-based-widget-loading).
### MkDocs (Material)
For MkDocs with the [Material theme](https://squidfunk.github.io/mkdocs-material/), you can add theme syncing so the widget matches your documentation's light/dark mode.
1. Add the widget script to your `mkdocs.yml`:
```yaml theme={null}
extra_javascript:
- js/gurubase-widget.js
```
2. Create `docs/js/gurubase-widget.js`:
```javascript theme={null}
(function () {
function initWidget() {
// Guard against double initialization
if (document.getElementById("guru-widget-id")) return;
// Load the widget
var script = document.createElement("script");
script.src = "https://widget.gurubase.io/widget.latest.min.js";
script.setAttribute("data-widget-id", "YOUR_WIDGET_ID");
script.setAttribute("data-light-mode", "auto");
script.defer = true;
script.id = "guru-widget-id";
document.body.appendChild(script);
// Theme sync for Material theme
script.onload = function () {
var checkWidget = setInterval(function () {
if (window.chatWidget && window.chatWidget.switchTheme) {
clearInterval(checkWidget);
function syncTheme() {
// Material theme uses data-md-color-scheme on body
var scheme = document.body.getAttribute("data-md-color-scheme");
var isLight = scheme === "default" || scheme === "light";
window.chatWidget.switchTheme(isLight);
}
// Watch for theme changes
new MutationObserver(syncTheme).observe(document.body, {
attributes: true,
attributeFilter: ["data-md-color-scheme"],
});
syncTheme();
}
}, 500);
setTimeout(function () {
clearInterval(checkWidget);
}, 20000);
};
}
// Wait for DOM to be ready before accessing document.body
if (document.readyState === "loading") {
document.addEventListener("DOMContentLoaded", initWidget);
} else {
initWidget();
}
})();
```
### Sphinx / Read the Docs
For Sphinx documentation (including Read the Docs), you can add the widget using either a static JavaScript file or a template override.
**Important:** Choose only ONE of the following approaches. Using both will
cause the widget to load twice.
#### Option A: Static JavaScript File (Recommended)
Use this approach for a cleaner setup with all widget configuration in a single JavaScript file.
1. Create `_static/gurubase-widget.js`:
```javascript theme={null}
document.addEventListener("DOMContentLoaded", function () {
// Customize widget settings
const widgetSettings = {
widgetId: "YOUR_WIDGET_ID", // Replace with your Widget ID from https://app.gurubase.io/my-gurus
text: "Ask AI", // Optional - Button text
margins: { bottom: "20px", right: "20px" }, // Optional
lightMode: "auto", // Optional - "light", "dark", or "auto"
bgColor: "#0D9373", // Optional - Widget background color
iconUrl: "YOUR_ICON_URL", // Optional - Widget icon URL
name: "YOUR_NAME", // Optional - Widget name
// baseUrl: "http://localhost:8029/api/", // Optional - For self-hosted Gurubase (Enterprise only)
};
// Load the Gurubase widget
const guruScript = document.createElement("script");
guruScript.src = "https://widget.gurubase.io/widget.latest.min.js";
guruScript.defer = true;
guruScript.id = "guru-widget-id";
// Add widget settings as data attributes
Object.entries({
"data-widget-id": widgetSettings.widgetId,
"data-text": widgetSettings.text,
"data-margins": JSON.stringify(widgetSettings.margins),
"data-light-mode": widgetSettings.lightMode,
"data-bg-color": widgetSettings.bgColor,
"data-icon-url": widgetSettings.iconUrl,
"data-name": widgetSettings.name,
"data-base-url": widgetSettings.baseUrl,
}).forEach(([key, value]) => {
if (value) {
// Only set if value is defined
guruScript.setAttribute(key, value);
}
});
// Append the script to the document
document.body.appendChild(guruScript);
});
```
2. Add the script to your `conf.py`:
```python theme={null}
# Static files directory
html_static_path = ['_static']
# Add the widget script to all pages
html_js_files = [
'gurubase-widget.js',
]
```
#### Option B: Template Override
Use this approach if you prefer to add the widget directly in HTML templates.
1. Create or edit `_templates/layout.html`:
```html theme={null}
{% extends "!layout.html" %} {% block extrahead %} {{ super() }}
{% endblock %}
```
2. Make sure your `conf.py` includes the templates path:
```python theme={null}
templates_path = ['_templates']
```
#### Theme Sync for Dark Mode
For themes with dark mode support (like Furo or PyData), add theme syncing to automatically match the widget theme with your documentation.
**Using static JS file (`_static/gurubase-widget.js`):**
```javascript theme={null}
document.addEventListener("DOMContentLoaded", function () {
const widgetSettings = {
widgetId: "YOUR_WIDGET_ID",
};
const guruScript = document.createElement("script");
guruScript.src = "https://widget.gurubase.io/widget.latest.min.js";
guruScript.defer = true;
guruScript.id = "guru-widget-id";
guruScript.setAttribute("data-widget-id", widgetSettings.widgetId);
document.body.appendChild(guruScript);
// Theme sync for Sphinx themes with dark mode
guruScript.onload = function () {
var checkWidget = setInterval(function () {
if (window.chatWidget && window.chatWidget.switchTheme) {
clearInterval(checkWidget);
function syncTheme() {
var isDark =
document.body.dataset.theme === "dark" ||
document.documentElement.dataset.theme === "dark";
window.chatWidget.switchTheme(!isDark);
}
new MutationObserver(syncTheme).observe(document.documentElement, {
attributes: true,
attributeFilter: ["data-theme"],
});
new MutationObserver(syncTheme).observe(document.body, {
attributes: true,
attributeFilter: ["data-theme"],
});
syncTheme();
}
}, 500);
setTimeout(function () {
clearInterval(checkWidget);
}, 20000);
};
});
```
**Using template override (`_templates/layout.html`):**
```html theme={null}
{% block extrahead %} {{ super() }}
{% endblock %}
```
### Zendesk Knowledge Base
For Zendesk Help Center themes (like Copenhagen), add the widget to your theme's `script.js` file.
1. Navigate to your Zendesk Help Center (e.g., `https://.zendesk.com/hc/en-us`)
2. Open **Knowledge Admin**
3. Select **Customize design** from the left sidebar (Eye icon)
4. Click **Customize** on the Live theme
5. Click **Edit code** to open the theme editor
6. Open the `script.js` file
7. Add the following code just before the closing `})();` at the end of the file:
 ```javascript theme={null}
// Gurubase Widget
window.addEventListener("DOMContentLoaded", () => {
// Guard against double initialization
if (document.getElementById("guru-widget-id")) return;
// Customize widget settings
const widgetSettings = {
widgetId: "YOUR_WIDGET_ID", // Replace with your Widget ID from https://app.gurubase.io/my-gurus
text: "Ask AI", // Optional - Button text
margins: { bottom: "20px", right: "20px" }, // Optional
lightMode: "light", // Optional - "light", "dark", or "auto"
passUserInfo: true, // Pass user identifier from Zendesk HelpCenter.user.email (automatic for Zendesk)
// bgColor: "#0D9373", // Optional - Widget background color
// iconUrl: "YOUR_ICON_URL", // Optional - Widget icon URL
// name: "YOUR_NAME", // Optional - Widget name
// baseUrl: "https://gurubase.yourcompany.com/api/", // Optional - For self-hosted Gurubase (Enterprise only)
};
// Load the Gurubase widget
const guruScript = document.createElement("script");
guruScript.src = "https://widget.gurubase.io/widget.latest.min.js";
guruScript.defer = true;
guruScript.id = "guru-widget-id";
// Add widget settings as data attributes
Object.entries({
"data-widget-id": widgetSettings.widgetId,
"data-text": widgetSettings.text,
"data-margins": JSON.stringify(widgetSettings.margins),
"data-light-mode": widgetSettings.lightMode,
"data-pass-user-info": widgetSettings.passUserInfo,
"data-bg-color": widgetSettings.bgColor,
"data-icon-url": widgetSettings.iconUrl,
"data-name": widgetSettings.name,
"data-base-url": widgetSettings.baseUrl,
}).forEach(([key, value]) => {
if (value) {
// Only set if value is defined
guruScript.setAttribute(key, value);
}
});
// Append the script to the document
document.body.appendChild(guruScript);
});
```
8. Click **Save** and then **Publish** to make the changes live
Make sure to create a Widget ID for your Zendesk Help Center domain (e.g.,
`yourcompany.zendesk.com` or your custom domain) in the [Gurubase
platform](#getting-your-widget-id).
#### Alternative: Using document\_head.hbs Template
If you prefer to add the widget via the template, edit `templates/document_head.hbs` and add the script tag:
```html theme={null}
```
For **self-hosted Gurubase (Enterprise plan)**, add
`data-base-url="https://gurubase.yourcompany.com/api/"` to point to your
instance.
### Astro / Starlight
For [Astro](https://astro.build/) with [Starlight](https://starlight.astro.build/) documentation theme:
**Important:** Choose only ONE of the following approaches. Using both will
cause the widget to load twice since both methods add a script with the same
`id='guru-widget-id'`.
#### Option A: Component Approach (Recommended for Theme Sync)
Use this approach if you need automatic theme synchronization with Starlight's dark/light mode.
Create `src/components/GurubaseWidget.astro`:
```astro theme={null}
```
Then import and use this component in your layout. **Do not** add the widget to `astro.config.mjs` `head` if using this approach.
#### Option B: Config Approach (Simpler Setup)
Use this approach for a simpler setup without theme synchronization.
Add to `astro.config.mjs`:
```javascript theme={null}
import { defineConfig } from "astro/config";
import starlight from "@astrojs/starlight";
export default defineConfig({
integrations: [
starlight({
// ... other config
head: [
{
tag: "script",
attrs: {
src: "https://widget.gurubase.io/widget.latest.min.js",
"data-widget-id": "YOUR_WIDGET_ID",
"data-light-mode": "auto",
id: "guru-widget-id",
defer: true,
},
},
],
}),
],
});
```
**Do not** create or use the `GurubaseWidget.astro` component if using this approach.
### Retype
For [Retype](https://retype.com/) documentation:
Add the widget script to your `retype.yml`:
```yaml theme={null}
integrations:
custom:
head: |
```
## Troubleshooting
* **Check domain configuration**: Ensure your Widget ID was created for the
exact domain where you're testing. Remember that `www.example.com` and
`example.com` are different domains. - **Check for JavaScript errors**: Open
your browser's developer console (F12) and look for any errors. - **Verify
script loading**: Check the Network tab to ensure `widget.latest.min.js`
loads successfully. - **Check for ad blockers**: Some ad blockers may
prevent the widget from loading.
This usually happens when the widget script is included multiple times.
Common causes: - Using both the config approach AND component approach
(e.g., in Astro/Starlight) - Script included in both layout template and
page template - SPA navigation re-initializing without proper cleanup
**Solution**: Ensure you only use ONE method to add the widget, and check
that `document.getElementById('guru-widget-id')` guard is in place.
* Ensure you're using `data-light-mode="auto"` for automatic detection - For
custom theme sync, verify your `MutationObserver` is watching the correct
element and attribute - Check that `window.chatWidget.switchTheme()` is
being called after the widget loads
Create a separate Widget ID for your local development URL (e.g.,
`http://localhost:3000` or `http://localhost:*` for any port).
## Next Steps
Configure example questions for your widget
Explore our API documentation
```javascript theme={null}
// Gurubase Widget
window.addEventListener("DOMContentLoaded", () => {
// Guard against double initialization
if (document.getElementById("guru-widget-id")) return;
// Customize widget settings
const widgetSettings = {
widgetId: "YOUR_WIDGET_ID", // Replace with your Widget ID from https://app.gurubase.io/my-gurus
text: "Ask AI", // Optional - Button text
margins: { bottom: "20px", right: "20px" }, // Optional
lightMode: "light", // Optional - "light", "dark", or "auto"
passUserInfo: true, // Pass user identifier from Zendesk HelpCenter.user.email (automatic for Zendesk)
// bgColor: "#0D9373", // Optional - Widget background color
// iconUrl: "YOUR_ICON_URL", // Optional - Widget icon URL
// name: "YOUR_NAME", // Optional - Widget name
// baseUrl: "https://gurubase.yourcompany.com/api/", // Optional - For self-hosted Gurubase (Enterprise only)
};
// Load the Gurubase widget
const guruScript = document.createElement("script");
guruScript.src = "https://widget.gurubase.io/widget.latest.min.js";
guruScript.defer = true;
guruScript.id = "guru-widget-id";
// Add widget settings as data attributes
Object.entries({
"data-widget-id": widgetSettings.widgetId,
"data-text": widgetSettings.text,
"data-margins": JSON.stringify(widgetSettings.margins),
"data-light-mode": widgetSettings.lightMode,
"data-pass-user-info": widgetSettings.passUserInfo,
"data-bg-color": widgetSettings.bgColor,
"data-icon-url": widgetSettings.iconUrl,
"data-name": widgetSettings.name,
"data-base-url": widgetSettings.baseUrl,
}).forEach(([key, value]) => {
if (value) {
// Only set if value is defined
guruScript.setAttribute(key, value);
}
});
// Append the script to the document
document.body.appendChild(guruScript);
});
```
8. Click **Save** and then **Publish** to make the changes live
Make sure to create a Widget ID for your Zendesk Help Center domain (e.g.,
`yourcompany.zendesk.com` or your custom domain) in the [Gurubase
platform](#getting-your-widget-id).
#### Alternative: Using document\_head.hbs Template
If you prefer to add the widget via the template, edit `templates/document_head.hbs` and add the script tag:
```html theme={null}
```
For **self-hosted Gurubase (Enterprise plan)**, add
`data-base-url="https://gurubase.yourcompany.com/api/"` to point to your
instance.
### Astro / Starlight
For [Astro](https://astro.build/) with [Starlight](https://starlight.astro.build/) documentation theme:
**Important:** Choose only ONE of the following approaches. Using both will
cause the widget to load twice since both methods add a script with the same
`id='guru-widget-id'`.
#### Option A: Component Approach (Recommended for Theme Sync)
Use this approach if you need automatic theme synchronization with Starlight's dark/light mode.
Create `src/components/GurubaseWidget.astro`:
```astro theme={null}
```
Then import and use this component in your layout. **Do not** add the widget to `astro.config.mjs` `head` if using this approach.
#### Option B: Config Approach (Simpler Setup)
Use this approach for a simpler setup without theme synchronization.
Add to `astro.config.mjs`:
```javascript theme={null}
import { defineConfig } from "astro/config";
import starlight from "@astrojs/starlight";
export default defineConfig({
integrations: [
starlight({
// ... other config
head: [
{
tag: "script",
attrs: {
src: "https://widget.gurubase.io/widget.latest.min.js",
"data-widget-id": "YOUR_WIDGET_ID",
"data-light-mode": "auto",
id: "guru-widget-id",
defer: true,
},
},
],
}),
],
});
```
**Do not** create or use the `GurubaseWidget.astro` component if using this approach.
### Retype
For [Retype](https://retype.com/) documentation:
Add the widget script to your `retype.yml`:
```yaml theme={null}
integrations:
custom:
head: |
```
## Troubleshooting
* **Check domain configuration**: Ensure your Widget ID was created for the
exact domain where you're testing. Remember that `www.example.com` and
`example.com` are different domains. - **Check for JavaScript errors**: Open
your browser's developer console (F12) and look for any errors. - **Verify
script loading**: Check the Network tab to ensure `widget.latest.min.js`
loads successfully. - **Check for ad blockers**: Some ad blockers may
prevent the widget from loading.
This usually happens when the widget script is included multiple times.
Common causes: - Using both the config approach AND component approach
(e.g., in Astro/Starlight) - Script included in both layout template and
page template - SPA navigation re-initializing without proper cleanup
**Solution**: Ensure you only use ONE method to add the widget, and check
that `document.getElementById('guru-widget-id')` guard is in place.
* Ensure you're using `data-light-mode="auto"` for automatic detection - For
custom theme sync, verify your `MutationObserver` is watching the correct
element and attribute - Check that `window.chatWidget.switchTheme()` is
being called after the widget loads
Create a separate Widget ID for your local development URL (e.g.,
`http://localhost:3000` or `http://localhost:*` for any port).
## Next Steps
Configure example questions for your widget
Explore our API documentation