Introduction
The Gurubase Zendesk App brings AI-powered assistance directly into your Zendesk Support workspace. Support teams shouldn’t have to jump between tickets, help center articles, docs, and logs just to craft a reliable answer. Gurubase works directly inside Zendesk to speed up resolution while keeping responses source-backed. It provides three powerful features to help support agents work more efficiently:- Chat Sidebar - Chat with your Guru AI directly in the ticket sidebar to get instant answers
- Ticket Editor - Rewrite and improve your ticket responses with AI assistance
- Knowledge Base Editor - Browse and improve your help center articles with AI
This integration deploys Gurubase as an AI assistant within Zendesk. If you want to use Zendesk tickets and articles as data sources for your Guru, see the Zendesk Ingestion guide instead.
Why Use Gurubase for Zendesk
Gurubase AI Copilot helps your support team resolve tickets faster with verifiable, hallucination-free responses:- Draft ticket replies directly in Zendesk - No context switching between tools
- AI Trust Score + source references - Every answer includes confidence scoring and citations to your knowledge base
- Follow-up question suggestions - Close issues faster with AI-suggested next steps
- Tone adjustment - Rephrase responses for the right tone and copy directly into the Zendesk editor
- Visual playbooks with Mermaid - Guided troubleshooting with flowcharts and diagrams
Want to see Gurubase in action? Book a demo to learn how Gurubase can help your team resolve Zendesk tickets faster.
Better Answers with Zendesk Data Ingestion
Support teams often face the same questions repeatedly - and the answers are already in your existing tickets and help center articles. By combining the Gurubase Zendesk App with Zendesk Ingestion, you can train your Guru on your historical support data for more accurate, context-aware responses. How it works:- Ingest your Zendesk data - Connect Gurubase to your Zendesk instance to import past tickets and help center articles as data sources
- AI learns from your history - Gurubase indexes ticket conversations, resolutions, and knowledge base content
- Get better answers - The Zendesk app now provides answers grounded in your actual support history and documentation
- Past ticket conversations and resolutions
- Help center articles and documentation
- Comments and attachments (including images and text files)
- Customer interactions and agent responses
Set Up Zendesk Ingestion
Learn how to connect and sync your Zendesk tickets and articles
Configure Backfill Jobs
Automatically sync new content on a schedule
For maximum effectiveness, set up Zendesk ingestion before installing the Zendesk app. This ensures your Guru has access to your historical data from day one.
Prerequisites
Before installing the Zendesk app, you’ll need:- A Gurubase account with at least one Guru created
- A Gurubase API key (access token)
- Admin access to your Zendesk Support instance
Installation
Step 1: Download the App Package
The Gurubase Zendesk app is distributed as a private app. Contact us to get access to the app package and schedule a demo.Step 2: Upload to Zendesk
- Go to your Zendesk Admin Center
- Navigate to Apps and Integrations → Apps → Zendesk Support Apps
- Click Upload private app
- Select the Gurubase app package (.zip file)
- Click Upload
Step 3: Configure the App
After uploading, you’ll be prompted to configure the app settings:The Base URL should be just the domain without a trailing slash or
/api/ path. The app automatically appends the correct API paths.Step 4: Install the App
- Review the settings and click Install
- The app will now appear in your Zendesk Support workspace
Features
Chat Sidebar
The Chat Sidebar appears in the ticket sidebar when viewing tickets. It provides four tabs to help agents find information quickly: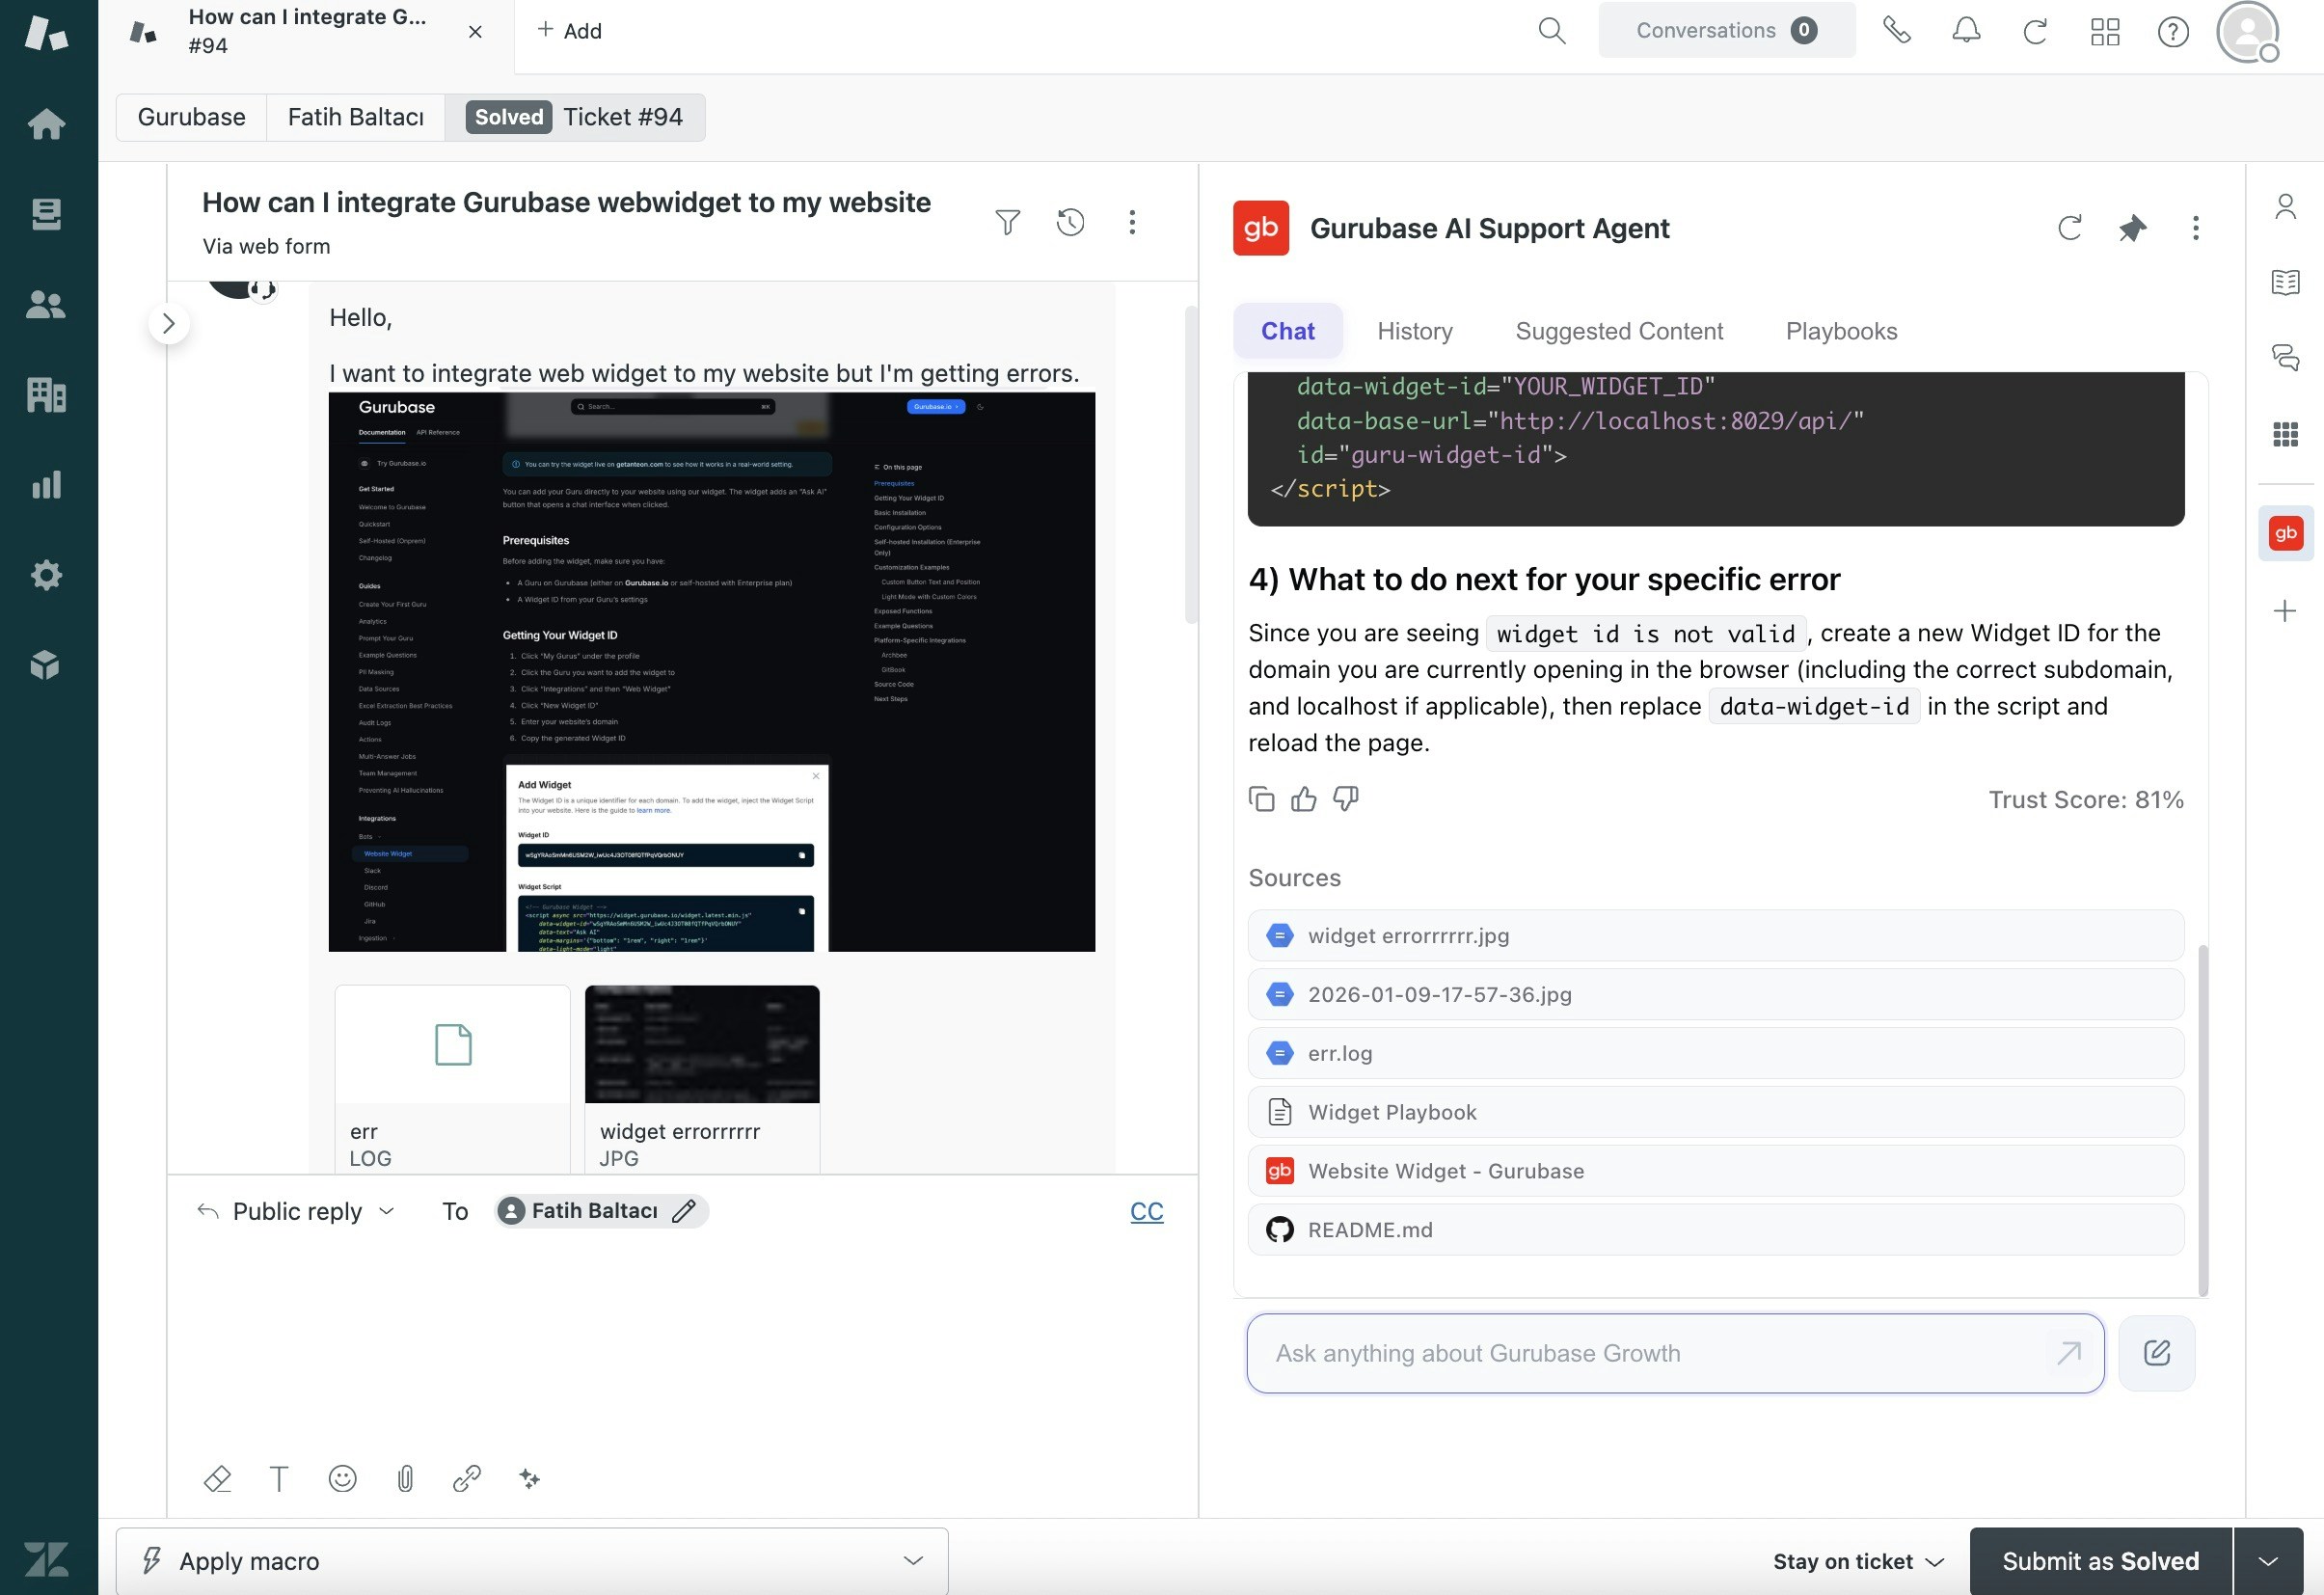
Chat Tab
The main chat interface for asking questions to your Guru AI.- Ask questions about the current ticket or any topic
- Get instant, source-backed answers from your knowledge base
- View AI Trust Score and source references for every response
- Copy responses directly into ticket replies
- Attach images and log files for context-aware answers
- Regenerate the initial answer with the Re-answer button next to the input field
- Open any ticket in Zendesk
- Find the Gurubase app in the right sidebar
- Type your question and press Enter
- The AI will respond with citations to your knowledge base
Only the first ticket message is used to generate the initial answer. Use the Re-answer button to regenerate that answer at any time; follow-up replies on the ticket are not included.
History Tab
View and search your previous conversations with the AI assistant.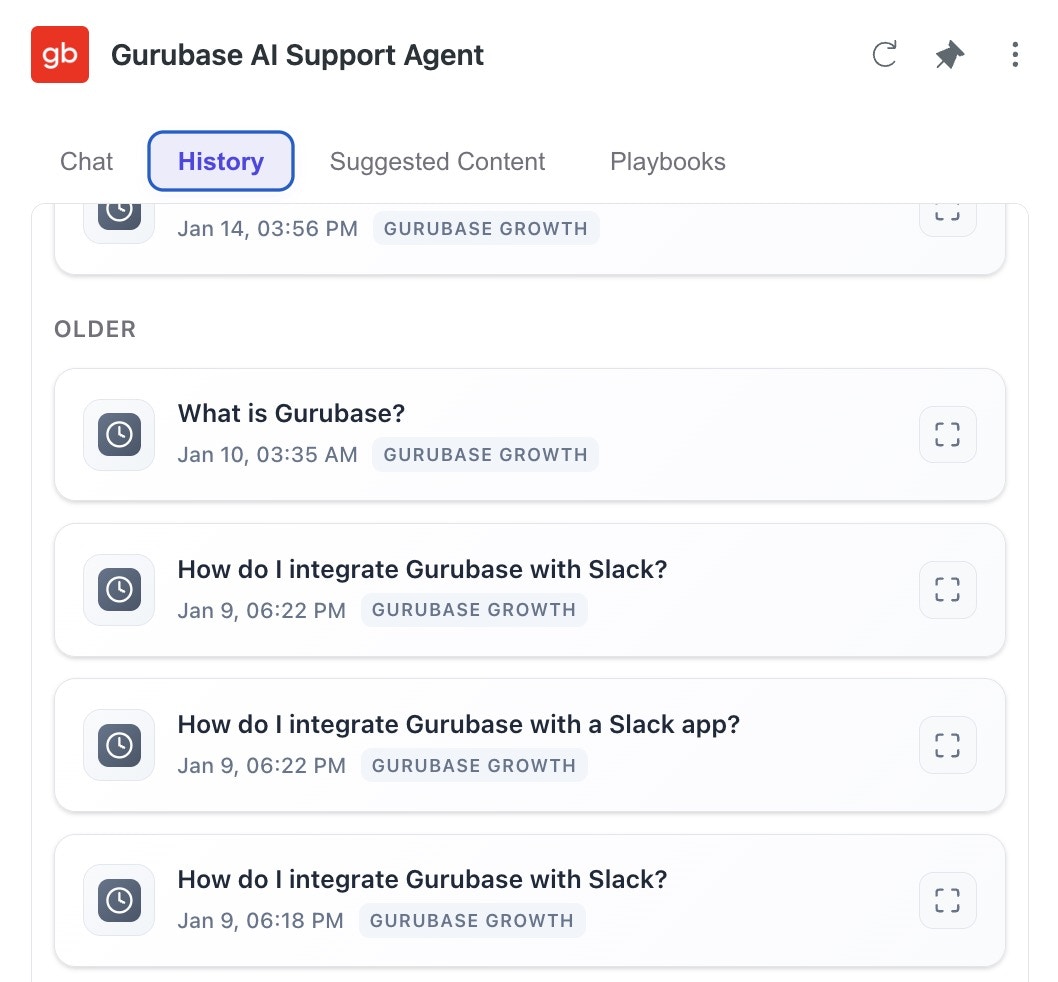
- Organized by time - Questions grouped by Today, Last Week, and Older
- Search functionality - Find specific past conversations
- Quick resume - Click any conversation to continue where you left off
- Source references - See which sources were used in previous answers
Suggested Content Tab
Automatically surfaces relevant content from your knowledge base based on the current ticket context.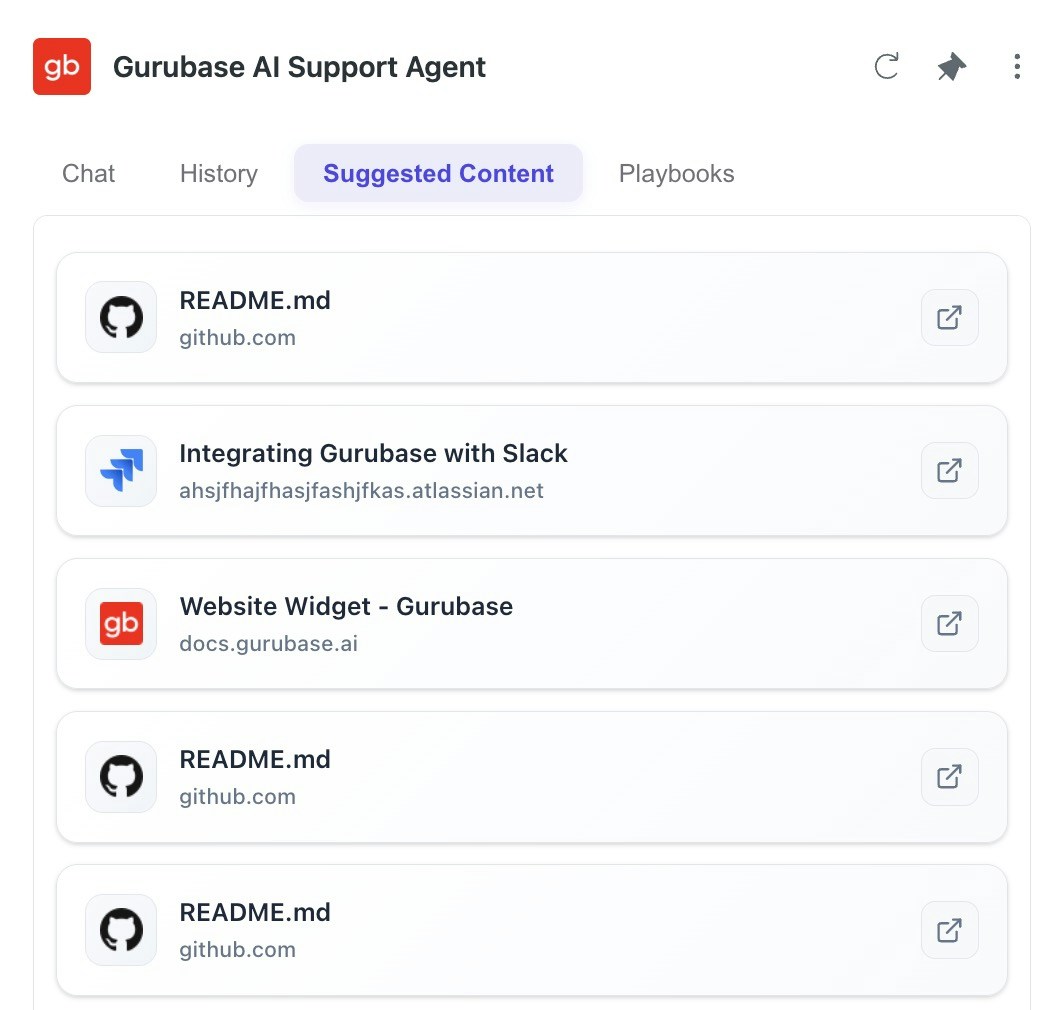
- Context-aware - Uses semantic search based on ticket subject and description
- Quick access - Click to open relevant articles, docs, or previous tickets
Playbooks Tab
Access visual troubleshooting guides and step-by-step playbooks with Mermaid diagram support.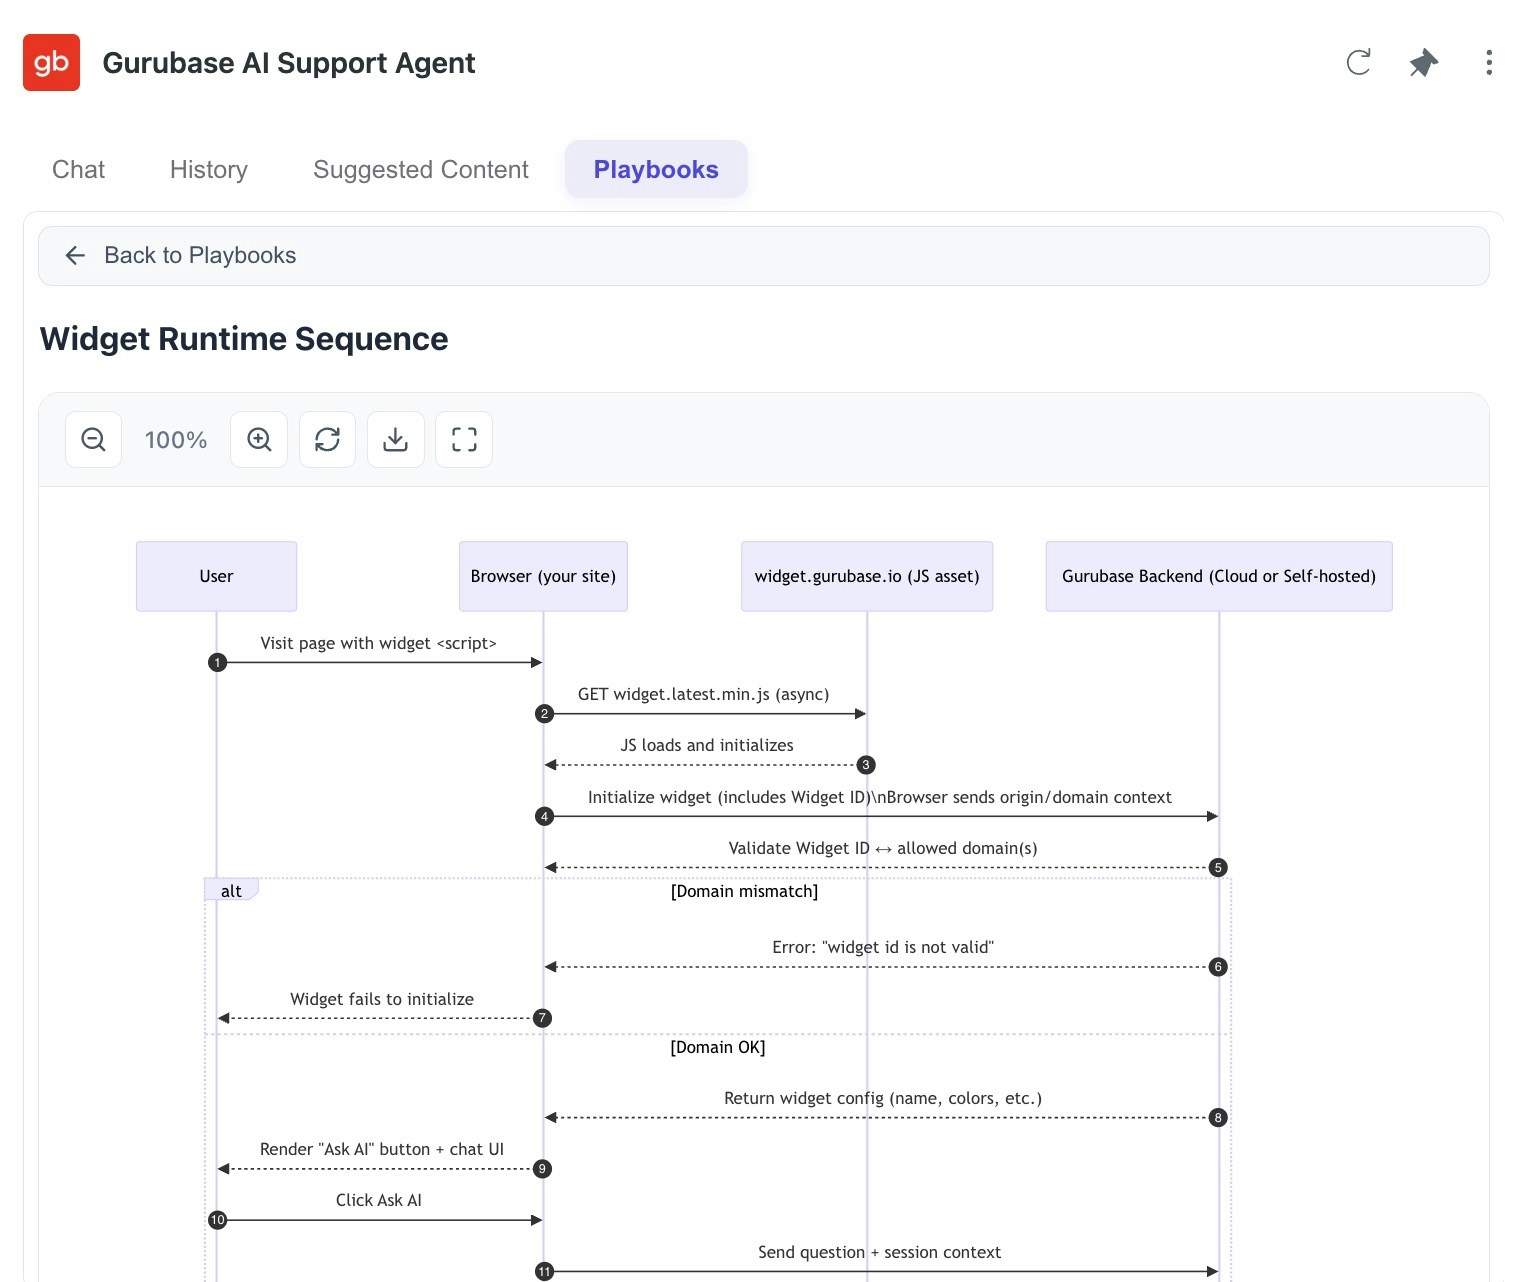
- Visual flowcharts - Mermaid diagrams for guided troubleshooting
- Interactive navigation - Zoom, pan, and explore complex workflows
- Labeled organization - Playbooks are automatically loaded based on labels
To add playbooks, create Text data sources in your Gurubase dashboard with:
- Subtype: Select “Mermaid”
- Label: Add the
playbookslabel
Ticket Editor
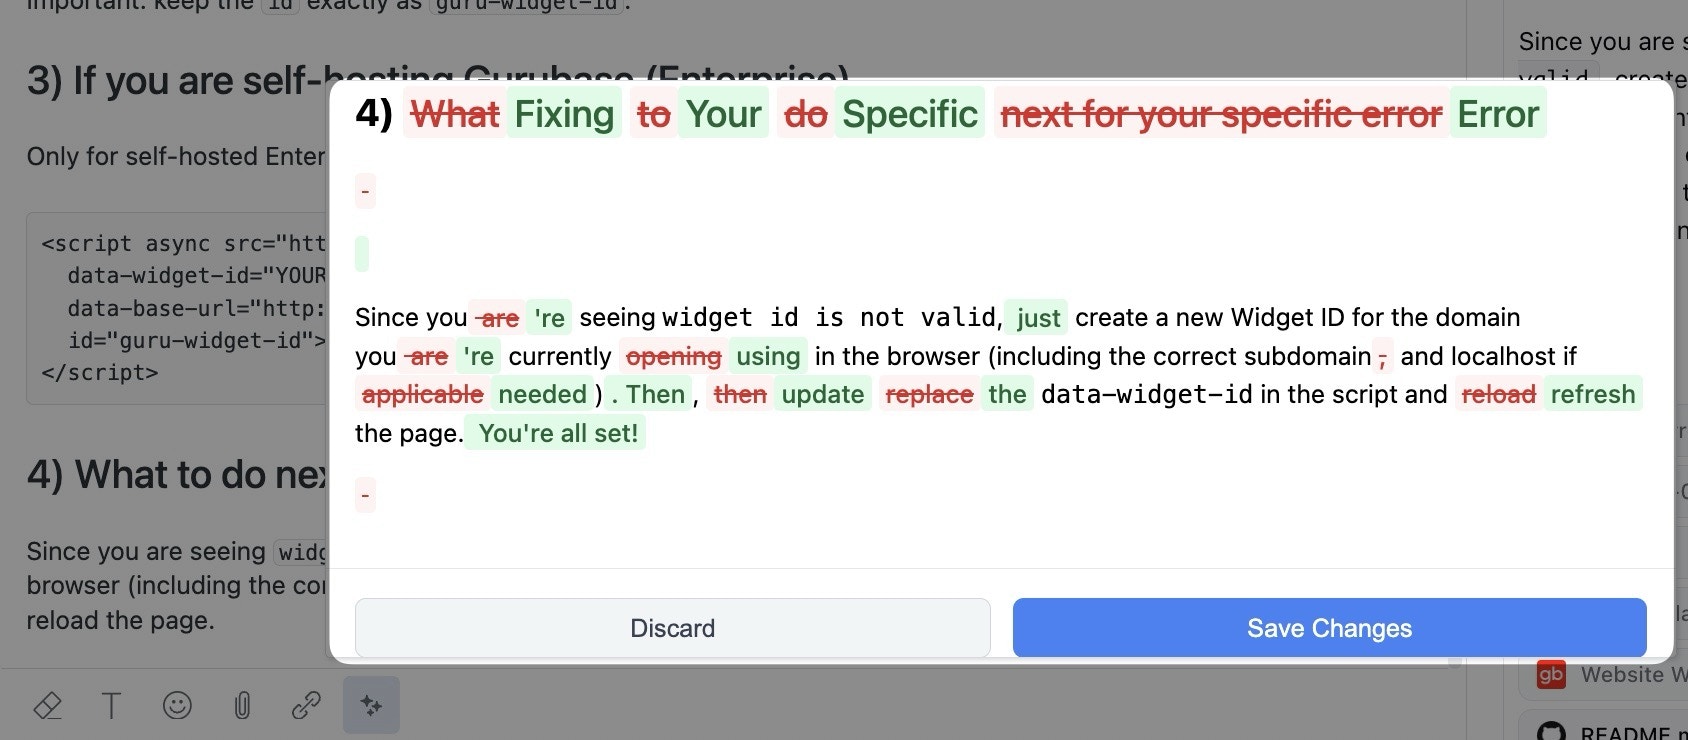
The Ticket Editor helps agents craft better responses by rewriting and improving their draft replies using AI.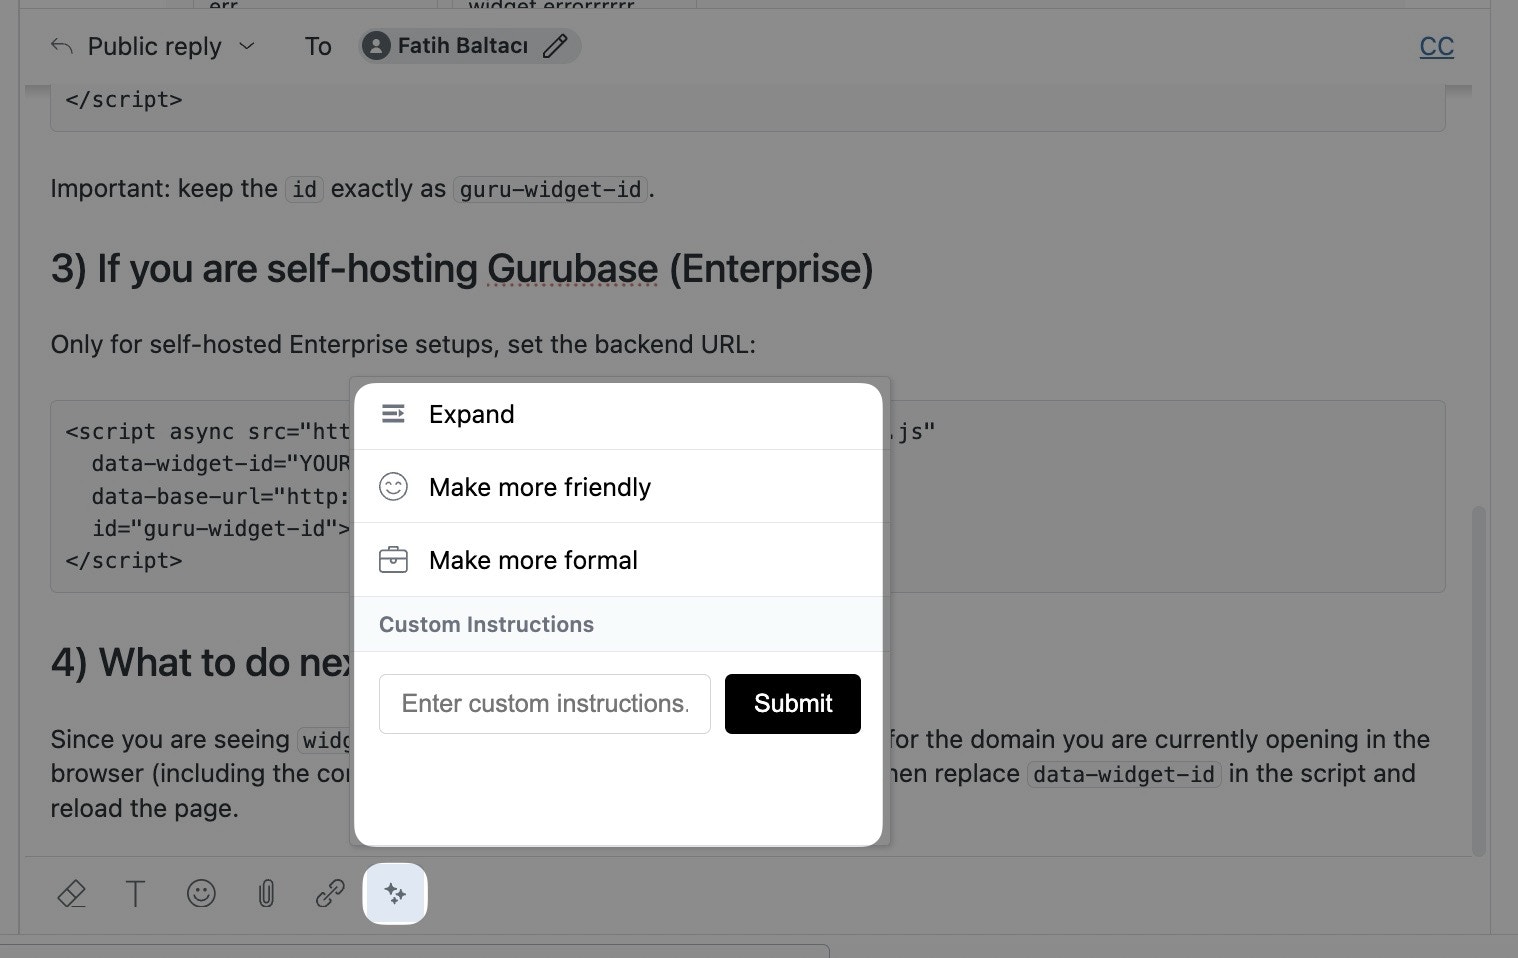
Every action preserves the addressee, greeting, and sign-off exactly as written in the draft, cleans up typos and grammar, and never invents facts or inserts boilerplate openers like “I hope this message finds you well”.
How to use:
- Write your draft response in the ticket comment box
- Click on the Gurubase Ticket Editor icon
- Select a transformation action (Expand, Make more friendly, Make more formal) or enter custom instructions
- Review the diff view showing original vs. improved text
- Click Save to apply changes or Discard to keep the original
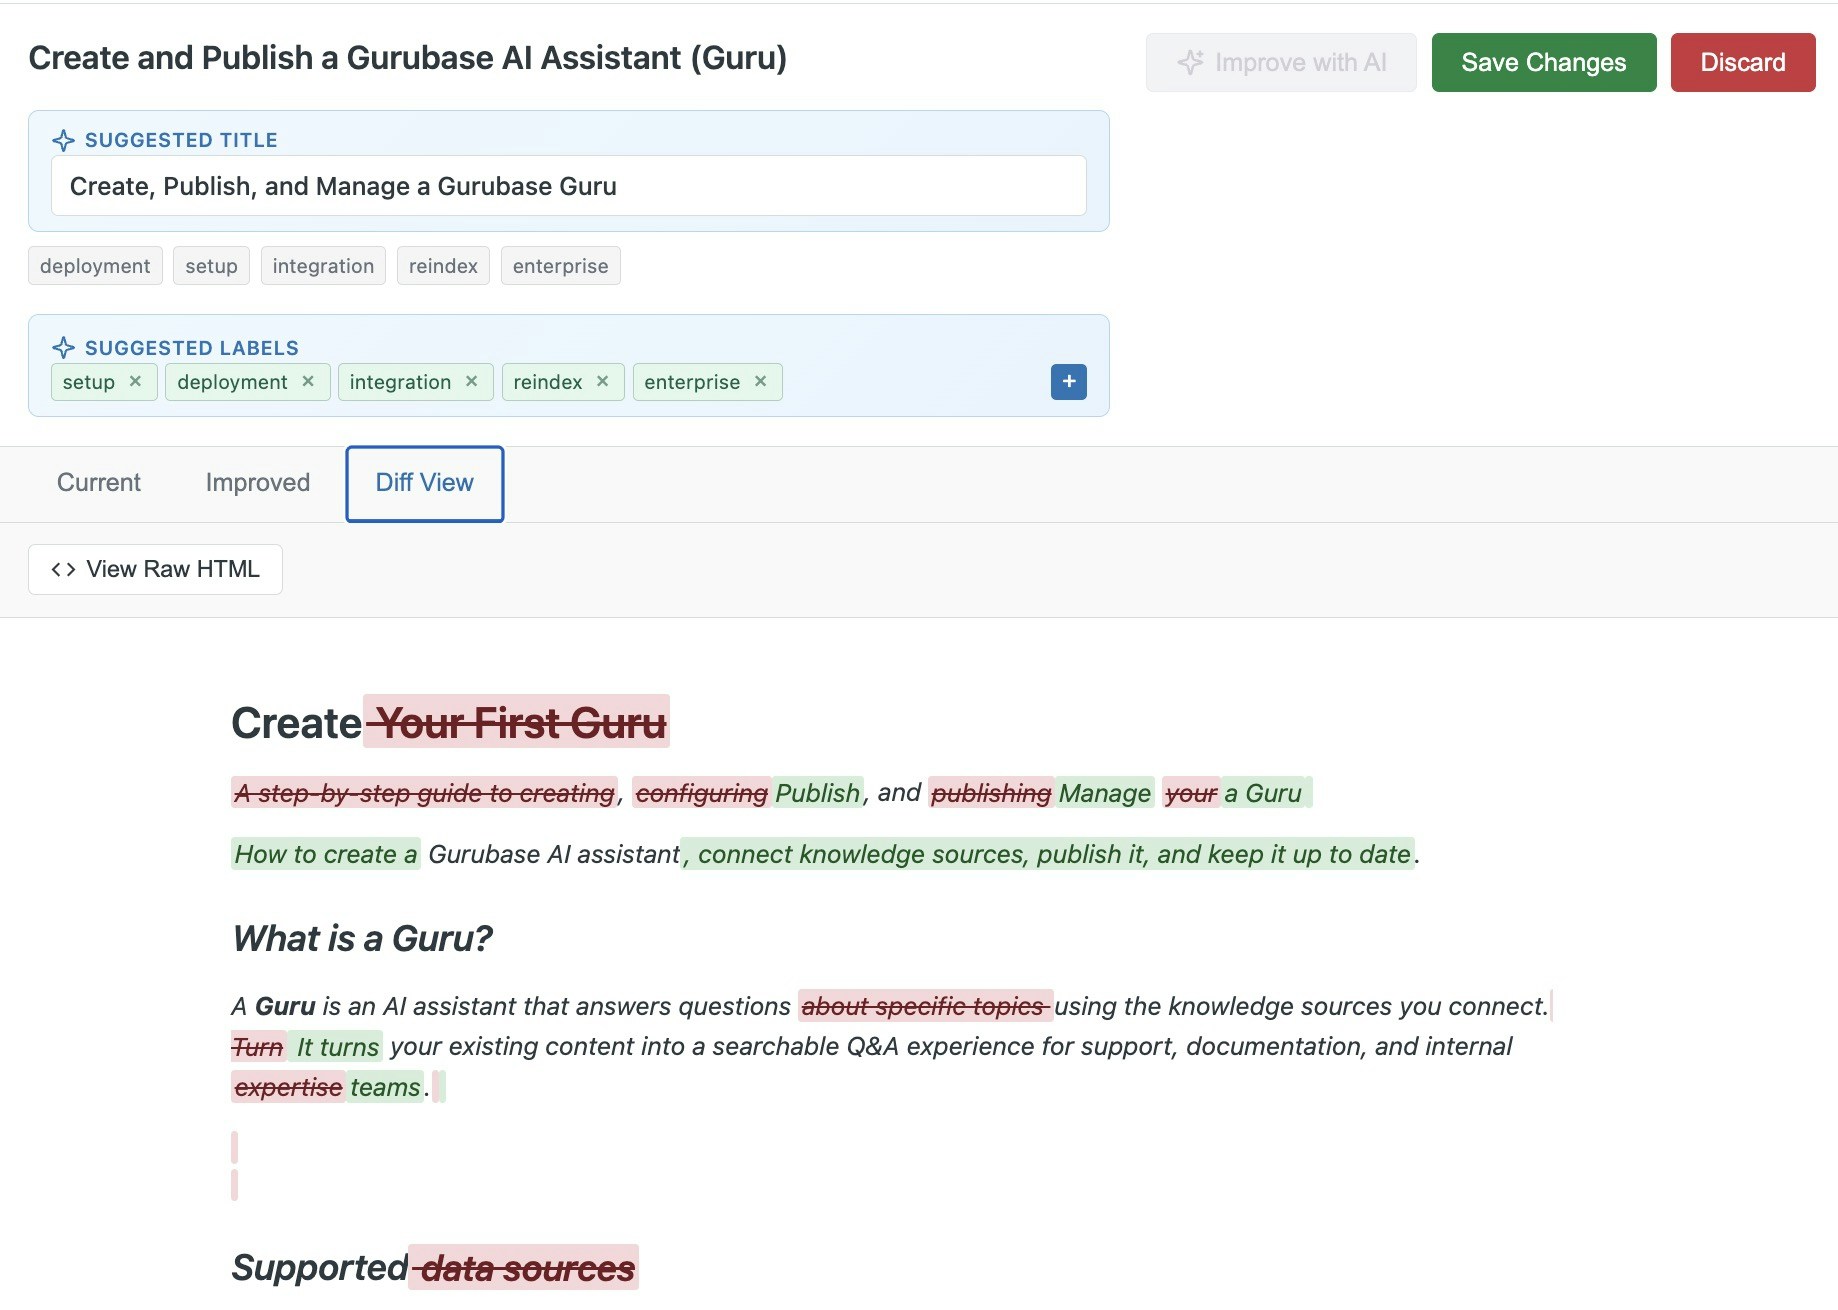
Knowledge Base Editor
The Knowledge Base Editor allows you to browse, search, and improve your Zendesk help center articles using AI.
- Article Browser - Browse all your help center articles with search and label filtering
- Collapsible Sidebar - Hide the article list to give the editor the full width
- Article Breadcrumb - The open article’s title, Draft badge, Help Center link, and current labels pin to the top bar so the editor body stays uncluttered
- AI Improvement - Improve articles with preset or custom prompts
- Bulk Improve - Run a preset on a batch of articles and review each result one by one
- Diff View - Compare original and improved content, switching independently between Rendered or Source view and Inline or Split layout
- Jump Between Changes - Step through additions and modifications one at a time with prev/next controls in the Rendered and Split views
- Copy HTML - Copy the full proposed HTML from the diff toolbar
- Edit Content - Make manual edits to the original article on the Current tab and save them as the new version
- Compare HTML - Upload an external HTML file (or fetch one from S3) and diff it against the current article, then edit the compared HTML inline before publishing
- Persistent Selection - The last article you opened is automatically reopened when you return to the editor
- Direct Editing - Edit the improved content before saving
- Label Suggestions - Get AI-suggested labels for your articles
- PDF Export - Download articles as PDF documents
- Click on the Gurubase icon in the Zendesk navigation bar
- Browse or search for articles in the left sidebar
- Click an article to view its content
- Click Improve with AI and select a preset or enter custom instructions
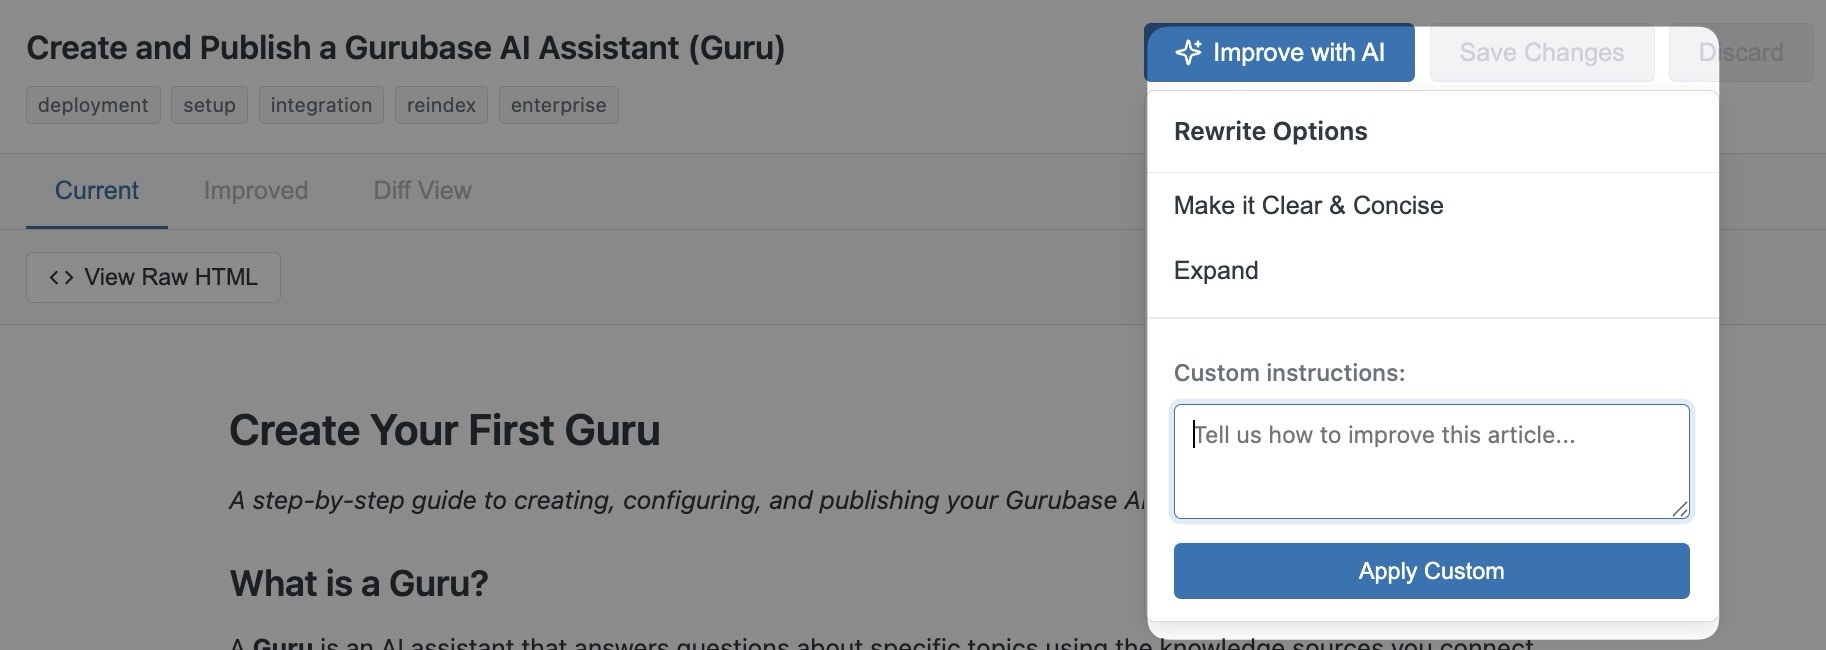
- Review the changes in the Improved or Diff View tabs
- Edit labels in the suggestions panel if needed
- Click Save Changes to update the article in Zendesk
Editing the Original Article
Use Edit Content on the Current tab to make manual edits without first running an AI improvement. Both the rendered view and the raw HTML stay in sync while you type. Click Save Changes to keep the edit as a pending update, or discard to revert to the original.Compare HTML Tab
Use the Compare HTML tab to upload an external HTML file and diff it against the current article. The diff supports the same two-axis mode picker (Rendered or Source, Inline or Split), making it easy to review proposed changes from another tool or to migrate content into Zendesk. Click Edit in the Compare toolbar to adjust the compared HTML before publishing. The rendered view and raw HTML stay in sync while you type, and the diff re-renders against the current article when you save.Bulk Improve
Use Bulk Improve in the left sidebar to run a preset on multiple articles in one batch and review the results one by one. How to use:- Click Bulk Improve at the top of the article list
- Enter selection mode, tick the articles you want to include (up to 10 per batch), and choose a preset prompt
- Gurubase queues the batch, marks each row as it progresses (
pending→improving→ready), and unlocks review as soon as the first row is ready - Open a ready row to review the diff, then click Publish to apply, Reject to discard, or Cancel to leave the row for later
Diff Modes
The diff toolbar exposes two independent segmented controls:
Rendered + Split labels each pane Current and Proposed and lets each side scroll independently. Source + Split renders a two-column source diff with the same headers. The overflow menu adds Word Wrap (for Source), Copy Diff (git-style unified diff), and Copy HTML (full proposed HTML).
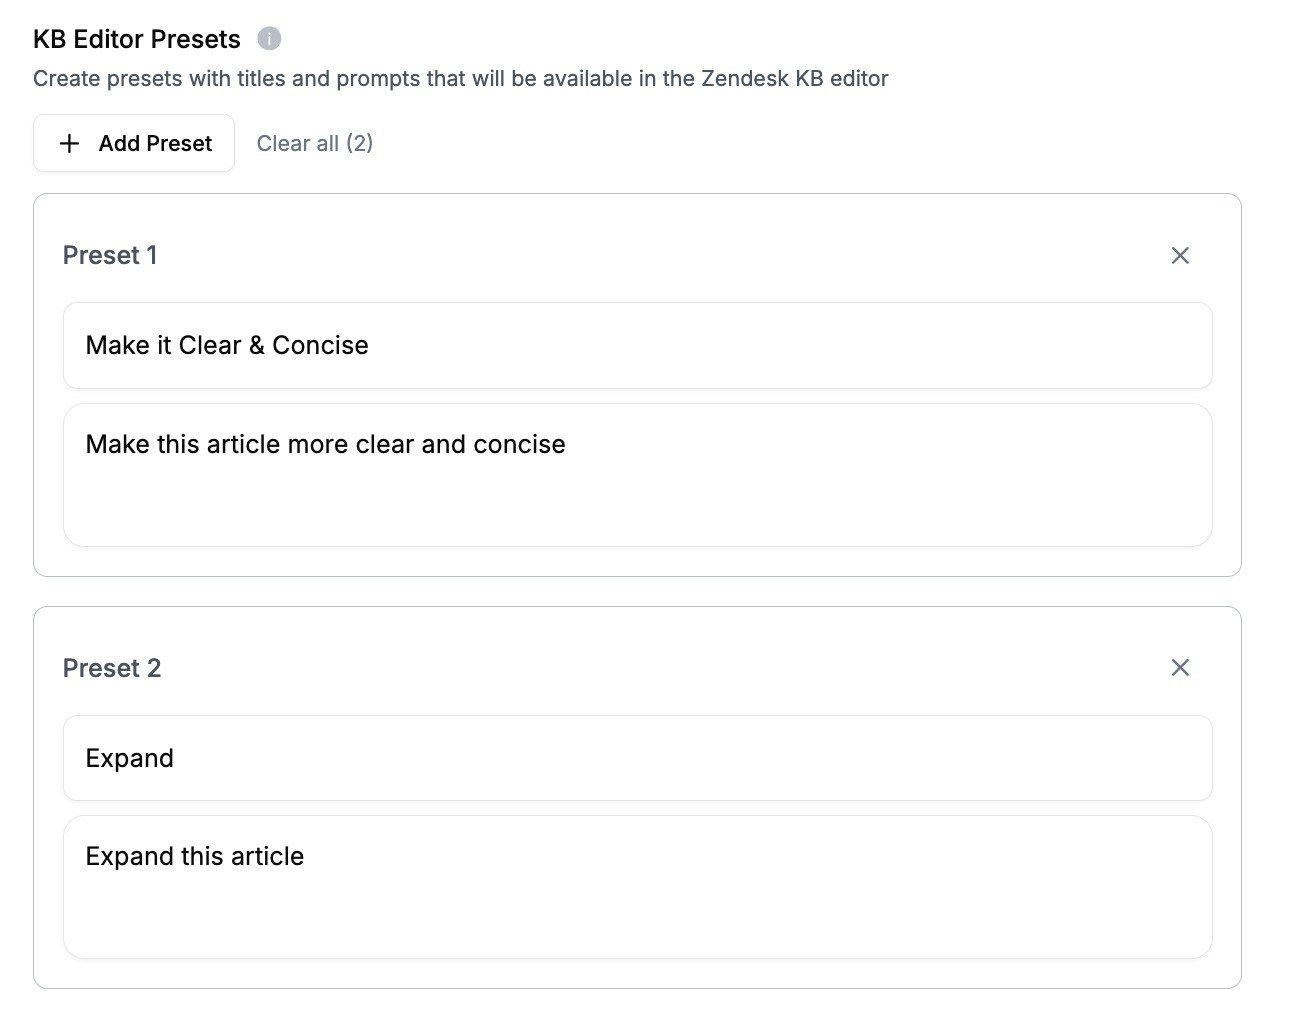
Configuring KB Editor Presets
To customize the rewrite options available in the “Improve with AI” dropdown, configure KB Editor Presets in your Gurubase dashboard:- Go to your Guru’s Settings page
- Navigate to Advanced → KB Editor Presets
- Add presets with a title and prompt for each rewrite option
Configuration for Self-Hosted
For self-hosted Gurubase instances, update the Base URL setting to point to your instance:- Go to Zendesk Admin Center → Apps and Integrations → Apps → Zendesk Support Apps
- Find the Gurubase app and click the settings icon
- Update the Base URL to your self-hosted instance URL (e.g.,
https://gurubase.yourcompany.com) - Save the changes
Ensure your self-hosted instance is accessible from the Zendesk servers. You may need to configure network/firewall rules accordingly.
Next Steps
Book a Demo
See Gurubase in action and get started
Zendesk Ingestion
Use Zendesk tickets and articles as data sources
API Reference
Explore our API documentation