

Overview
With single sign-on (SSO), people sign in to Gurubase through your identity provider (IdP) instead of a Gurubase password. Gurubase acts as a SAML 2.0 service provider and works with Google Workspace, Okta, Microsoft Entra ID, Keycloak, and any other IdP that speaks SAML 2.0.- Roles stay in Gurubase. The IdP proves who someone is. What they can do (super admin, guru admin, guru viewer) is assigned in User Management, never taken from the IdP.
- Groups map to content groups. Group memberships the IdP sends can join people to content groups automatically.
- Works behind a VPN. The IdP never connects to your Gurubase server: the user’s browser carries the request to the IdP and posts the signed response back. Gurubase needs no inbound access from the internet and no outbound access to the IdP.
Before you start
- Gurubase URL. Under Settings > General, the Gurubase URL must be the
HTTPS address your users open, for example
https://gurubase.example.com. The ACS URL and Entity ID are built from it. - Clock. The server clock must be in sync (NTP). Signed responses are only accepted within a few minutes of the time they were issued.
- A break-glass account. Keep at least one super admin who signs in with a password and two-factor authentication, in case the IdP is unavailable.
Configure Gurubase
Open Settings > Single Sign-On. The Service provider details section lists the values your IdP asks for.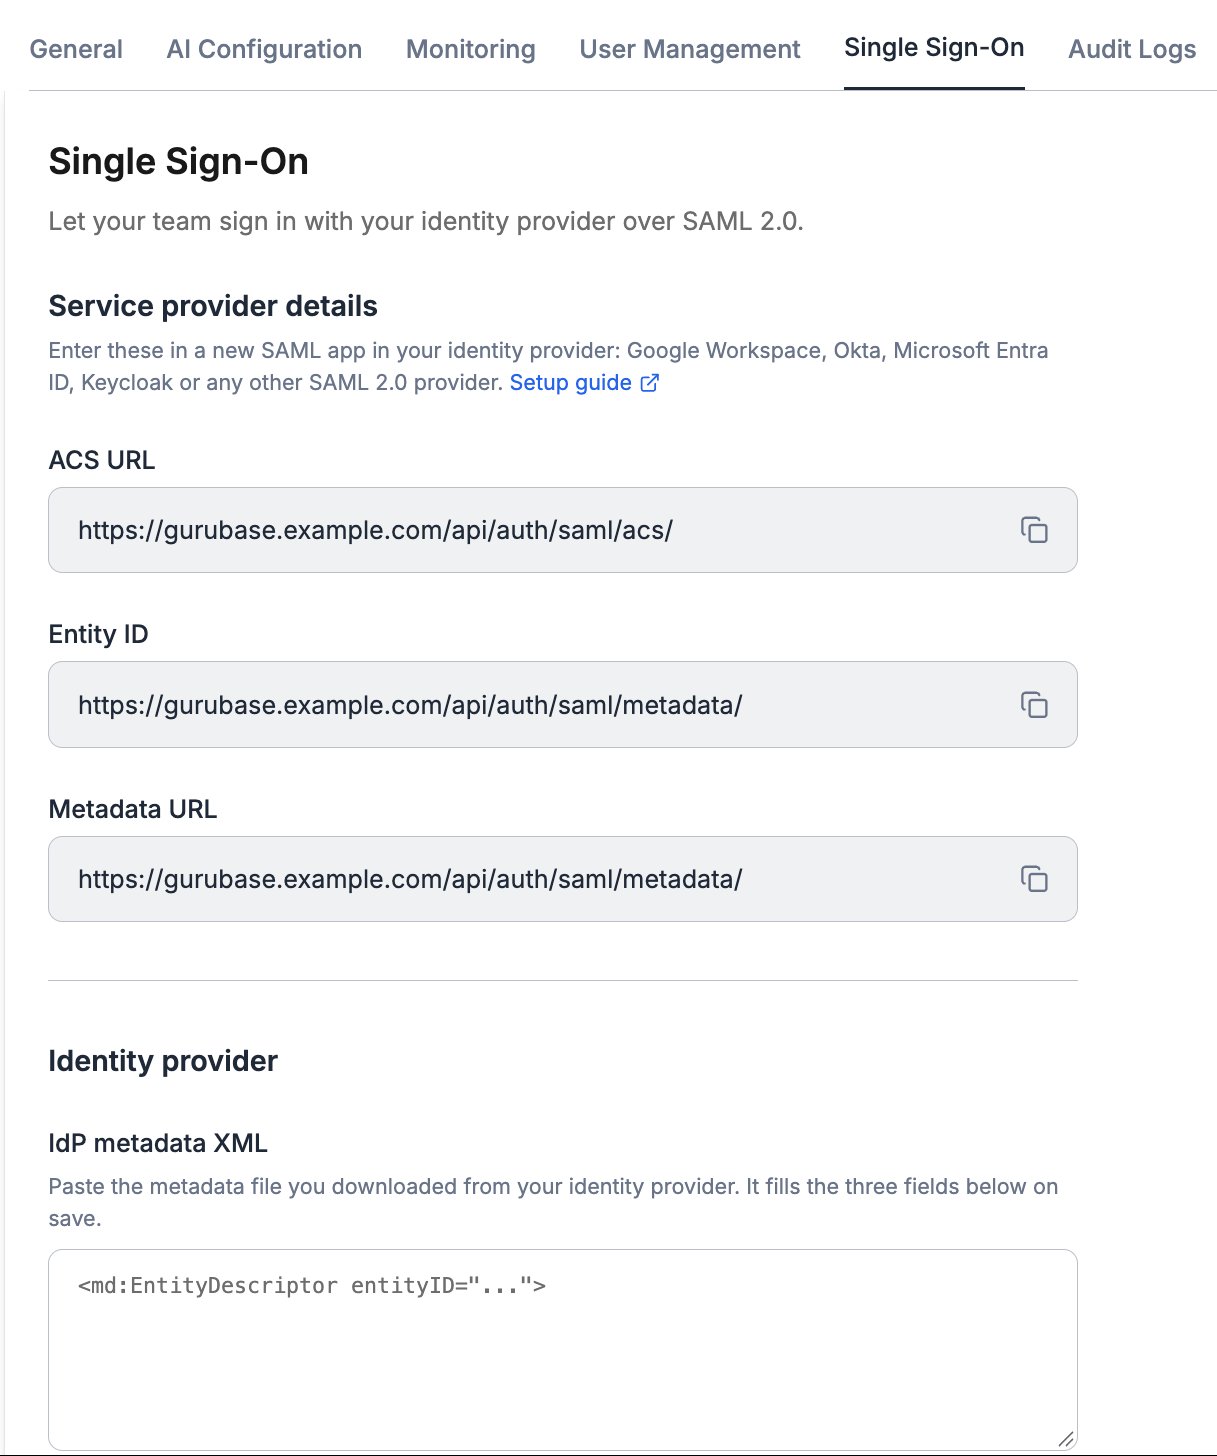
Keep this tab open, set up the IdP (next section), then come back and finish
here.
Set up Google Workspace
1
Add a custom SAML app
In the Google Admin console (
admin.google.com), go to Apps >
Web and mobile apps > Add app > Add custom SAML app. Name it
Gurubase. For the app icon, you can use
gurubase-icon.png.2
Copy Google's IdP details
On the Google Identity Provider details step, click Download
metadata. You will paste this file into Gurubase.
3
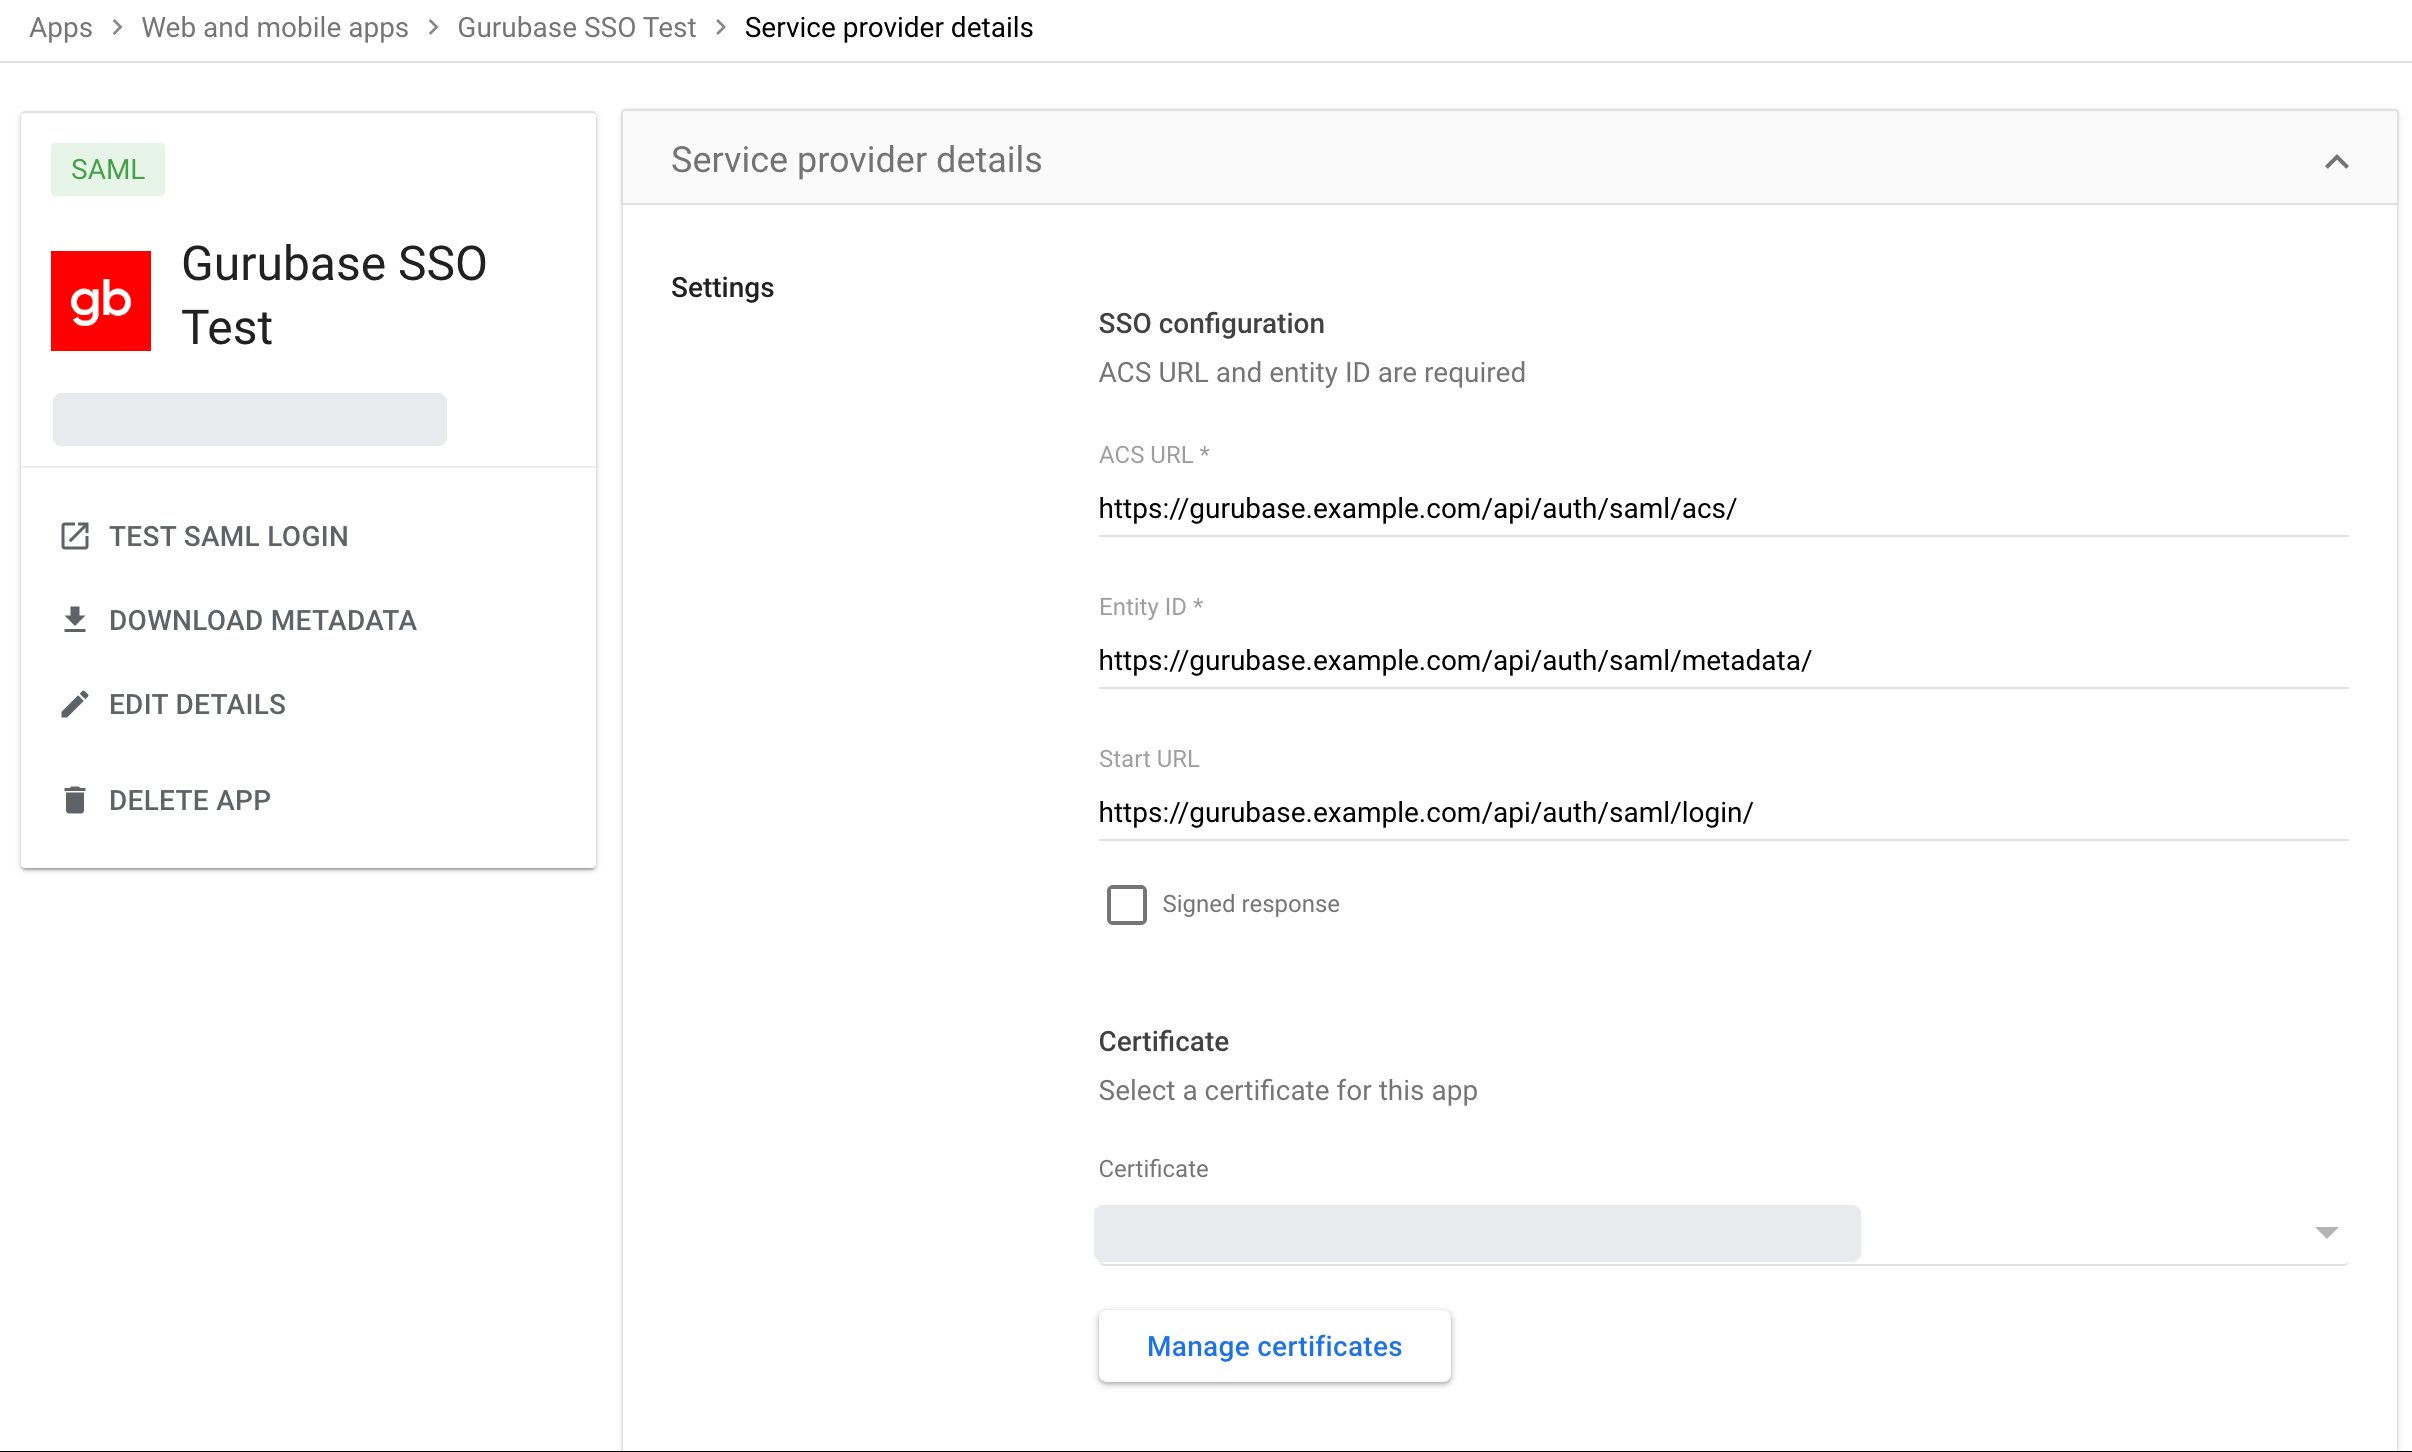
Enter the service provider details
- ACS URL: the ACS URL from Gurubase.
- Entity ID: the Entity ID from Gurubase.
- Start URL (optional):
https://<your-gurubase-url>/api/auth/saml/login/ - Signed response: either setting works. Gurubase accepts a signed response or a signed assertion.
- Name ID format:
UNSPECIFIEDorEMAIL. Name ID:Basic Information > Primary email.
4
Map attributes
- Under Attributes, map
First nametofirstNameandLast nametolastName. Without them, new accounts are named after the email address. - Under Group membership (optional), pick the Google groups Gurubase
should know about and set the app attribute to
groups. Google allows up to 75 groups here.
5
Turn the app on
Open the app, then User access, and turn it ON for everyone or
for the organizational units and groups that should use Gurubase. The app
is off for everyone by default; until you turn it on, Google stops
sign-in with 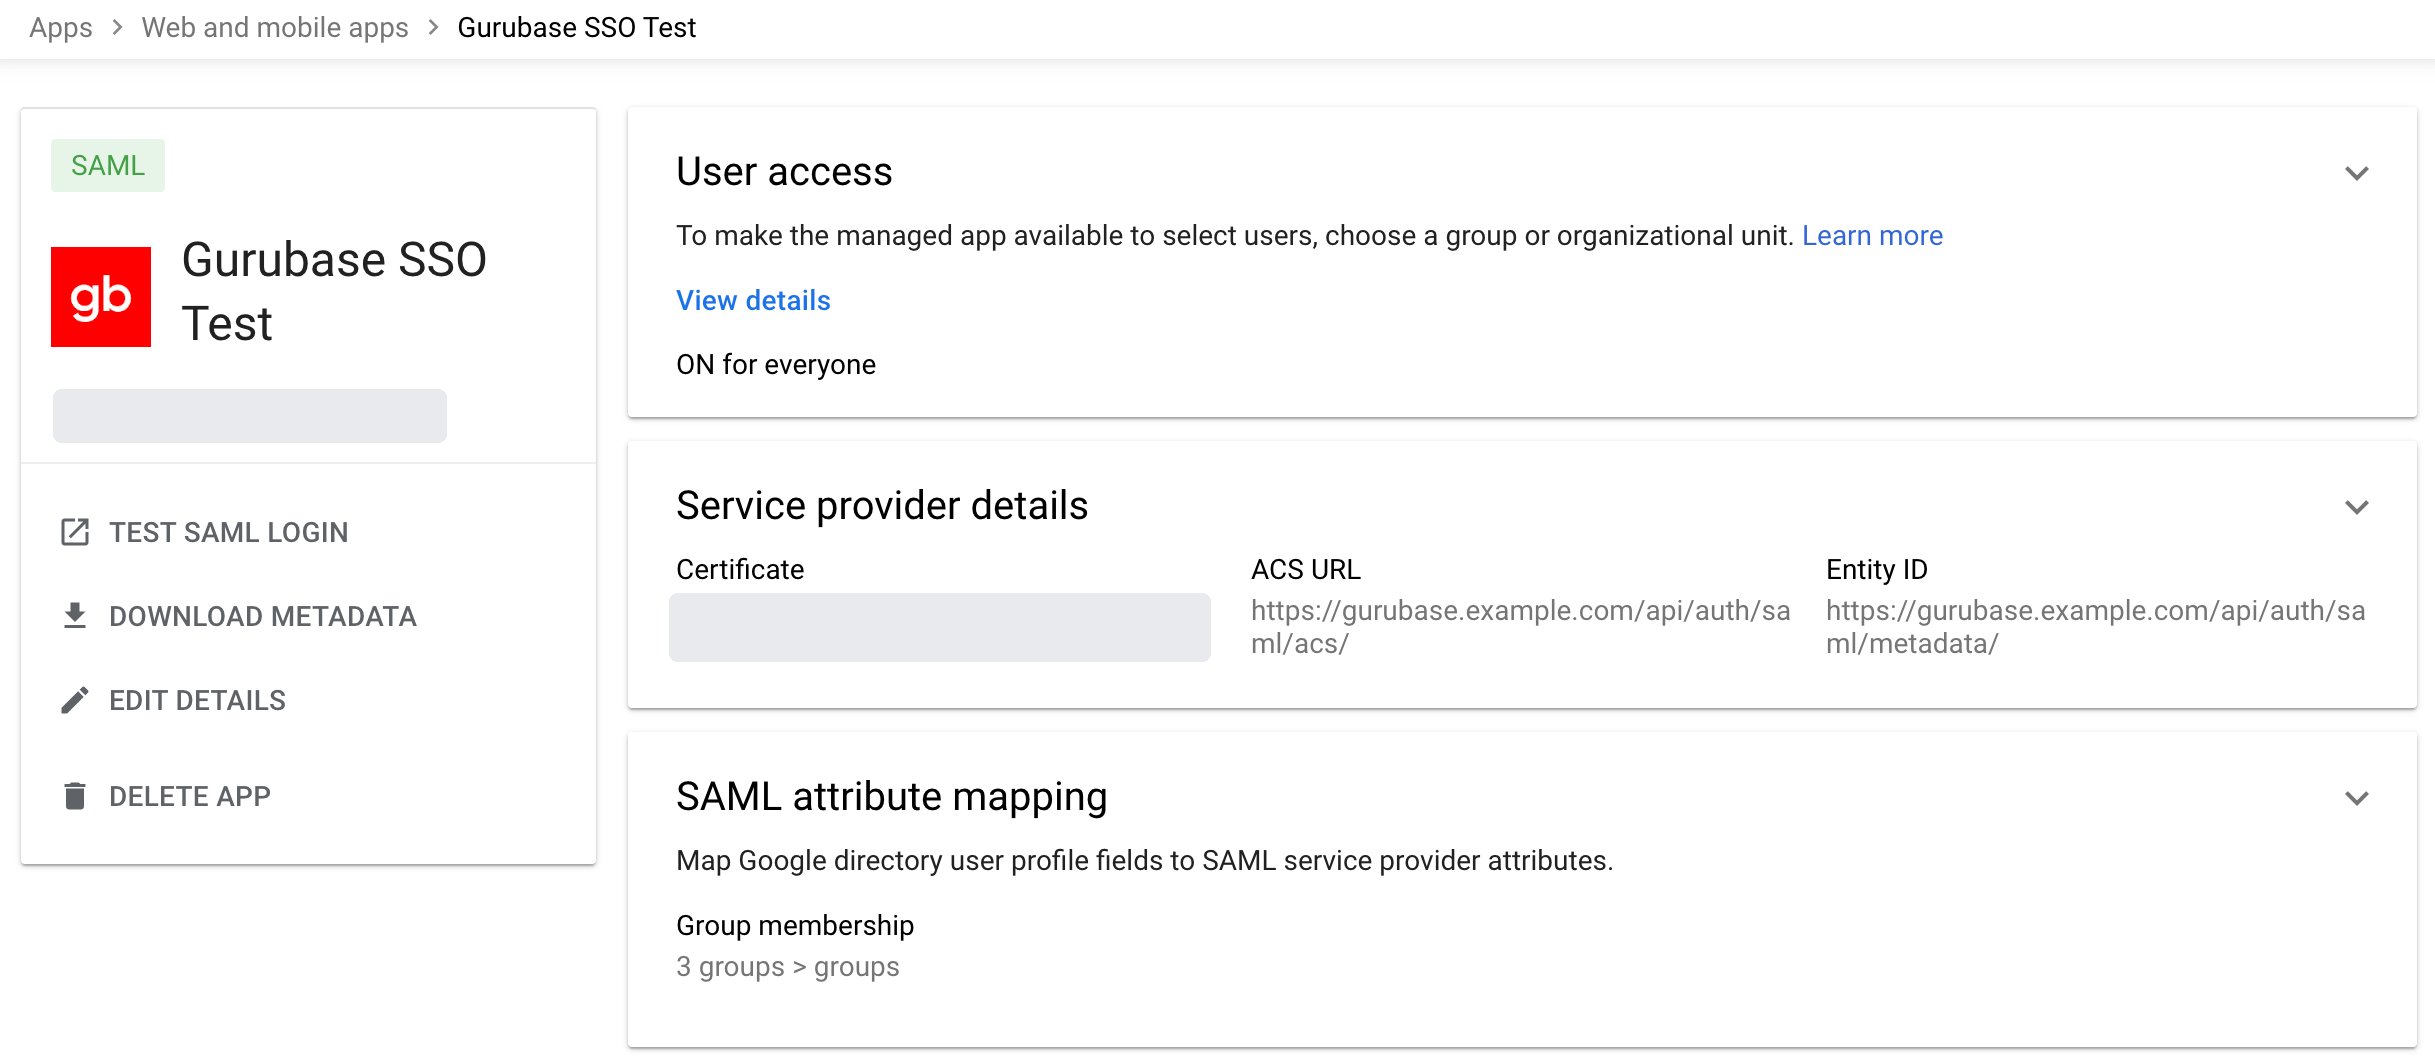
app_not_configured_for_user. Changes can take a few
minutes, and occasionally up to 24 hours, to apply.Set up Okta
1
Create a SAML app
In the Okta Admin Console, go to Applications > Applications > Create
App Integration, choose SAML 2.0 and click Next. Name it
Gurubase; for the logo you can use
gurubase-icon.png.2
Configure SAML
- Single sign-on URL: the ACS URL from Gurubase. Keep Use this for Recipient URL and Destination URL ticked.
- Audience URI (SP Entity ID): the Entity ID from Gurubase.
- Name ID format:
EmailAddress. Application username:Email. - Under Attribute Statements, add
firstNamewith the valueuser.firstNameandlastNamewithuser.lastName. - Under Group Attribute Statements (optional), add
groupswith a filter that matches the groups Gurubase should know about, for example Starts withgurubase-. A filter of Matches regex.*also sends the built-inEveryonegroup.
3
Download the metadata
On the app’s Sign On tab, copy the Metadata URL under Metadata
details, open it in the browser and save the XML. You will paste it
into Gurubase.
4
Assign people
On the Assignments tab, assign the groups or people who should use
Gurubase. Unassigned users are stopped at Okta.
Other identity providers
Use the same ACS URL and Entity ID. Send the user’s email as the NameID, sign the assertion or the response with RSA-SHA256, and send group names in an attribute calledgroups. If your IdP can only send an opaque NameID, set
Email attribute in Gurubase to the attribute that carries the email, and
make sure users cannot edit that attribute themselves.
Finish in Gurubase
1
Paste the IdP metadata
Paste the metadata file into IdP metadata XML and click Save.
Gurubase fills the IdP entity ID, SSO URL and signing certificate from it
and shows when the certificate expires. You can also enter the three
fields by hand.
2
Set who can sign in
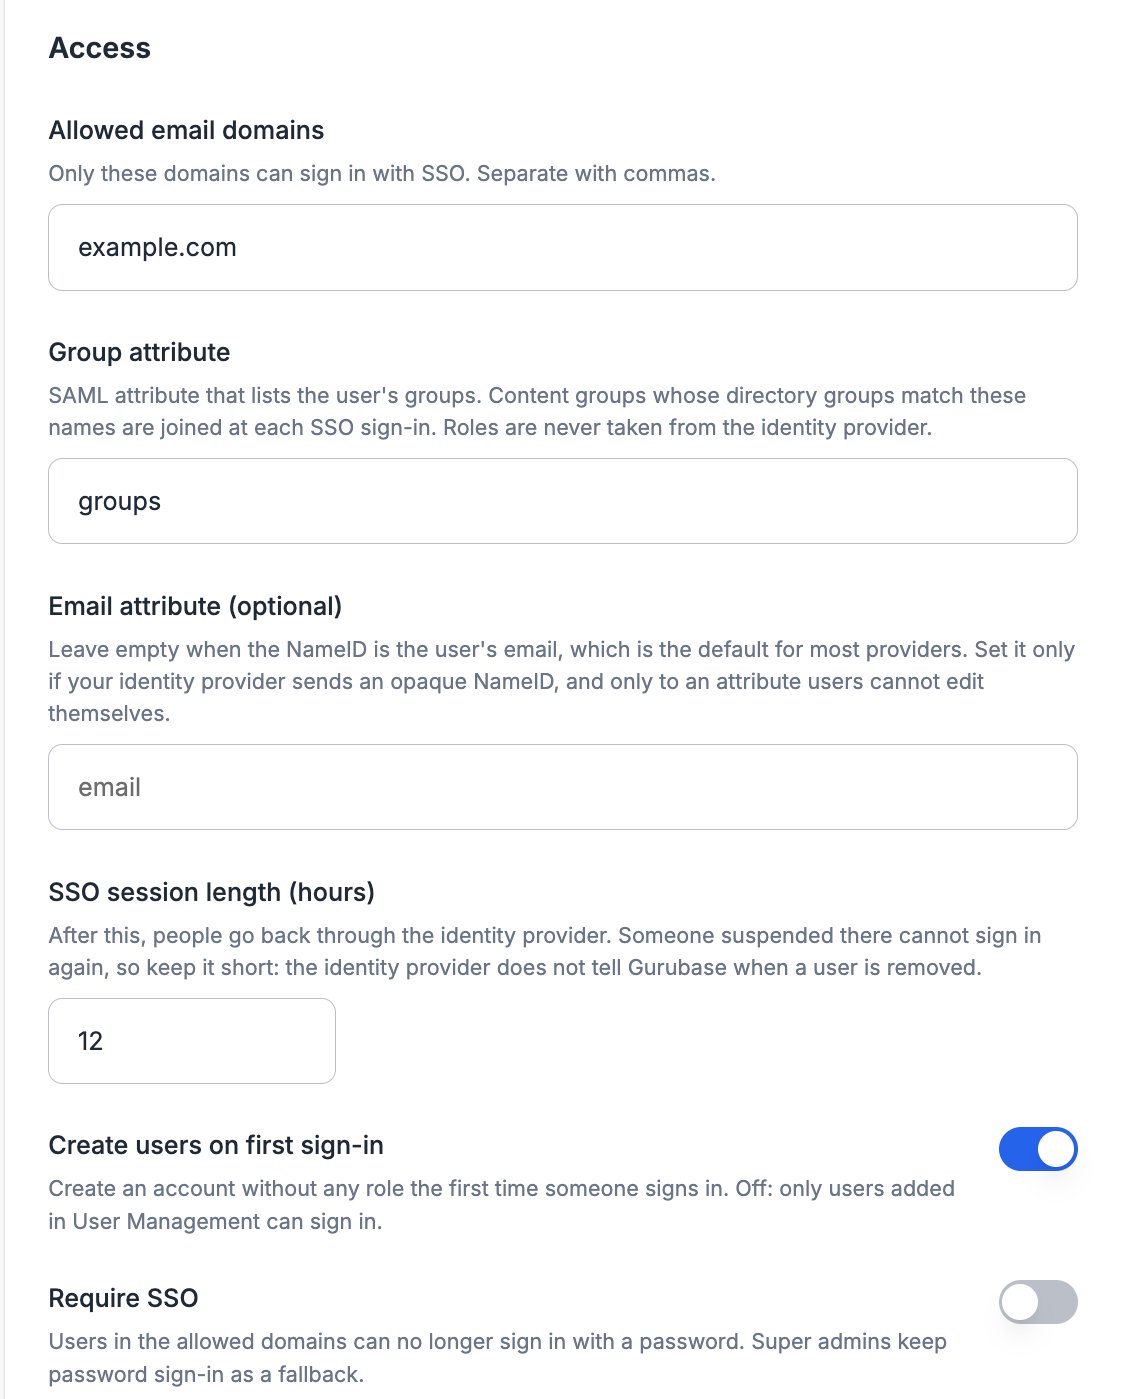
- Allowed email domains: every domain your users’ primary emails use.
If your Google Workspace has secondary domains (for example
example.comandexample.io), list all of them. - Group attribute:
groups, unless your IdP uses another name. - SSO session length: how long an SSO session lasts before the user goes back through the IdP (default 12 hours). SAML gives the IdP no way to tell Gurubase that a user was suspended, so this is how long a suspended user can keep an existing session.
- Create users on first sign-in: on by default. A new account starts with no role and sees no gurus until an admin assigns one. Turn it off to allow only people already added in User Management.
3
Check the setup
Click Validate settings to check the saved configuration. Every check
explains what is wrong and how to fix it.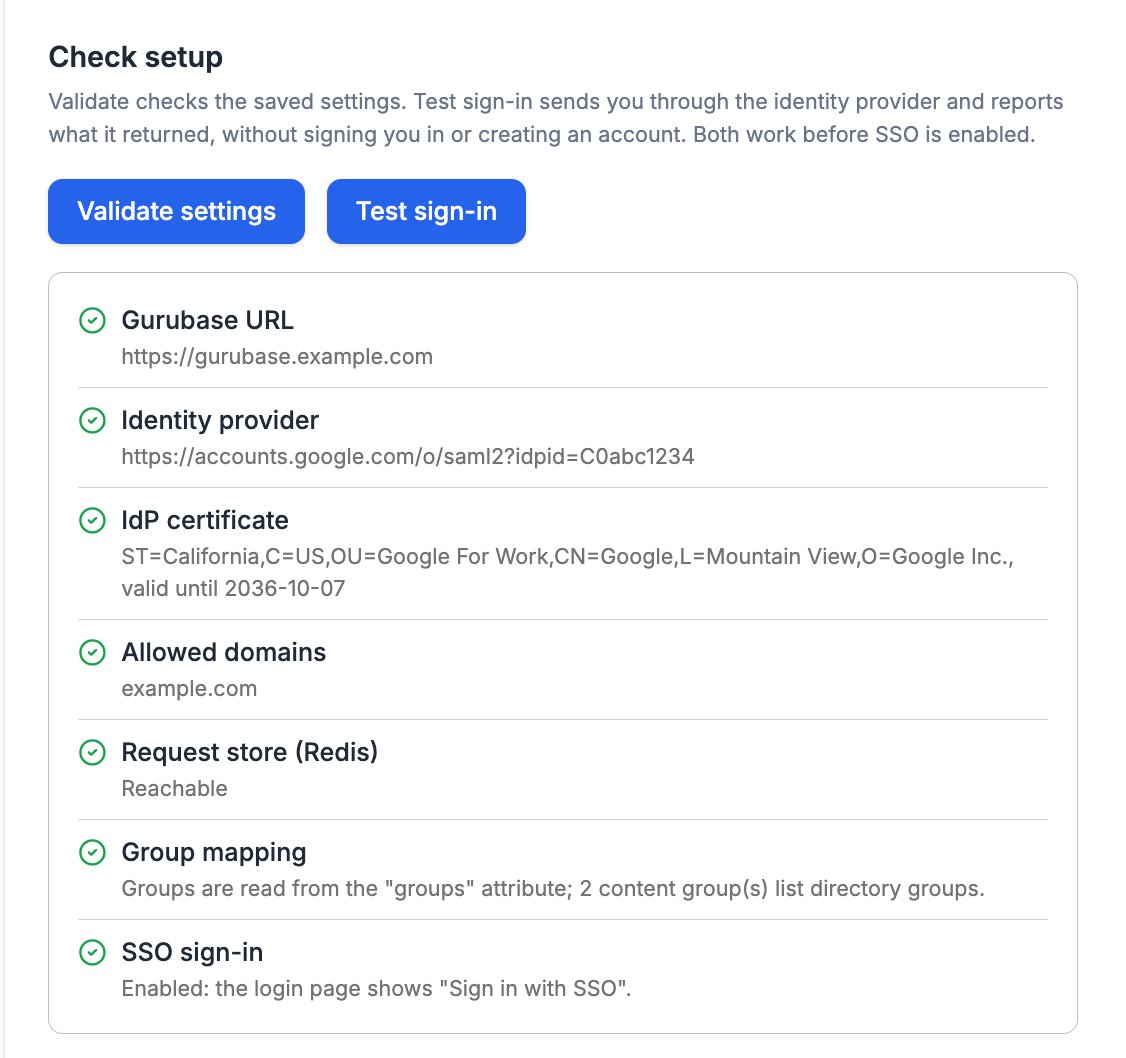
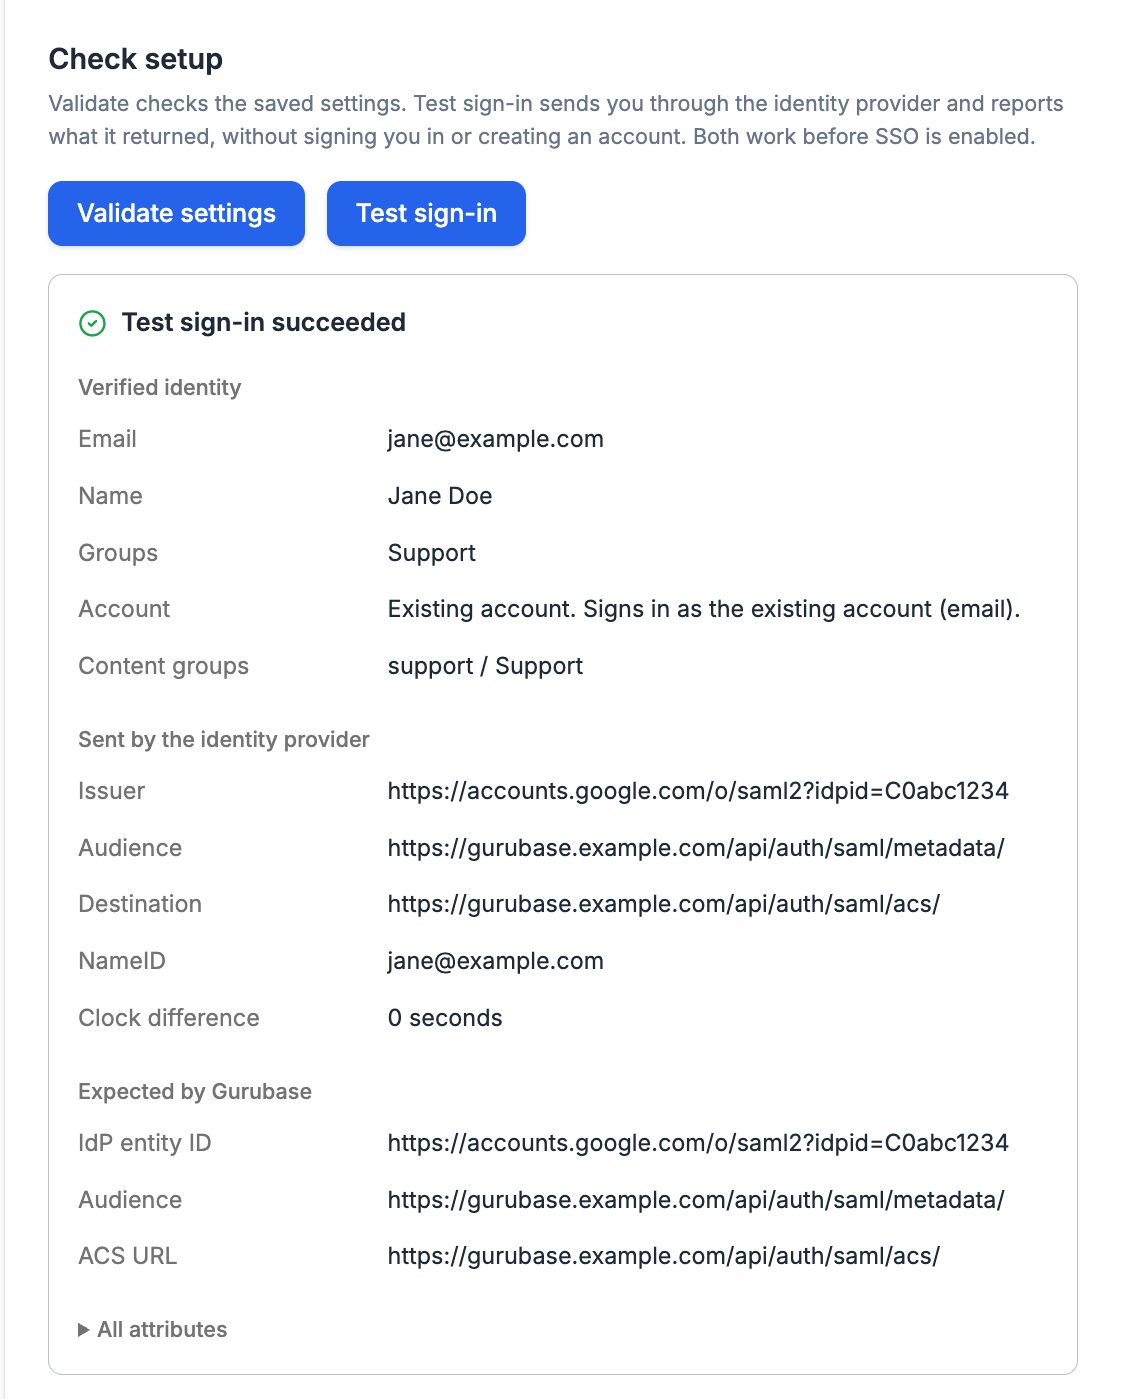
4
Enable SSO
Turn on Enable SSO and save. The login page now shows Sign in with
SSO. Users who open Gurubase from the IdP’s app launcher (the Google apps
grid or the Okta dashboard) are signed in too.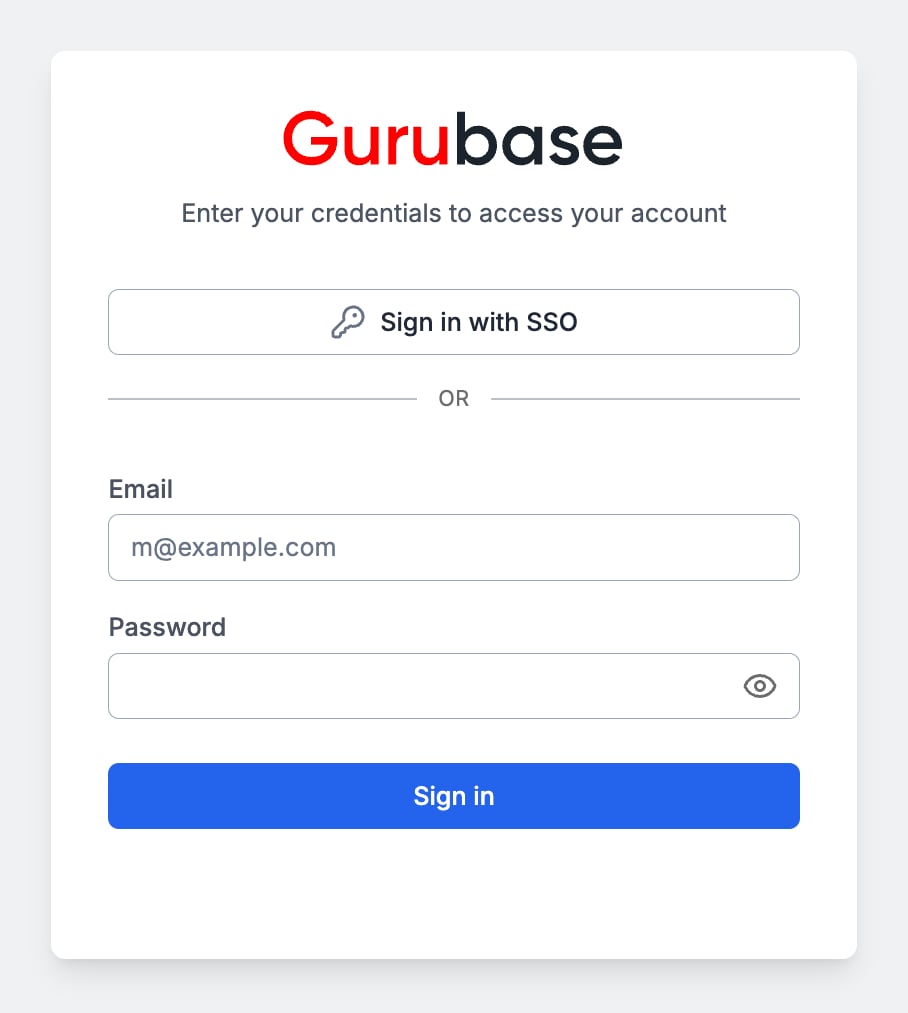
Accounts and roles
- The account is matched by email. Someone who already has a Gurubase account with the same email signs in to that account and keeps their roles.
- A new account has no role. Assign guru roles in User Management.
- After the first SSO sign-in, the account is bound to its IdP identity. Another IdP identity that presents the same email is refused.
Moving existing users to SSO
Users who already sign in with a password need no preparation. On their first SSO sign-in they land in the same account, matched by email regardless of letter case, with the same guru roles and content group memberships. A temporary password from User Management is retired at that point. You do not need to add new users in User Management first: with Create users on first sign-in on, their account appears there after the first sign-in, and you assign their guru roles from there.Groups
When the IdP sends group names, Gurubase joins the user to every content group whose Directory groups list one of those names, on each SSO sign-in. Add the Google group’s name (not its email) to the content group under Team > Groups > Edit Group > Directory groups.- Memberships created this way are removed when the user leaves the group in the IdP. Memberships an admin added by hand are never touched, even in a group that is mapped to a directory group; remove them by hand if the IdP should be the only source for that group.
- A user is only added to content groups of gurus they have a role on. When an admin assigns a role later, the groups from the last sign-in apply right away.
- Changing a content group’s Directory groups applies at once to everyone who signed in with SSO, without waiting for their next sign-in.
- Group memberships come only from an SSO sign-in. Someone who signs in with a password instead loses the memberships the IdP granted until their next SSO sign-in.
- Google sends group names. If two groups share a name (for example
[email protected]and[email protected]), Gurubase cannot tell them apart, so give the groups you map unique names.
Require SSO
Turn on Require SSO to stop password sign-in for users in the allowed domains. Password reset and password change are disabled for them as well, and sessions they started with a password end as soon as you save. Super admins can still sign in with a password, so you are not locked out if the IdP is down; protect those accounts with two-factor authentication.Certificate rotation
The IdP signs every response with its certificate, and Gurubase only trusts the certificate you saved. Google’s certificates are valid for five years and are shared by all custom SAML apps in your Workspace; Okta’s are valid for ten years and belong to the app. Validate settings warns 30 days before the saved certificate expires. To rotate without downtime:- In Google Admin, open the app and click Manage certificates, then add a new certificate.
- In Gurubase, paste the new certificate below the current one in IdP signing certificate and save. Gurubase accepts both while they are listed.
- In Google Admin, switch the app to the new certificate.
- Run Test sign-in, then remove the old certificate from Gurubase.